Hosting a WordPress Site on EC2 with Security Features
Whether you're an aspiring e-tailer, blogger, or enthusiast looking to establish an online presence, WordPress offers unparalleled flexibility.
From crafting an online store to sharing your thoughts through a blog, WordPress can power a wide range of websites.
In this tutorial, we'll cover the essentials of setting up your WordPress site on an Amazon EC2 instance,
harnessing the scalability and reliability of the cloud. Furthermore, we'll implement security measures to fortify your website against
potential threats. Let's embark on this journey to elevate your WordPress hosting experience!
Part 1: Setting up EC2 instance (SSH)
Part 2: Setting up Elastic IP and Security Groups
Part 3: Setting up Packages and System Security.
Part 4: Setting up WordPress
Part 5: Setting up Wordpress Security
Part 6: Setup Complete and Summary
Part 1: Setting up EC2 instance (SSH)
1. To begin, navigate to the AWS Console and sign in to your account. Once logged in, you'll gain access to the AWS Management Console, where you can manage your various AWS services, including EC2.
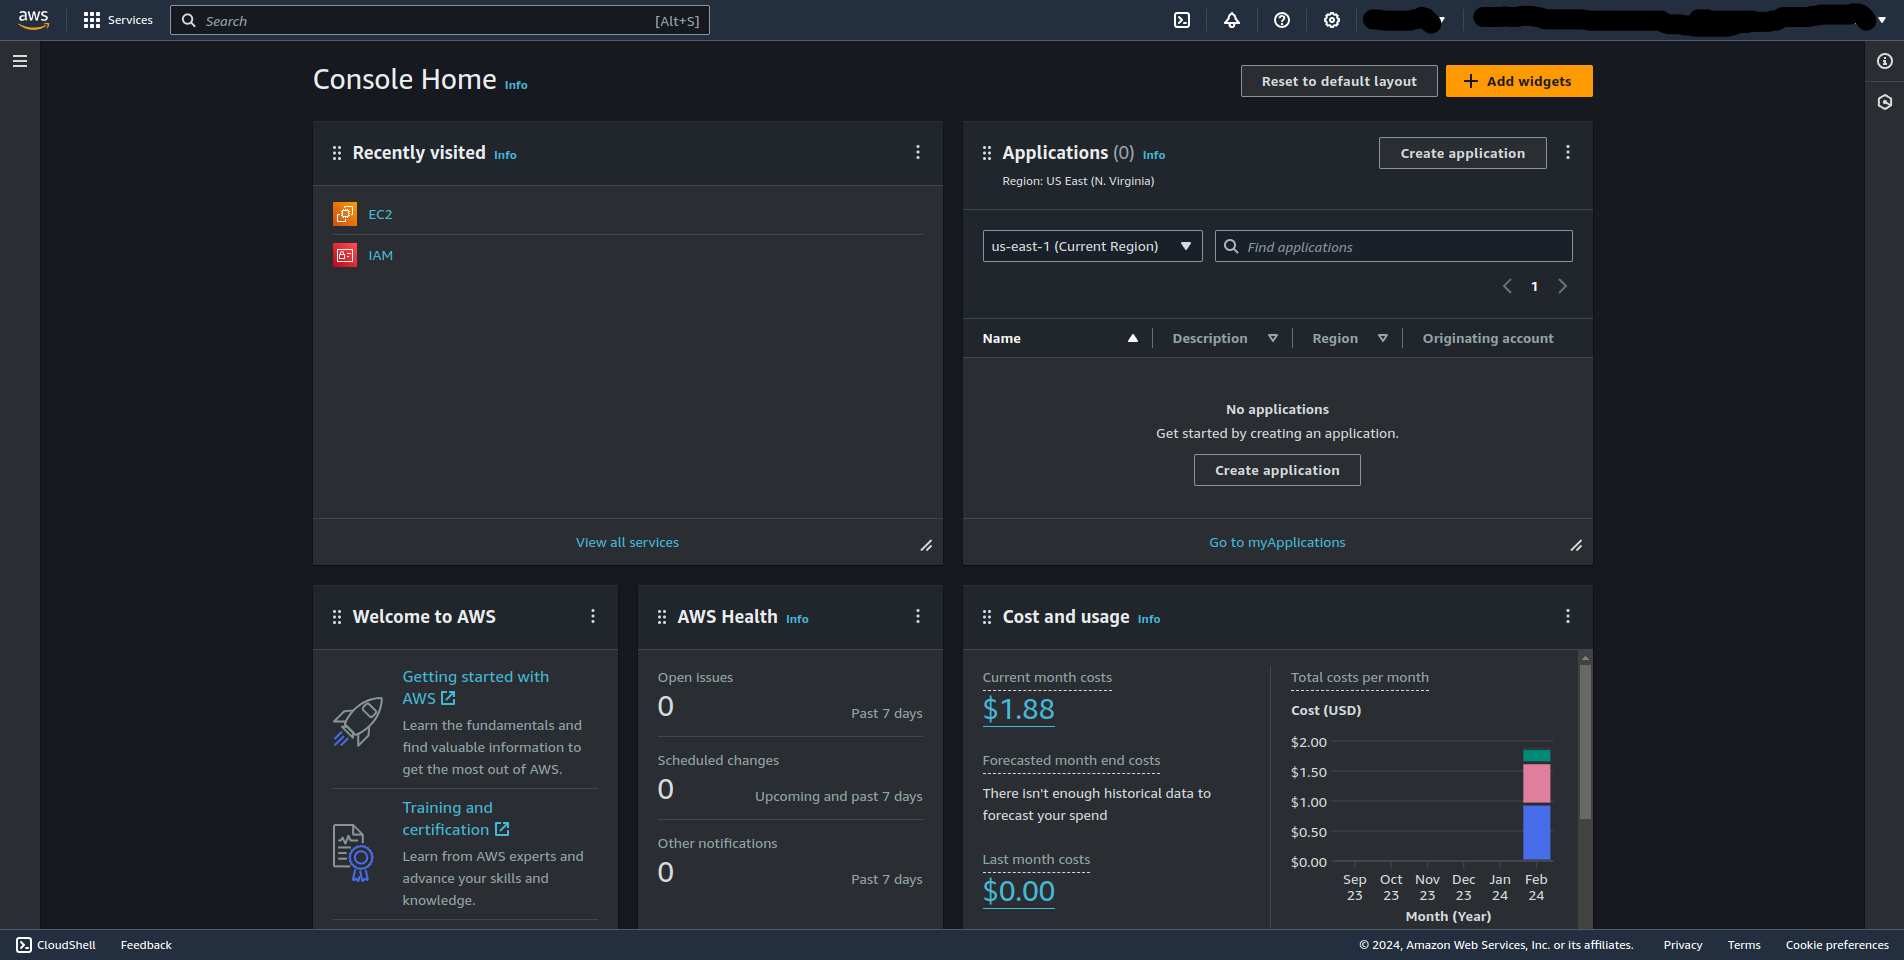
2. In the AWS Management Console, find and click on the "EC2" service to access the EC2 Dashboard. This is where you'll manage your instances.
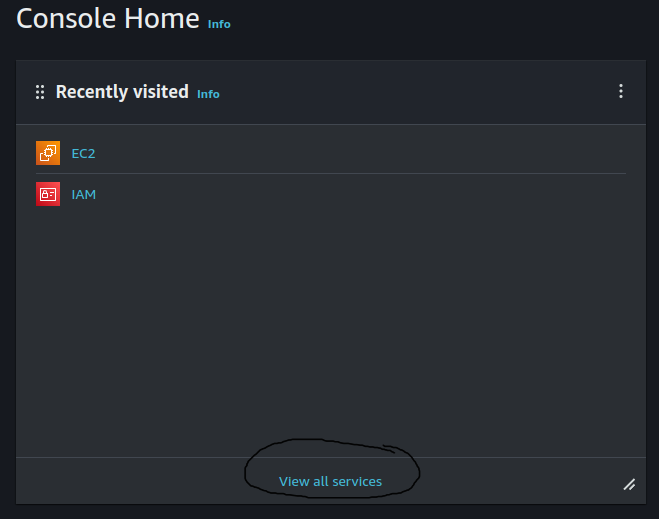
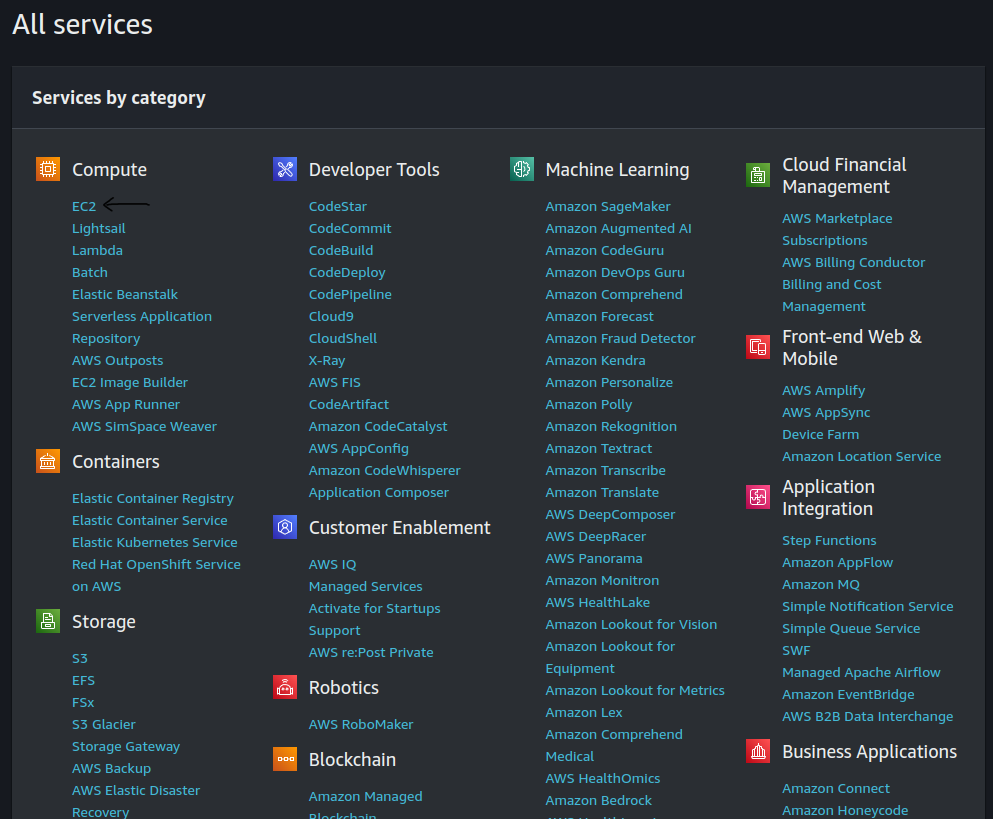
3. Once in the EC2 Dashboard, locate and click on "Instances" in the left navigation pane. Here, you can view and manage your instances.
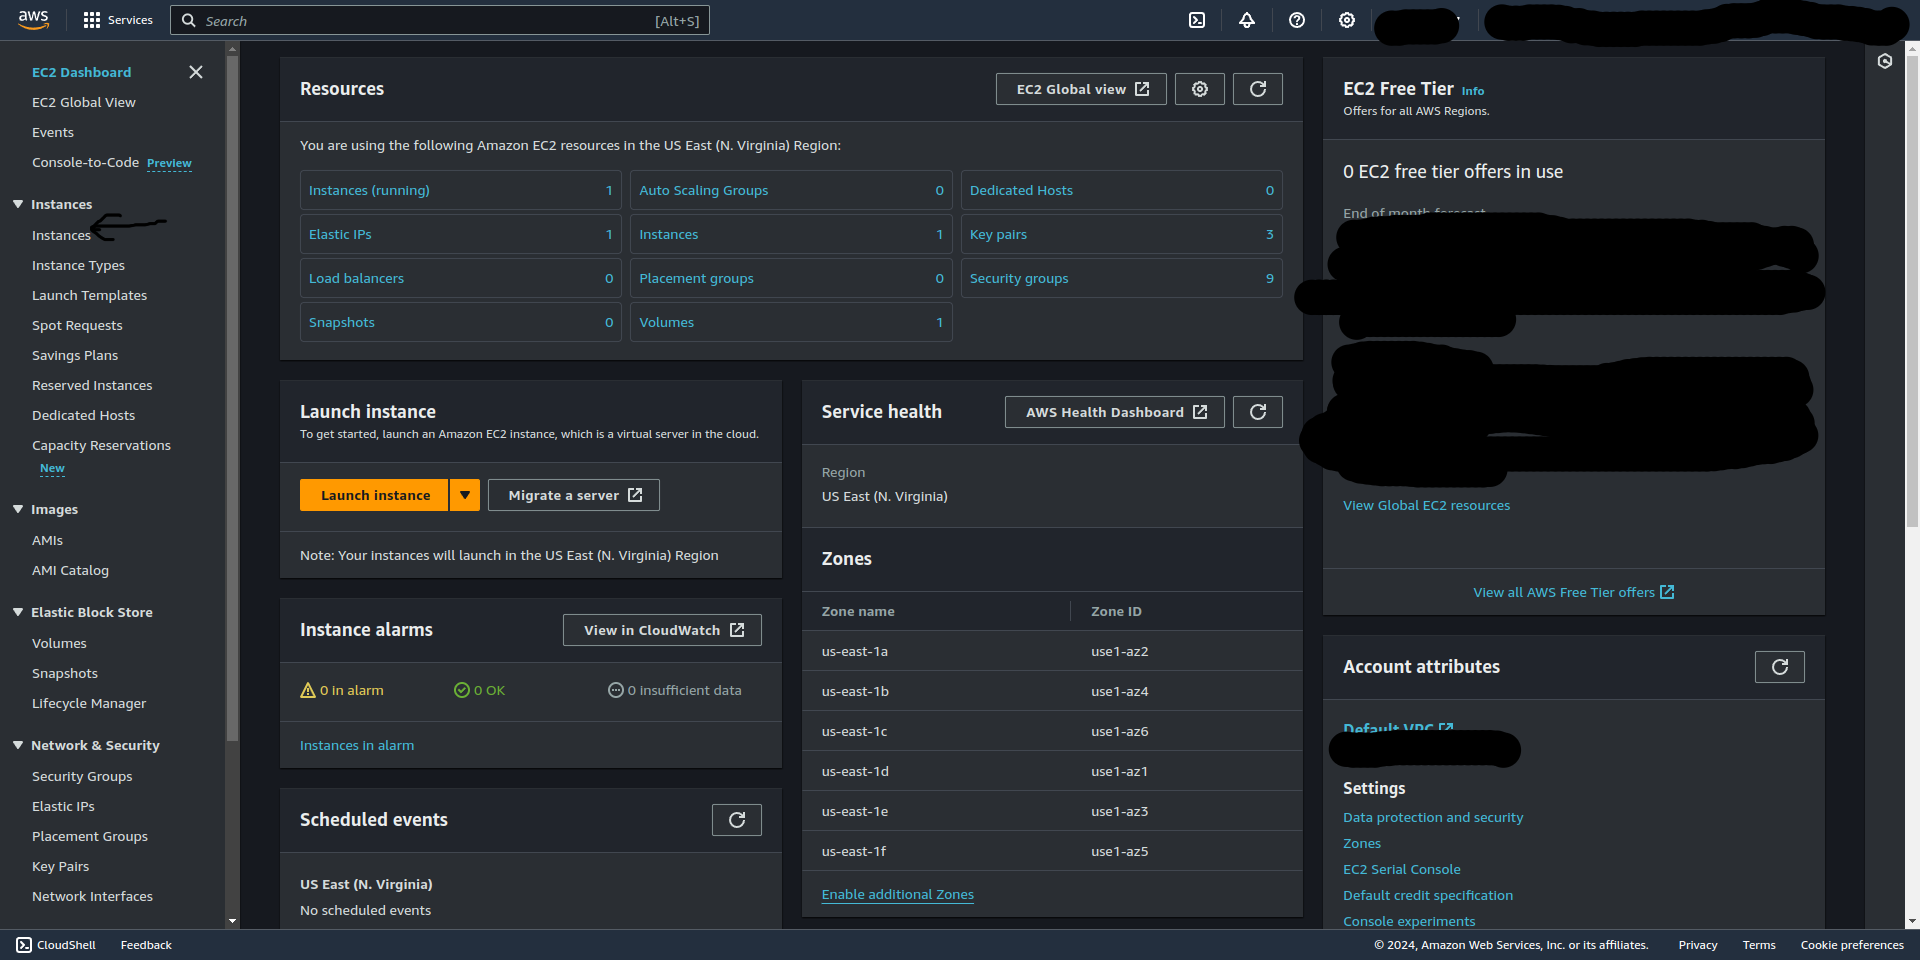
4. Click the "Launch Instance" button to initiate the process of creating a new EC2 instance. Follow the on-screen instructions to configure your instance settings.
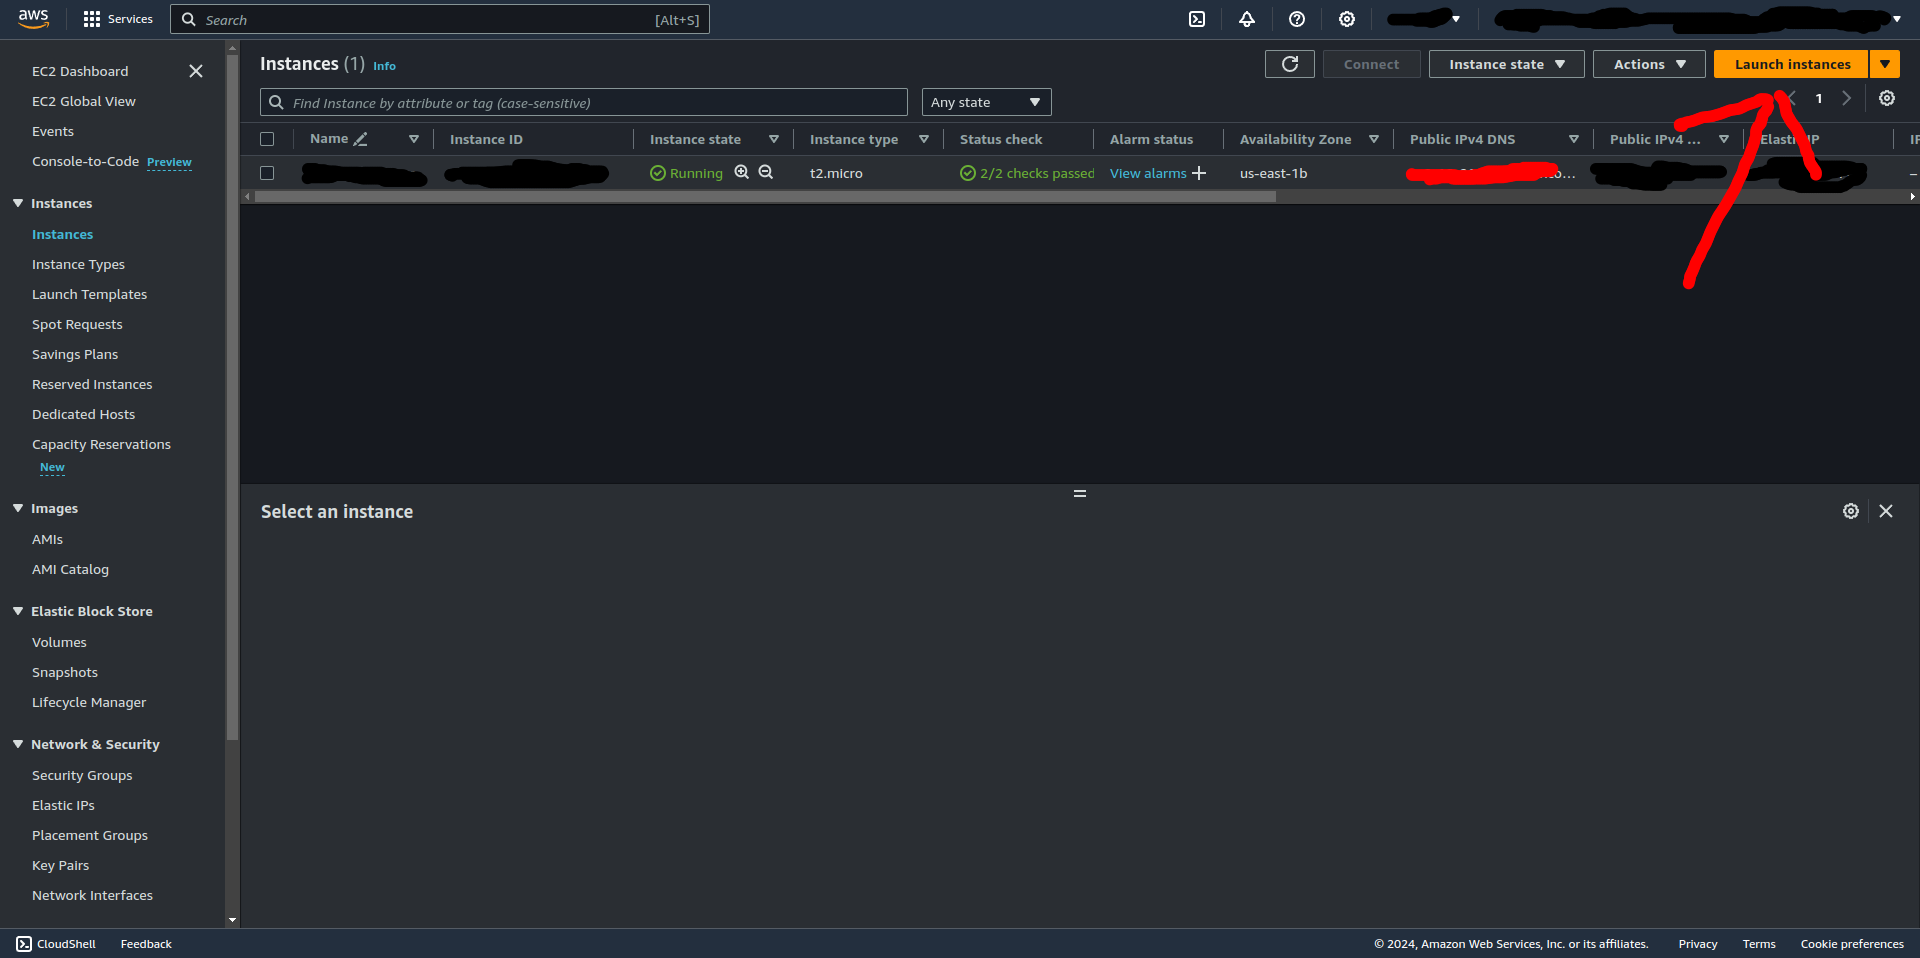
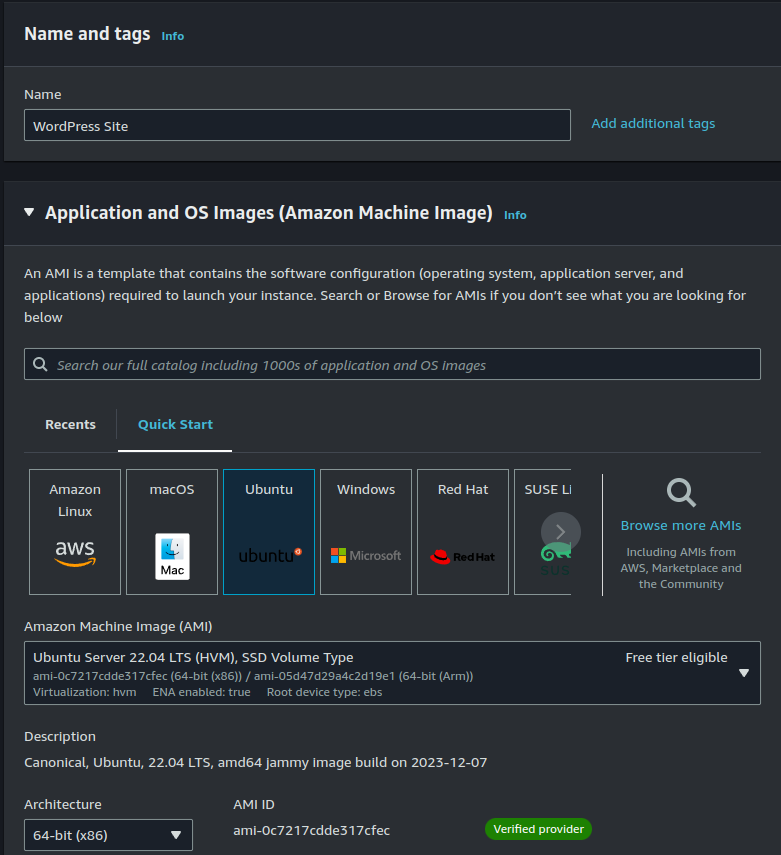
5. During the launch process, provide the following instance details:
- Instance Name: Choose a descriptive name like "MyWordPressSite."
- Distribution: Select "Ubuntu" for this guide.
- Instance Type: Opt for "t2.micro" (Free Tier eligible for this lesson).
- SSH Key Pair: Create a new one with your chosen encryption method. Choose an existing one if you already poses one to use.

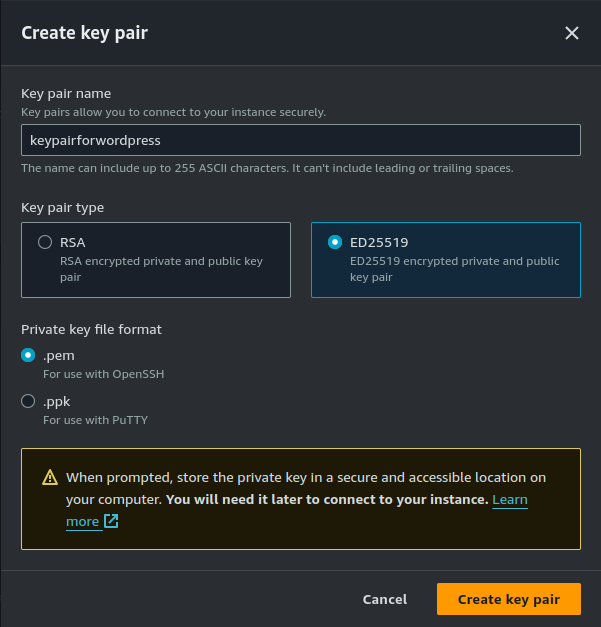
-
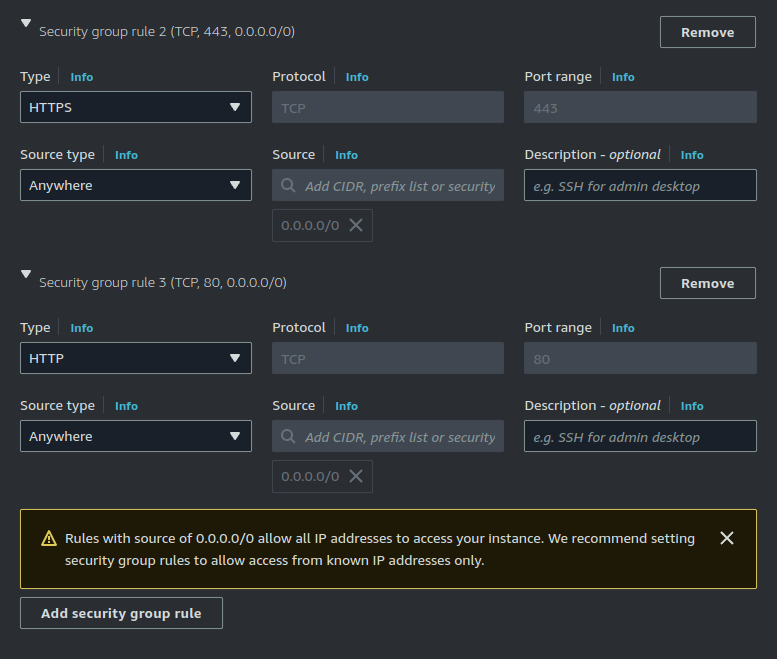
Security Group settings:
- Enter edit mode for Security Group.
- Disable auto-assign IP address.
- Restrict SSH access to the specific IP address of your location for security reasons.
- Allow HTTP and HTTPS access from anywhere for webpage access.
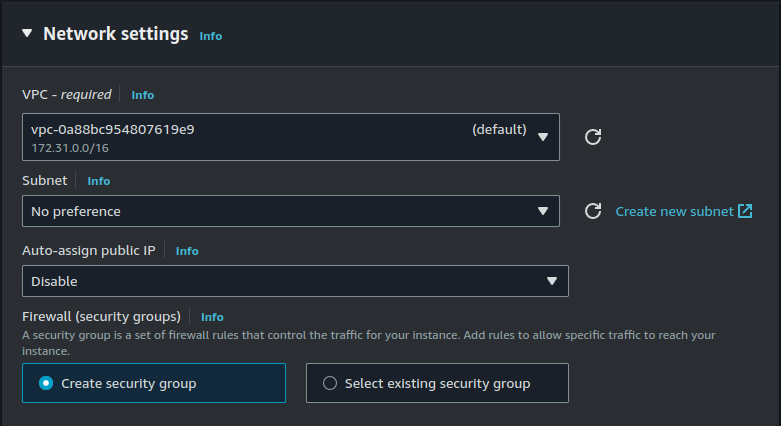
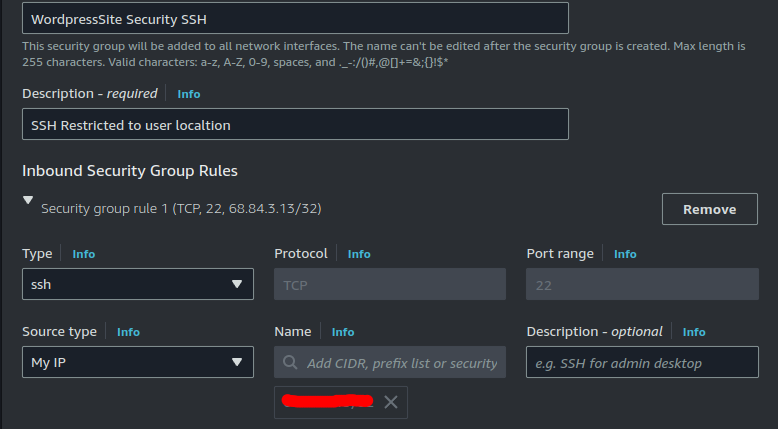
-
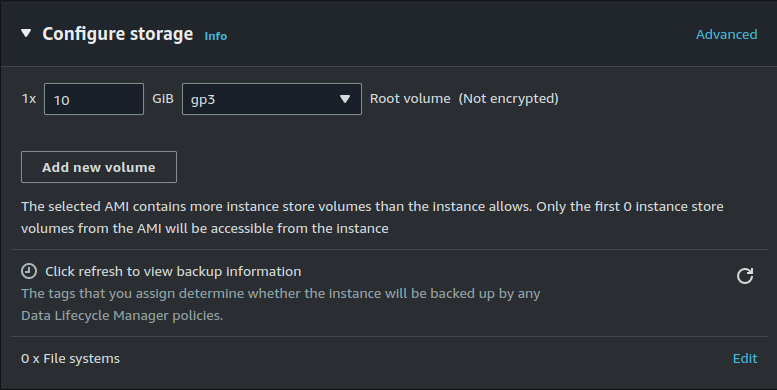
Storage Settings:
- Select 10GB of storage.
- Choose the storage type as General Purpose SSD (gp3).
-
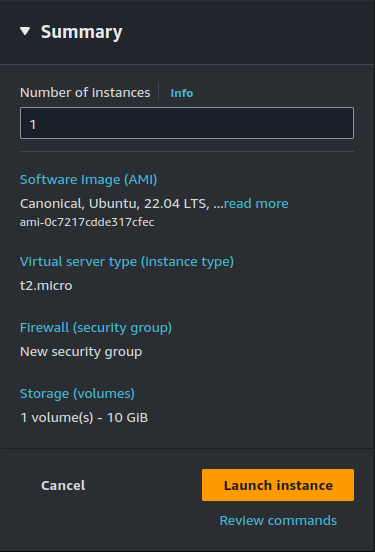
Verify Settings and Launch:
- Check the summary to ensure all settings are correct.
- Verify your configuration.
- Click "Launch" to initiate the instance creation.
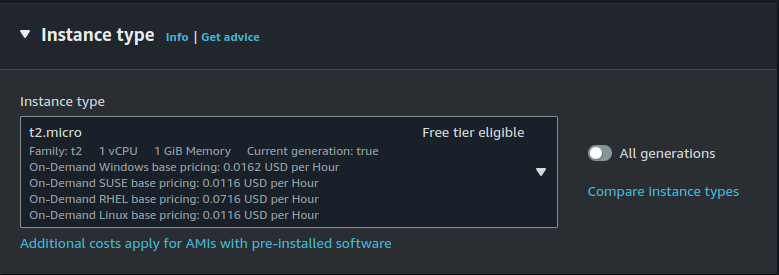
Make sure not to lose the SSH Key Pair as it is crucial for SSH access and can create problems later on.
6. Once launched successfully, you'll see a confirmation message.
Before proceeding to the LAMP stack installation for WordPress, configure the Elastic IP and Security Group settings.
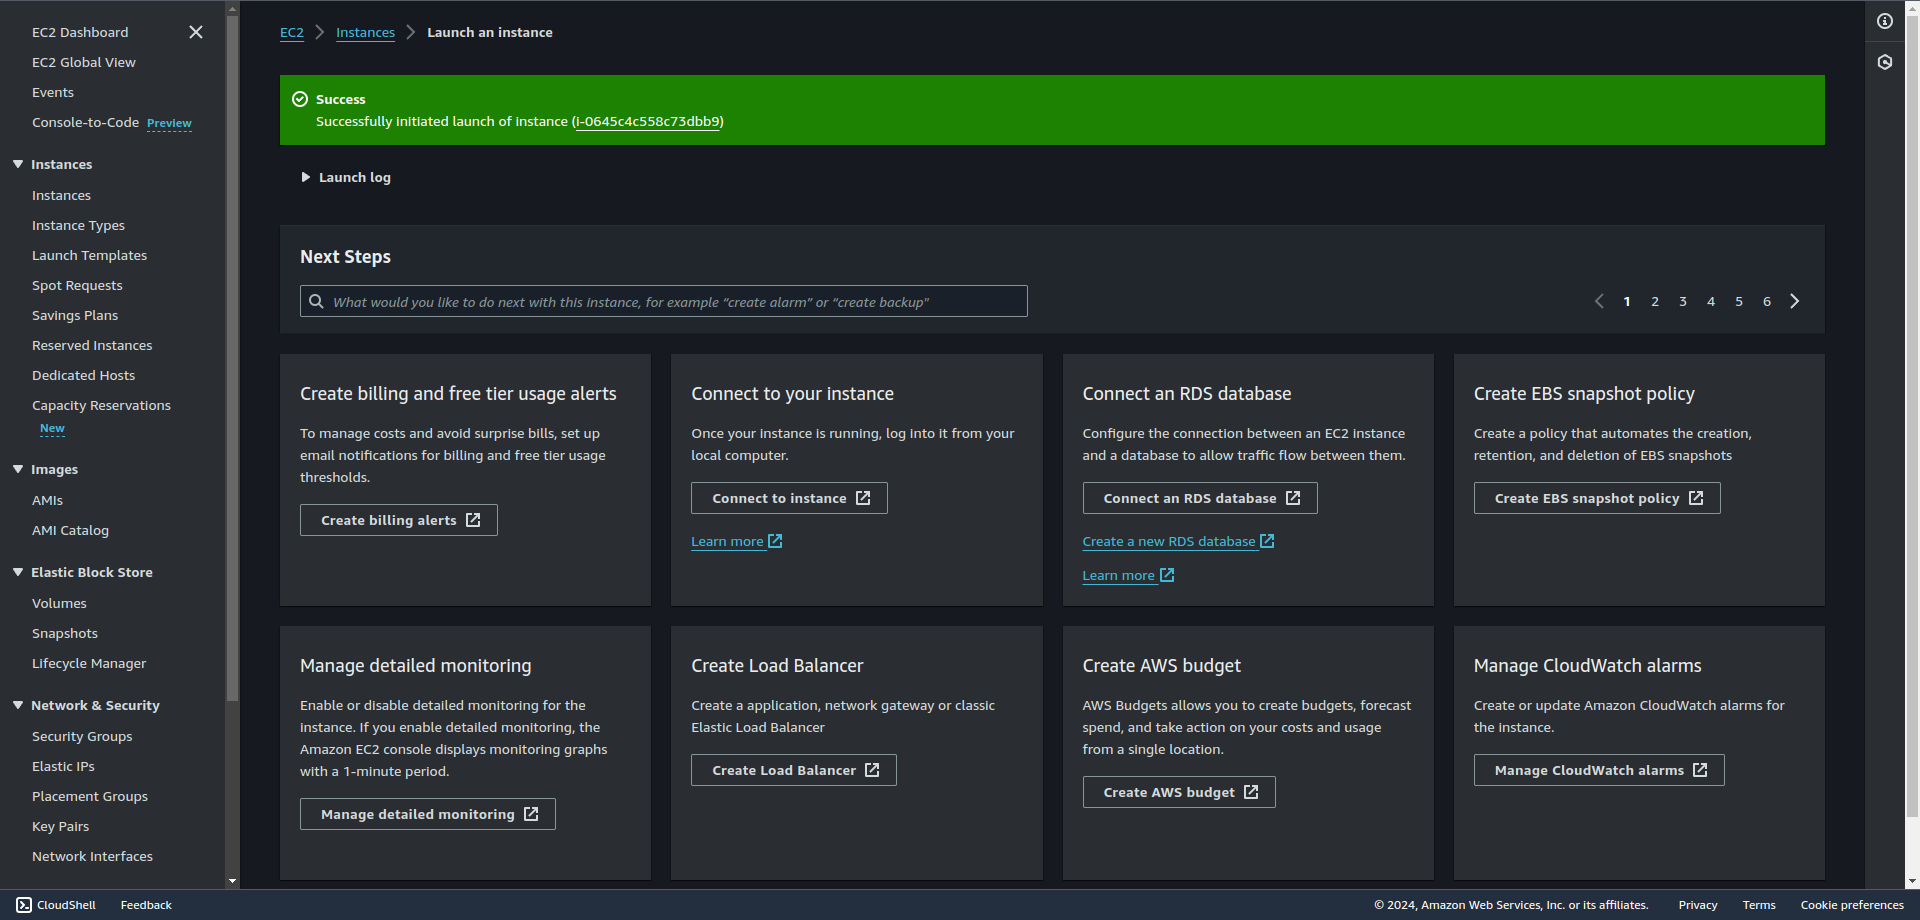
We will be covering the next steps in Part 2: Setting up Elastic IP and Security Groups
Part Two: Setting up Elastic IP and Security Groups
Now that your EC2 instance is successfully launched, it's time to enhance its configuration for improved accessibility and security. In this part, we'll guide you through setting up an Elastic IP, providing your instance with a static public IP address, and configuring Security Groups to control inbound and outbound traffic effectively. Follow the steps below to ensure a stable and secure foundation for hosting your WordPress site on Amazon EC2.
Step 1: Navigate to the EC2 Dashboard
Begin by accessing the AWS Management Console and navigating to the EC2 Dashboard. If you are not already on the dashboard, click on the "Services" dropdown, select "EC2" under "Compute," and you will land on the EC2 Dashboard.
Step 2: Access Elastic IP in the Network & Security Section
Scroll down to the "Network & Security" section in the left navigation pane of the EC2 Dashboard. Under this section, click on "Elastic IPs" to manage your Elastic IP addresses.
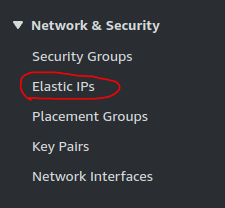
Step 3: Allocate Elastic IP
Once you are in the Elastic IP dashboard, locate and click on the "Allocate Elastic IP address" button. This action will allocate a static public IP that you can associate with your EC2 instances later.

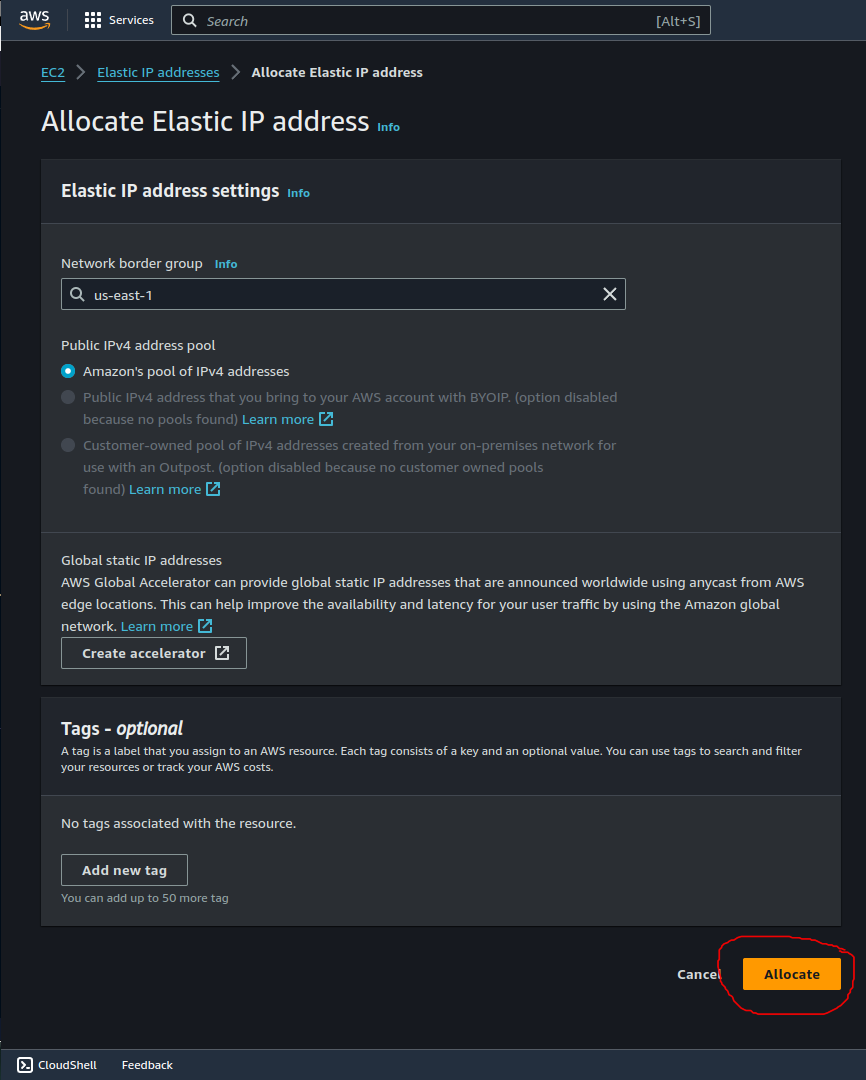
Step 4: Associate Elastic IP with an Instance
In the Elastic IP dashboard, locate the newly created Elastic IP address. Select it and proceed to associate it with your EC2 instance. This ensures that your instance has a static public IP, simplifying accessibility and configuration.

Step 5: Associate Elastic IP with an Instance
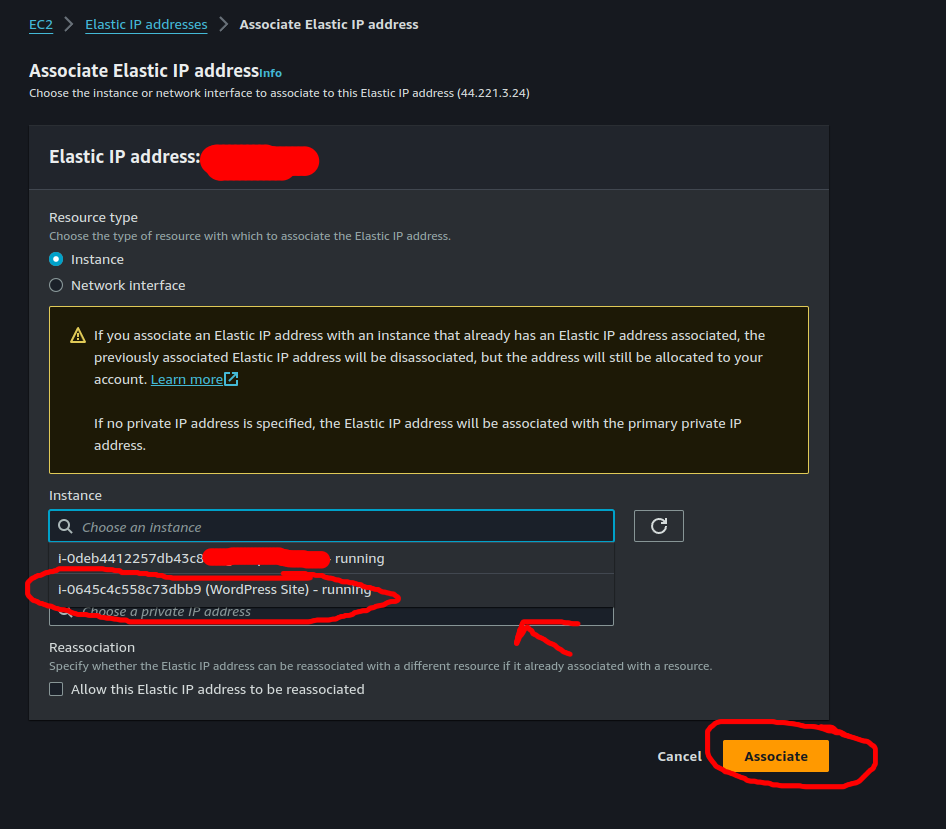
To associate the Elastic IP instance-wise, navigate to the "Associate Elastic IP address" section. Select the specific EC2 instance involved in the association. Click on the text area, and the Private IP address of the chosen instance will appear for you to confirm during the association process. Once done, it will bring you back to the Dashboard showing it is done successfully.

Step 6: Setting up Security Groups
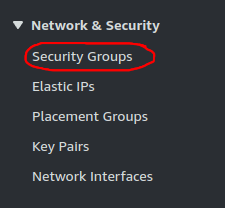
Now that the Elastic IP is associated, let's configure the inbound security rules for your groups. Navigate to the "Network & Security" section in the EC2 Dashboard. Under the "Security Groups" column, click on "Security Groups" to manage the security settings for your EC2 instances.
Note: In Part 1 of this guide, a security group has already been created. However, in this section, you have the option to create and use a different security group for a specific purpose or to meet different requirements.
Step 7: Create a New Security Group
In the "Security Groups" section, click on "Create Security Group" to initiate the process of creating a new security group. This step allows you to define specific inbound and outbound rules tailored to your requirements.

Step 8: Enter Security Group Details
When creating the new security group, provide a meaningful name and description. These details help identify the purpose and function of the security group. Fill in the following basic information:
- Name: Enter a descriptive name for your security group.
- Description: Add a brief description to clarify the security group's purpose.

Step 9: Set Inbound Rules
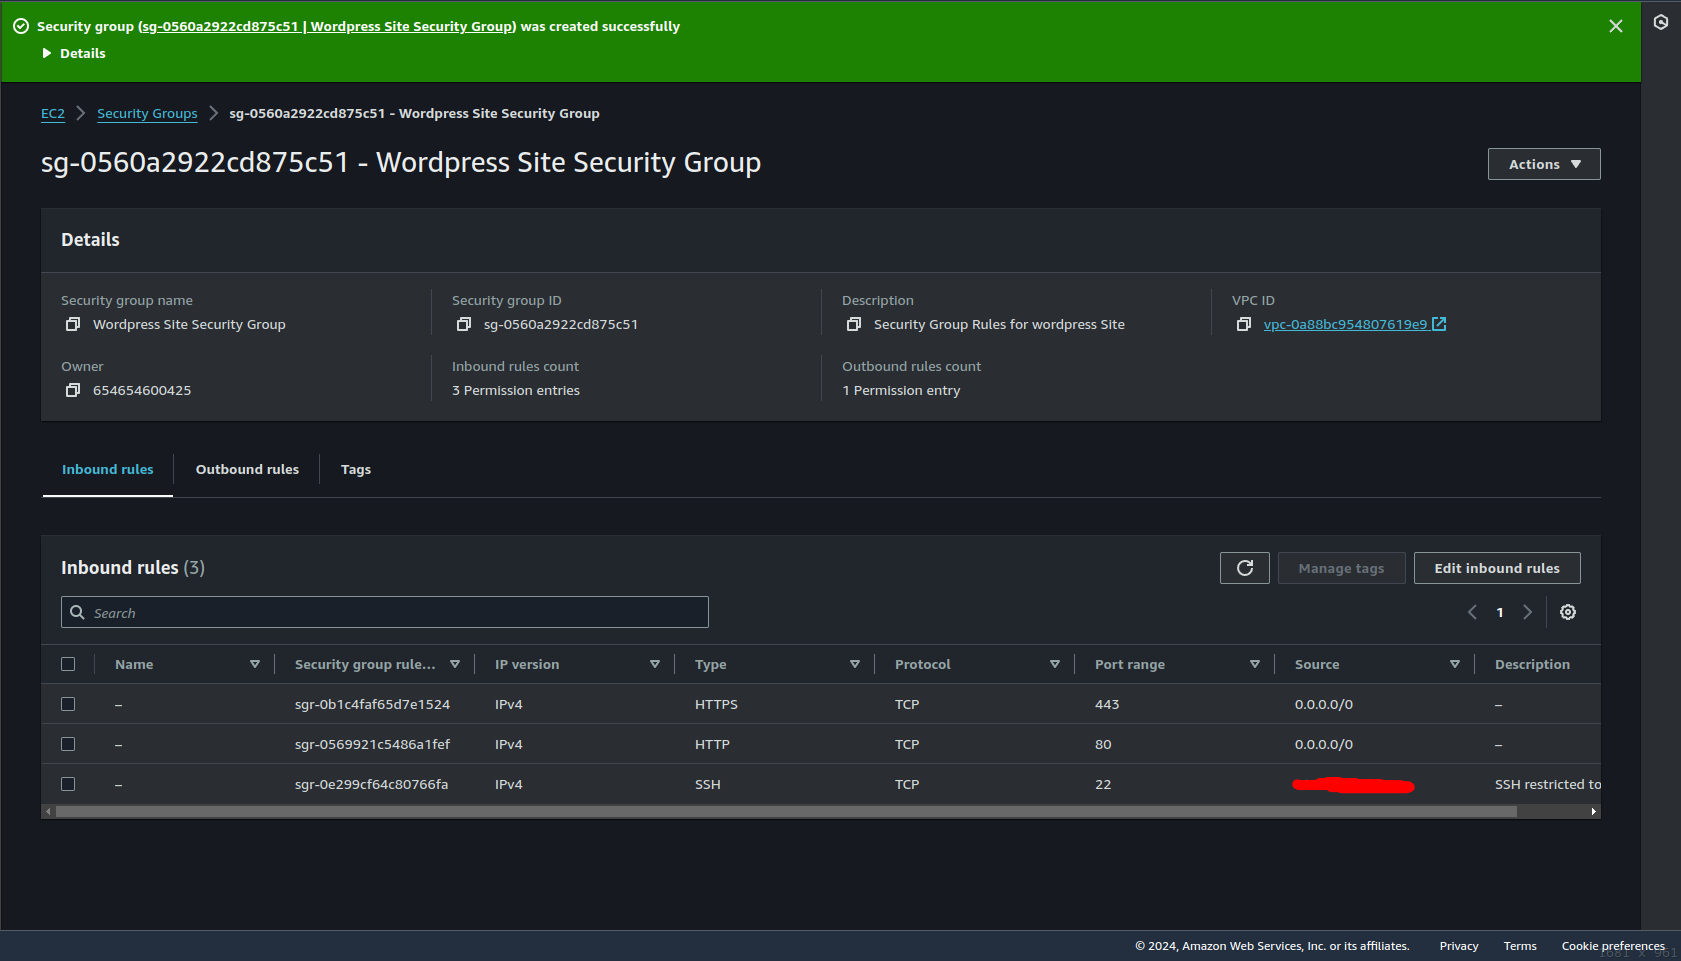
By default, a security group blocks any incoming traffic that doesn't have specific inbound rules. Here, we'll configure the inbound rules to make only HTTP and HTTPS traffic visible to the outside world while limiting SSH access to a specific IP address or your own IP address.

Follow these steps to set the inbound rules:
- Navigate the "Inbound Rules" section for the newly created security group.
- Add a rule for HTTP (port 80) to allow web traffic.
- Add a rule for HTTPS (port 443) to allow secure web traffic.
- If needed, add a rule for SSH (port 22) and specify the allowed IP address (e.g., your own IP or a specific range).

Scroll down to the bottom of the page and click on the "Create Security Group" button to save your configured rules.

You Should get a success message stating the security group has been created
Step 10: Change Instance Security Groups
Return to the "Instances" section in the EC2 Dashboard. Select the specific EC2 instance you want to modify, then follow these steps:
- Click on "Actions."
- Select "Security."
- Hover over "Change Security Groups" and click on it.

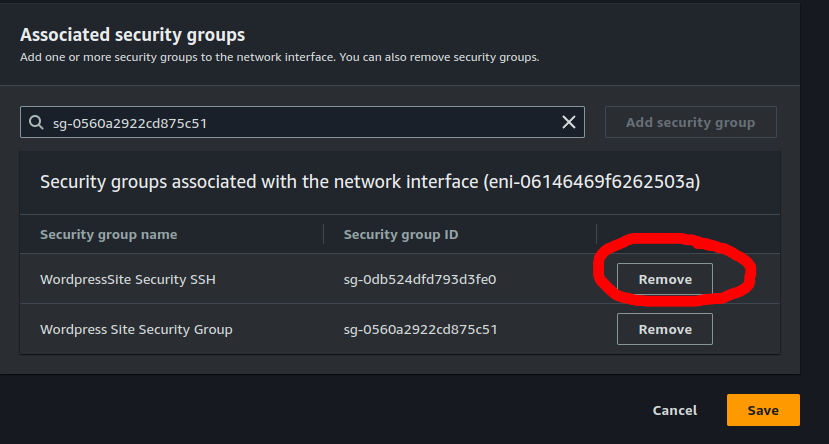
Step 11: Update Instance Security Groups
Follow these steps to update the security groups for your selected EC2 instance:
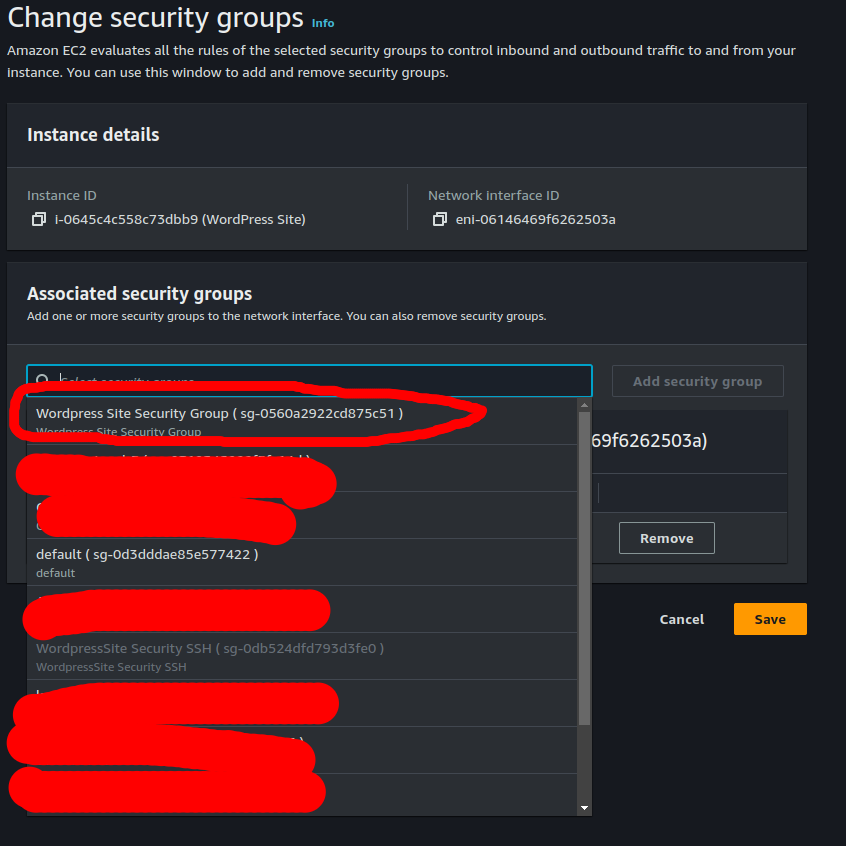
- Click on the text area labeled "Select Security Groups."
- Choose the newly created security group from the list of options and add it to the selection.
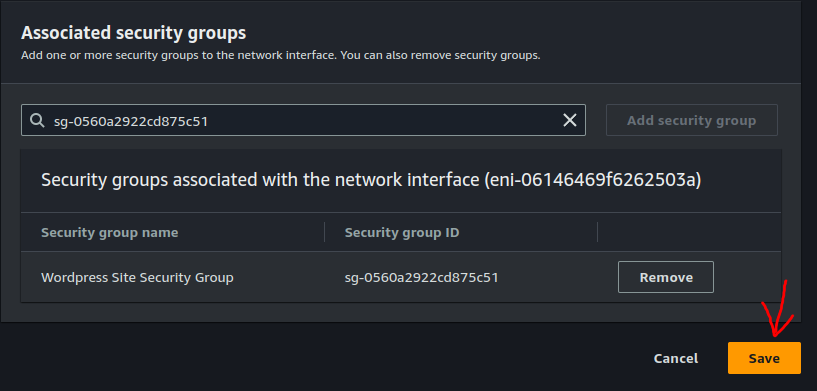
- Remove the old security group that needs to be replaced with the new one.
- Click "Save" to apply the changes to the instance's security groups.
- You will then Receive the confirmation that it is successfully set
Step 12: Accessing the Instance
To access the instance you were working on, follow these steps:
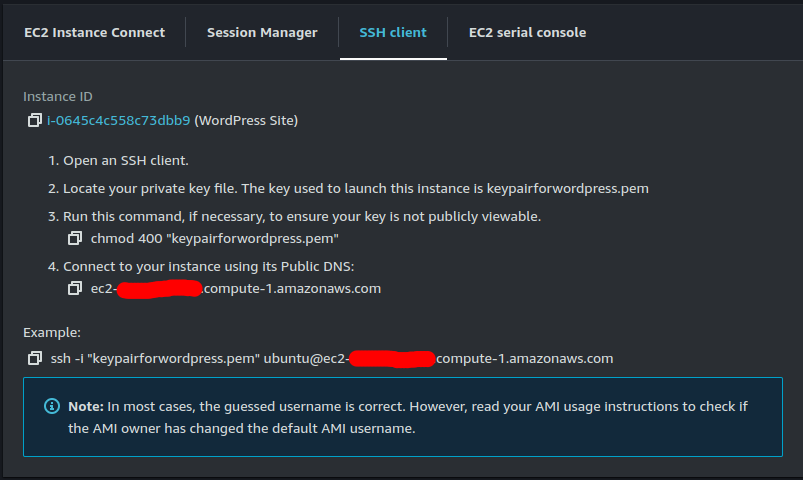
- Select the specific EC2 instance in the "Instances" section of the EC2 Dashboard.
- Click on the "Connect" button.
- Choose the SSH client option and follow the provided instructions.
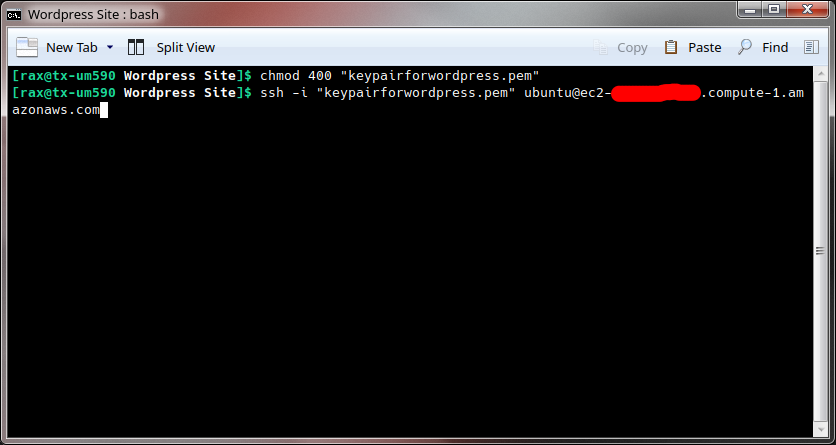
- Open your terminal to the location where the private key for the instance is located.
- Follow the SSH command option provided, which typically includes using the private key, to connect to the instance.
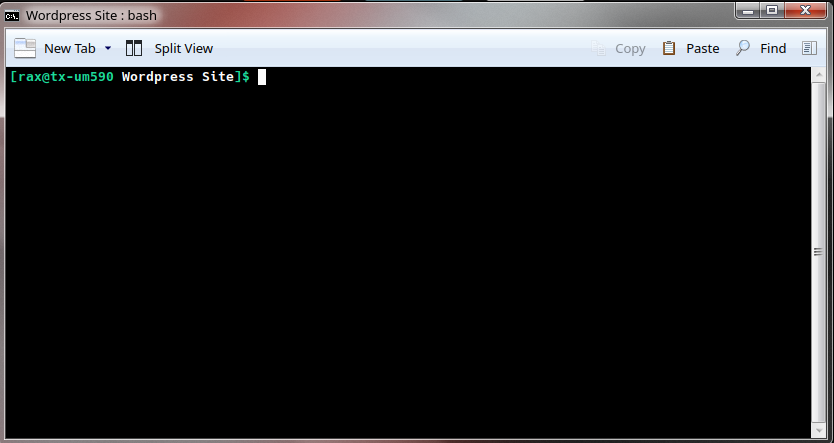
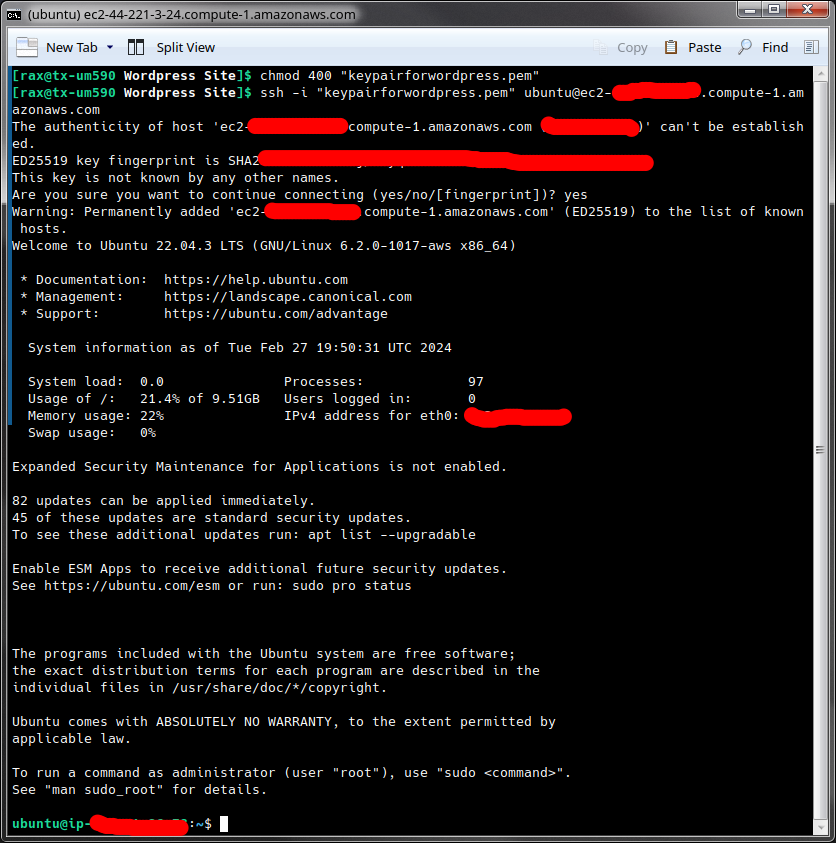
- When prompted with a warning that the key and the IP are not recognized, type 'yes' to continue.
- You should now be able to successfully connect to the instance.

Conclusion: Setting up Elastic IP and Security Groups
Congratulations! You've successfully configured the foundational elements for hosting your WordPress site on Amazon EC2. In this guide, we covered the steps to associate an Elastic IP with your instance, providing it with a static public IP address for enhanced accessibility. Additionally, we explored the creation and setup of Security Groups, ensuring controlled inbound and outbound traffic to your EC2 instances.
By following these steps, you've not only secured your EC2 instance but also established a reliable connection method using SSH. Feel free to proceed to the next part of the guide, where we'll delve into setting up the LAMP stack to host your WordPress site efficiently.
Part 3: Setting up Packages and System Security
Now that your Amazon EC2 instance is configured with an Elastic IP and the necessary security groups, it's time to proceed with setting up essential packages and enhancing system security. In this part, we will guide you through installing and configuring the LAMP stack for hosting your WordPress site. Additionally, we'll cover important system security measures, including instance security via multifactor authentication, to ensure a robust and protected environment for your web application.
Step 1: Update System Packages and Change Hostname
Before proceeding with further installations, it's essential to update your system and set a meaningful hostname. Run the following commands in your terminal:
						# Update the package lists
						sudo apt update

						# Upgrade installed packages
						sudo apt upgrade -y
During the update, you might encounter a CLI interface. Use the Tab key to navigate to the "OK" button and then press Enter.
						# Change the hostname to your desired name
						sudo hostnamectl set-hostname WordPressSite
						# OR Change the hostname using nano editor
						sudo nano /etc/hostname
Inside the nano editor, modify the hostname, then press CTRL-O, Enter, and exit with CTRL-X.
						# Reboot the system
						sudo reboot
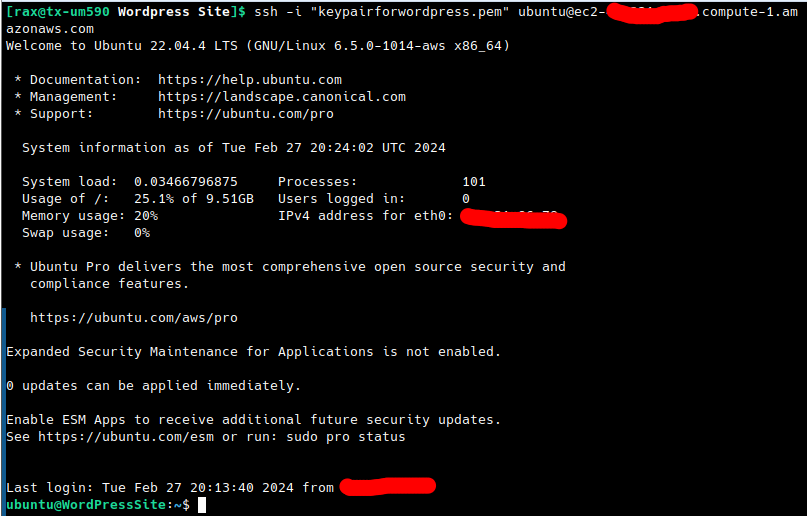
Wait for about 2 minutes to allow the system to finish the reboot. Afterward, you can access the instance again.

These commands ensure that your system has the latest package information, upgrades all installed packages, and sets a customized hostname for your EC2 instance. You should now be able to successfully connect to the instance and observe the applied changes, including the updated system packages and new hostname.
Step 2: Enhance System Security with Two-Factor Authentication (2FA)
To add an extra layer of security to your EC2 instance, you can set up Two-Factor Authentication (2FA). Follow these steps to enhance the security of your system:
- Install the necessary packages for Two-Factor Authentication:
sudo apt install libpam-google-authenticator
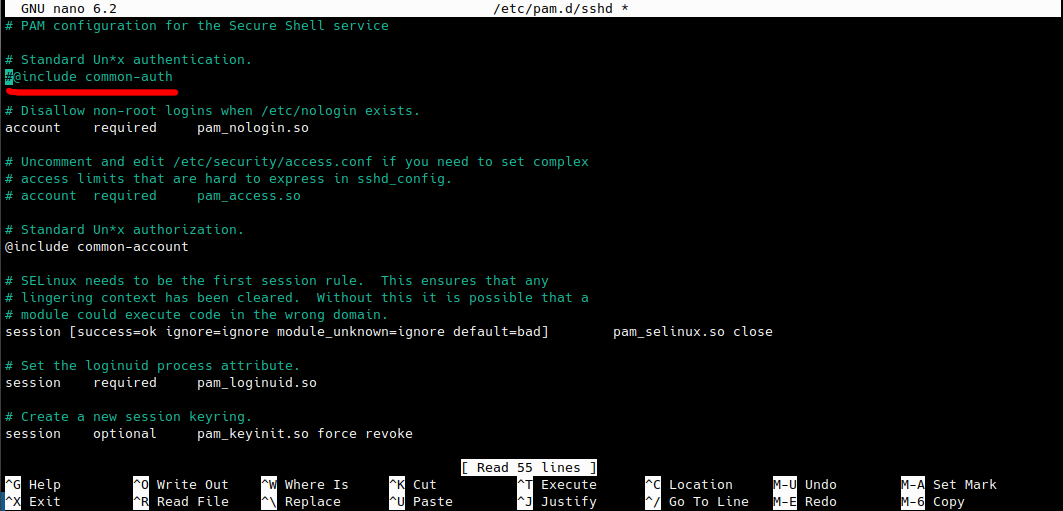
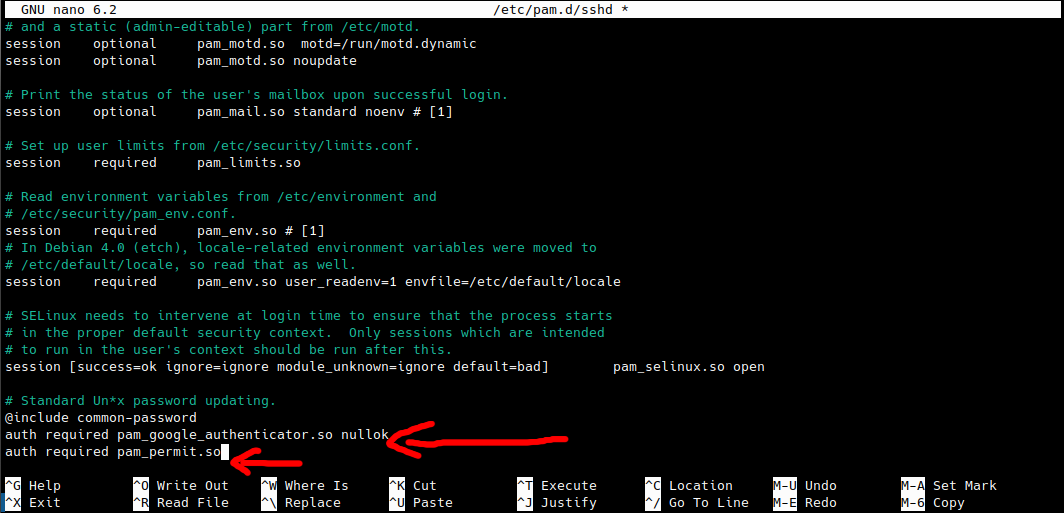
sudo nano /etc/pam.d/sshd
Add the following lines at the end of the file:
					auth required pam_google_authenticator.so nullok
					auth required pam_permit.so
Comment out the line that includes common-auth:
# @include common-auth
Save and exit (CTRL-O, Enter, CTRL-X).
sudo nano /etc/ssh/sshd_config
Ensure the following lines are in the file:
							ChallengeResponseAuthentication yes
							PasswordAuthentication no
							AuthenticationMethods publickey,password publickey,keyboard-interactive
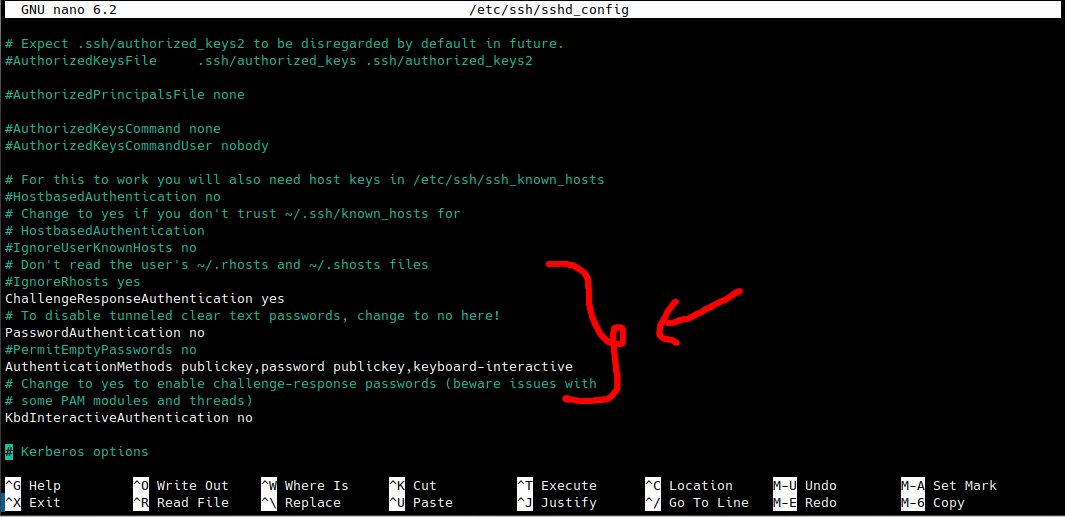
Save and exit (CTRL-O, Enter, CTRL-X).
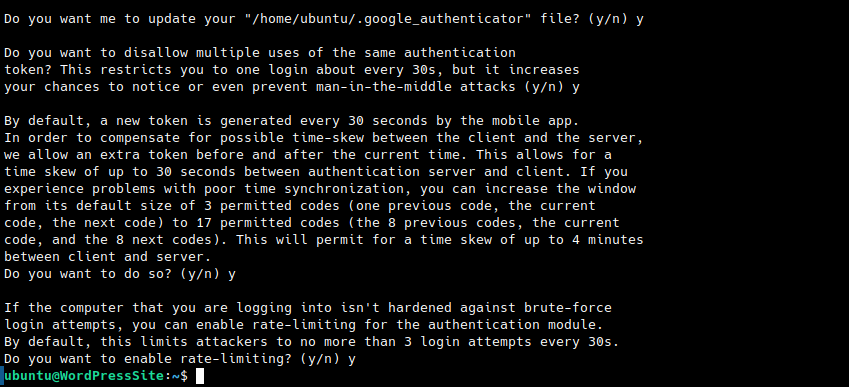
google-authenticator
Follow the on-screen instructions to set up Two-Factor Authentication for your user.


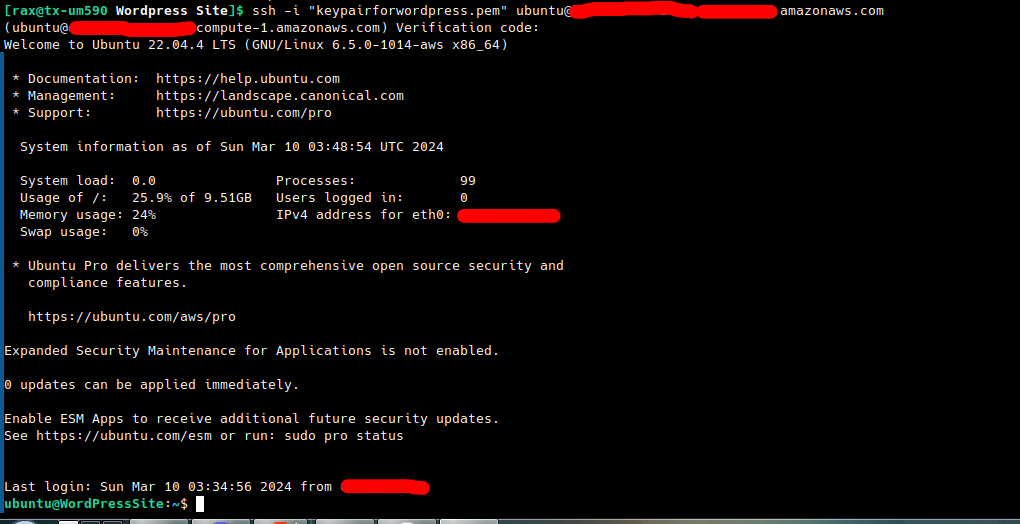
sudo systemctl restart sshd
With 2FA enabled, you'll need to provide a verification code from your authenticator app during SSH login, adding an extra layer of security to your EC2 instance.

Part Four: Setting Up WordPress
With your Amazon EC2 instance now configured with enhanced security measures, including Two-Factor Authentication (2FA), it's time to proceed with setting up WordPress. In this part, we'll guide you through the installation and configuration of the LAMP stack, followed by the deployment of WordPress on your secure EC2 instance.
Step 1: Install PHP, Apache2, and MySQL with Dependencies
Begin the setup of your WordPress environment by installing PHP, Apache2, and MySQL along with their required dependencies. Run the following command in your terminal:
			sudo apt update
			sudo apt install apache2 ghostscript libapache2-mod-php mysql-server php php-bcmath php-curl \
				php-imagick php-intl php-json php-mbstring php-mysql php-xml php-zip
This command installs Apache2, MySQL, PHP, and various PHP modules necessary for WordPress. It ensures your EC2 instance is equipped with the essential components for hosting a WordPress site.
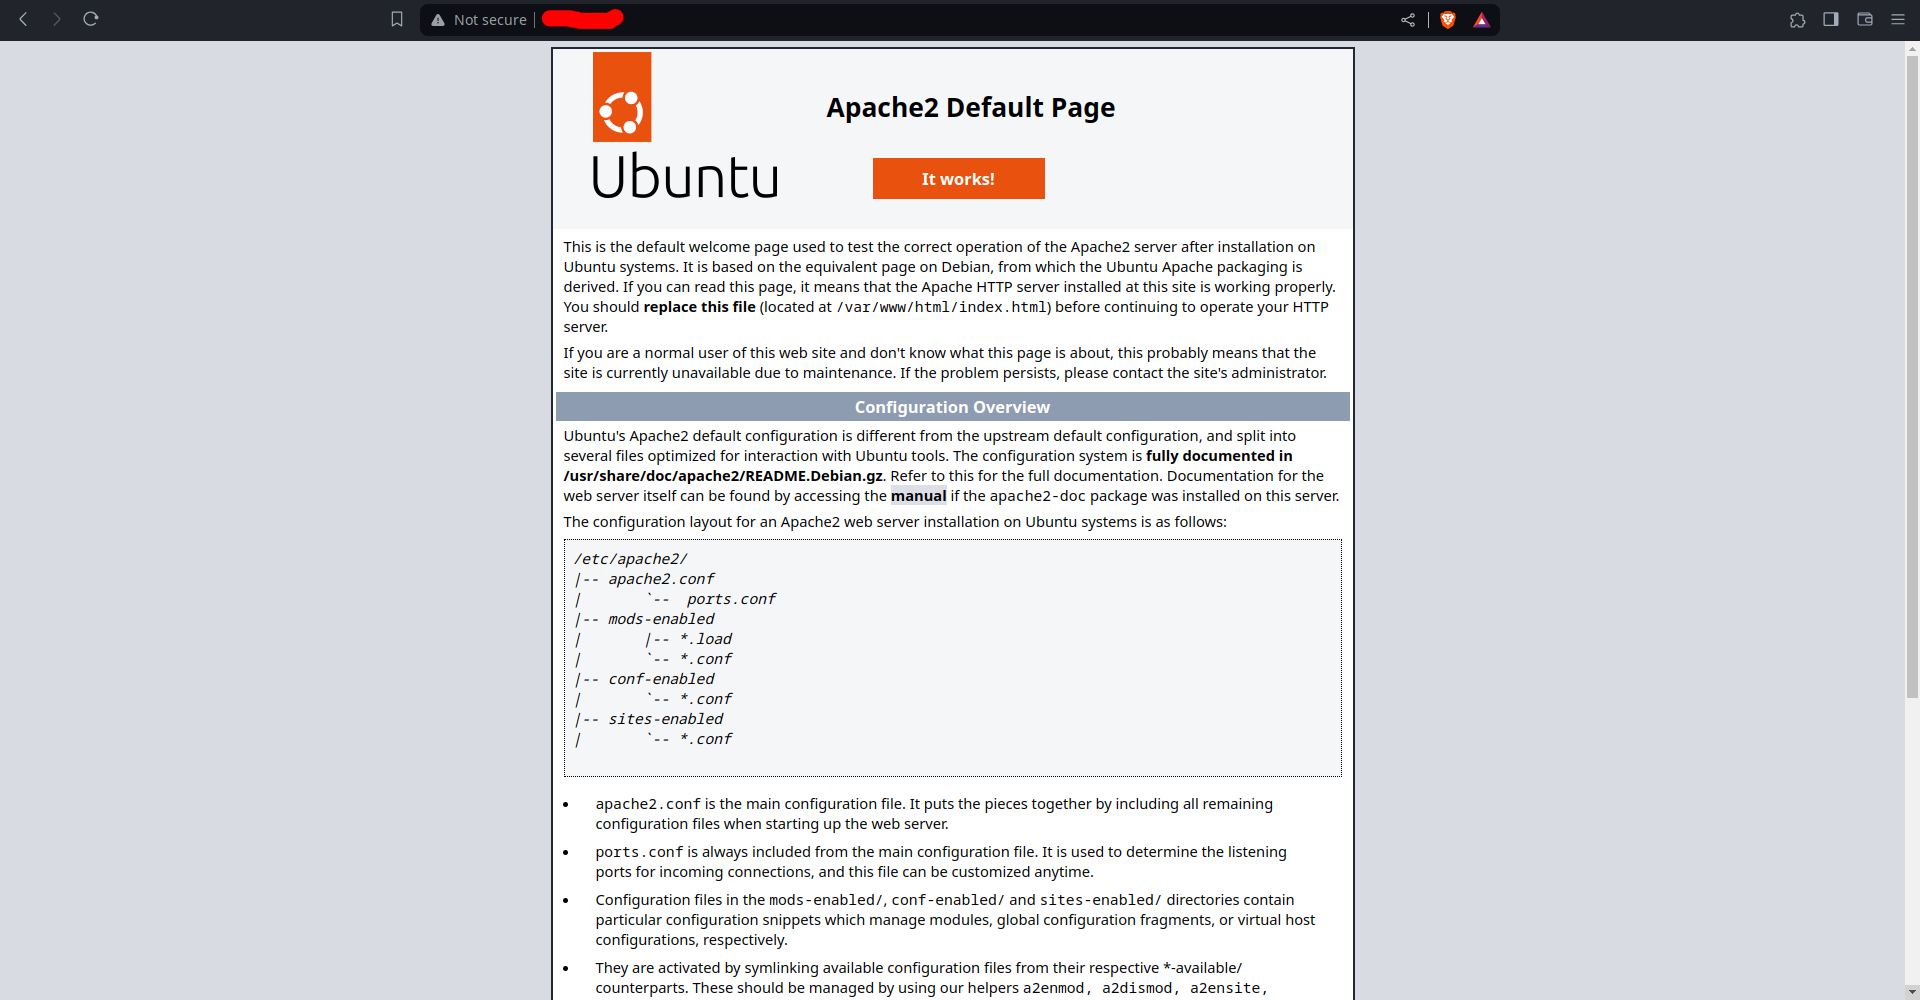
After installation, you can check if the webserver is working by accessing your EC2 instance's IP address on port 80 in your web browser.
Step 2: Install WordPress
Now that PHP, Apache2, and MySQL are installed, proceed to install WordPress. Execute the following commands in your terminal:
			# Create a directory for WordPress
			sudo mkdir -p /srv/www

			# Set ownership to the ubuntu user and www-data group
			sudo chown ubuntu:www-data /srv/www

			# Download and extract the latest WordPress version
			curl https://wordpress.org/latest.tar.gz | sudo -u ubuntu tar zx -C /srv/www
This will create a directory for WordPress, set the appropriate ownership, and download the latest WordPress version into the specified directory.
Step 3: Configure Apache for WordPress
Create an Apache site for WordPress by configuring the necessary settings. Run the following commands in your terminal:
			# Create the WordPress Apache configuration file
			sudo nano /etc/apache2/sites-available/wordpress.conf
Add the following lines to the file:
			<VirtualHost *:80>
				DocumentRoot /srv/www/wordpress
				<Directory /srv/www/wordpress>
					Options FollowSymLinks
					AllowOverride Limit Options FileInfo
					DirectoryIndex index.php
					Require all granted
				</Directory>
				<Directory /srv/www/wordpress/wp-content>
					Options FollowSymLinks
					Require all granted
				</Directory>
			</VirtualHost>
Save and exit (CTRL-O, Enter, CTRL-X).
Enable the WordPress site:
sudo a2ensite wordpress
Enable URL rewriting:
sudo a2enmod rewrite
Disable the default "It Works" site:
sudo a2dissite 000-default
Finally, reload Apache2 to apply all these changes:
sudo service apache2 reload
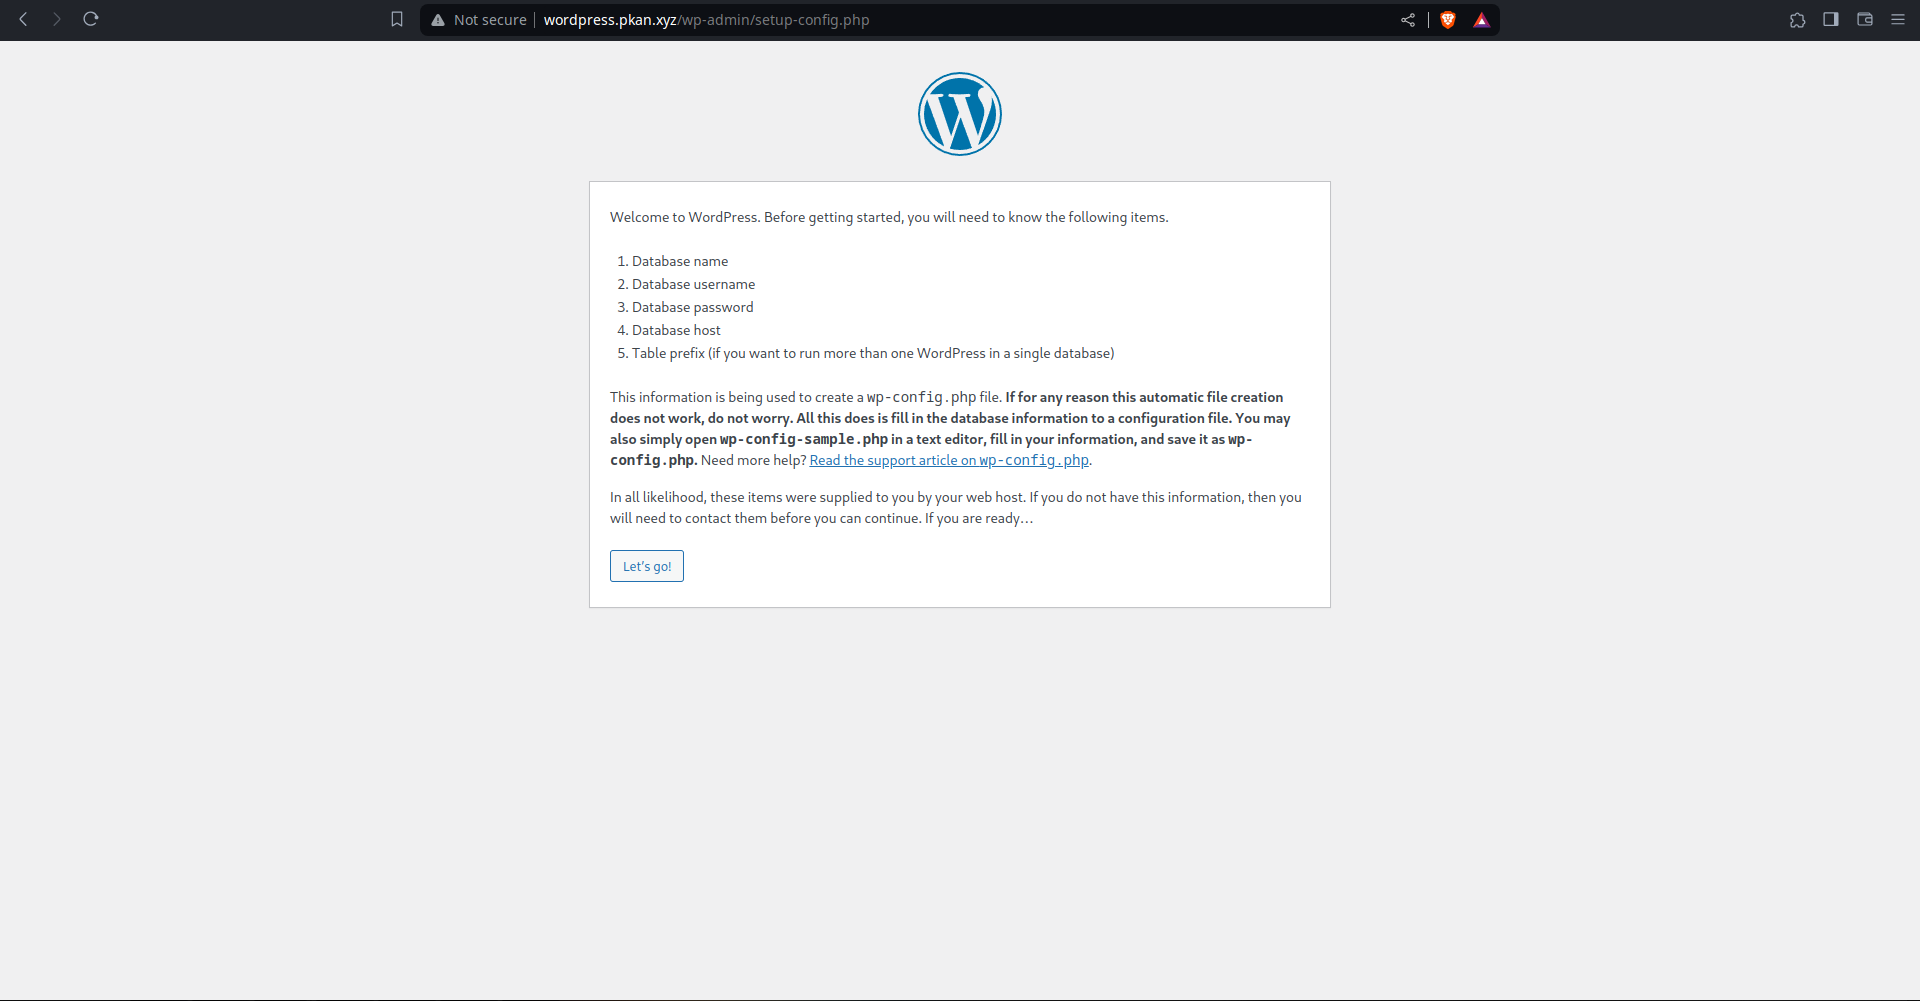
This configures Apache to host your WordPress site with the necessary settings for proper functionality. Check if the steps worked by accessing your EC2 instance's IP in a web browser. If you added your IP to DNS records, use the domain name to access the site.
Step 4: Configure Database
With MySQL installed and the service running, configure the database for WordPress by following these commands in your terminal:
				# Access the MySQL monitor
				sudo mysql -u root
You'll enter the MySQL monitor. Execute the following SQL commands:
				CREATE DATABASE wordpress;
				CREATE USER wordpress@localhost IDENTIFIED BY '';
				GRANT SELECT,INSERT,UPDATE,DELETE,CREATE,DROP,ALTER
				ON wordpress.*
				TO wordpress@localhost;
				FLUSH PRIVILEGES;
				quit
These commands create a database named 'wordpress', a user 'wordpress' with the specified password, and grant necessary privileges for WordPress. Ensure to replace '
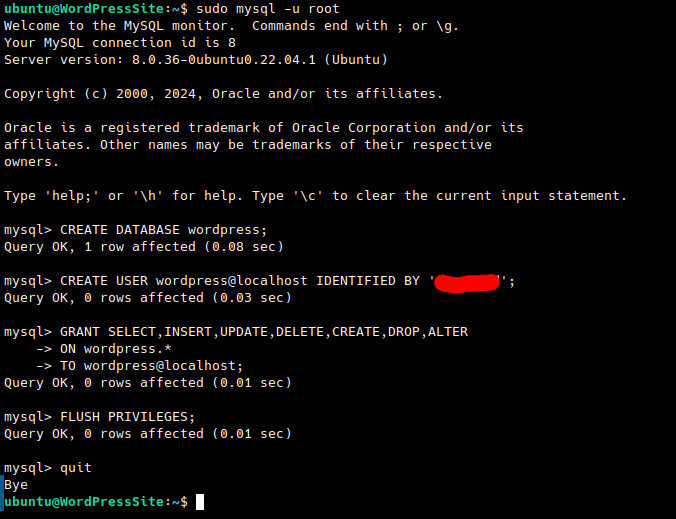
This sets up the MySQL database for your WordPress installation.
Step 5: Configure WordPress to Connect to the Database
Now, let's configure WordPress to use the database. Follow one of the two options below in your terminal:
Option 1: Using sed
				# Copy the sample configuration file to wp-config.php
				sudo -u ubuntu cp /srv/www/wordpress/wp-config-sample.php /srv/www/wordpress/wp-config.php

				# Set the database credentials using sed
				sudo -u ubuntu sed -i 's/database_name_here/wordpress/' /srv/www/wordpress/wp-config.php
				sudo -u ubuntu sed -i 's/username_here/wordpress/' /srv/www/wordpress/wp-config.php
				sudo -u ubuntu sed -i 's/password_here//' /srv/www/wordpress/wp-config.php
Option 2: Directly edit wp-config.php using nano
				# Copy the sample configuration file to wp-config.php
				sudo -u ubuntu cp /srv/www/wordpress/wp-config-sample.php /srv/www/wordpress/wp-config.php

				# Open the configuration file in nano
				sudo -u ubuntu nano /srv/www/wordpress/wp-config.php
Finally, open the configuration file in the nano editor:
sudo -u ubuntu nano /srv/www/wordpress/wp-config.php
Find the following lines:
					define( 'AUTH_KEY',         'put your unique phrase here' );
					define( 'SECURE_AUTH_KEY',  'put your unique phrase here' );
					define( 'LOGGED_IN_KEY',    'put your unique phrase here' );
					define( 'NONCE_KEY',        'put your unique phrase here' );
					define( 'AUTH_SALT',        'put your unique phrase here' );
					define( 'SECURE_AUTH_SALT', 'put your unique phrase here' );
					define( 'LOGGED_IN_SALT',   'put your unique phrase here' );
					define( 'NONCE_SALT',       'put your unique phrase here' );
find the specified lines in wp-config.php and replace them with the content of https://api.wordpress.org/secret-key/1.1/salt/. This step is crucial to ensure that your site is not vulnerable to "known secrets" attacks.
Save and close the configuration file in nano by typing CTRL+X, followed by Y, then Enter.
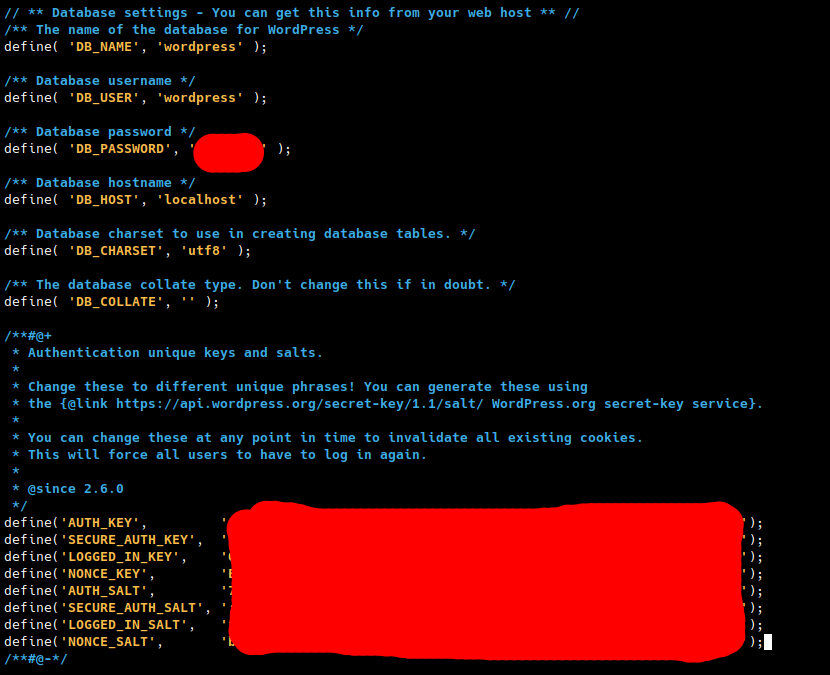
This completes the configuration of WordPress to connect to the database with the necessary credentials.
Step 6: Additional Steps
With the WordPress configuration almost complete, let's ensure proper permissions by setting group ownership to www-data and adjusting permissions. Run the following commands in your terminal:
			# Fix permissions by setting group ownership to www-data
			sudo chgrp www-data -R /srv/www

			# Set directory permissions
			find /srv/www -type d -exec sudo chmod 2775 {} \;

			# Set file permissions
			find /srv/www -type f -exec sudo chmod 0664 {} \;
Now, it's time to open the webpage and finalize the setup. Access your WordPress site in a web browser:
http://your-ec2-instance-ip
Replace 'your-ec2-instance-ip' with the actual IP address of your EC2 instance. If you've set up a custom domain, use that instead.
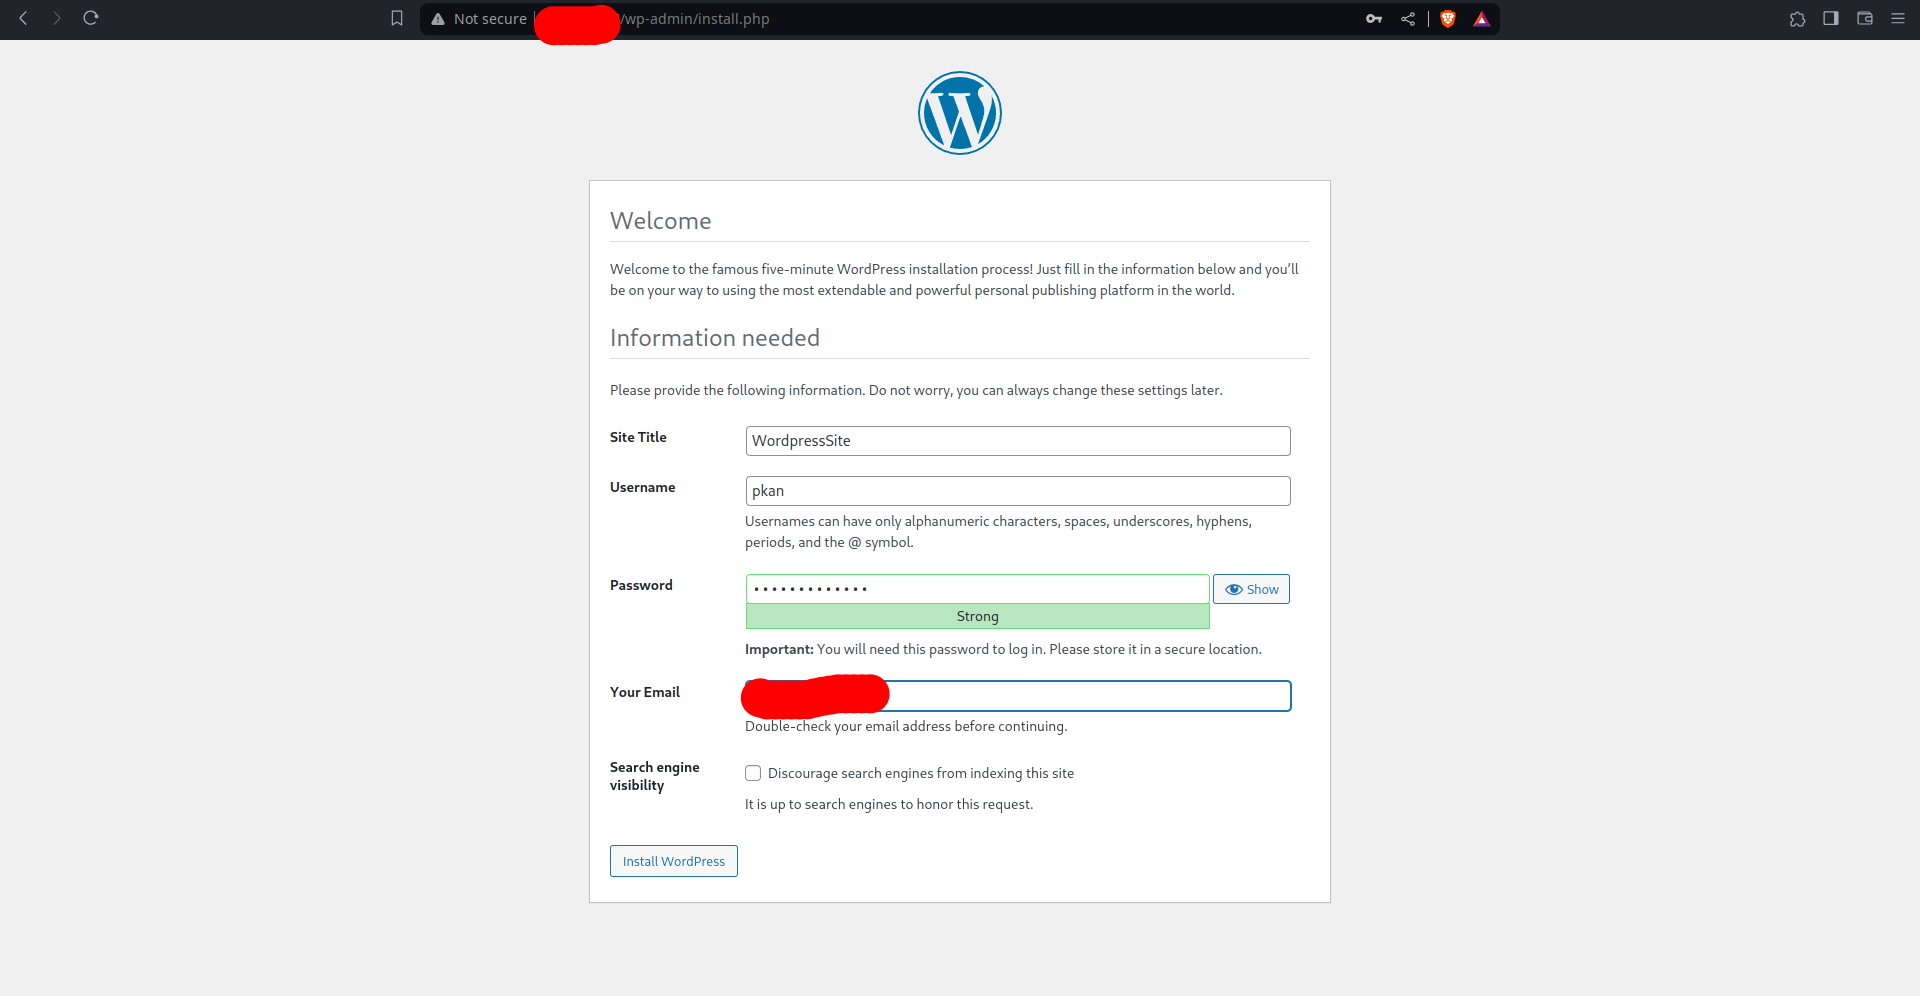
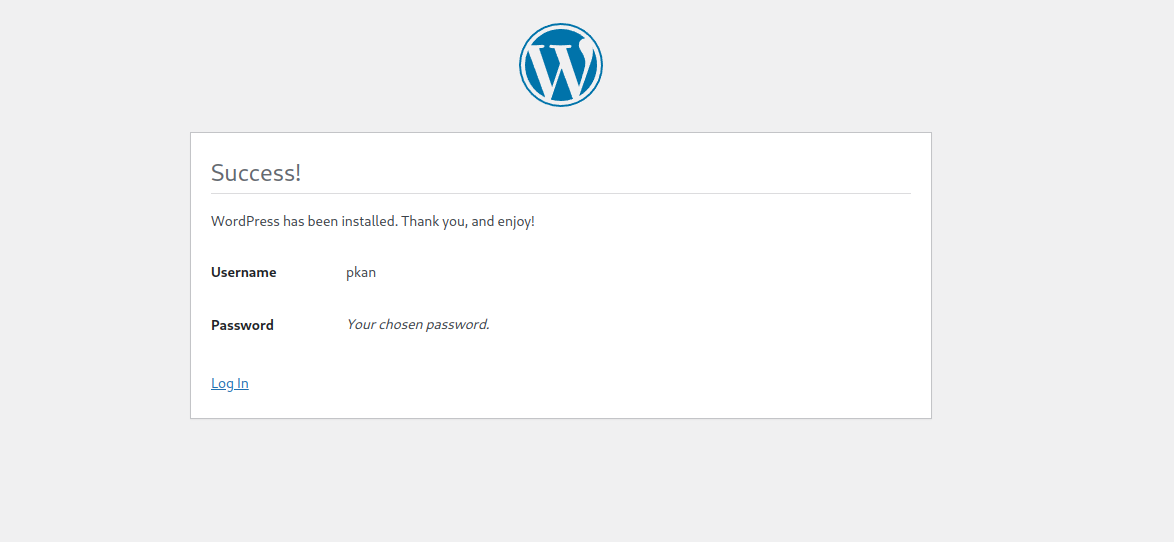
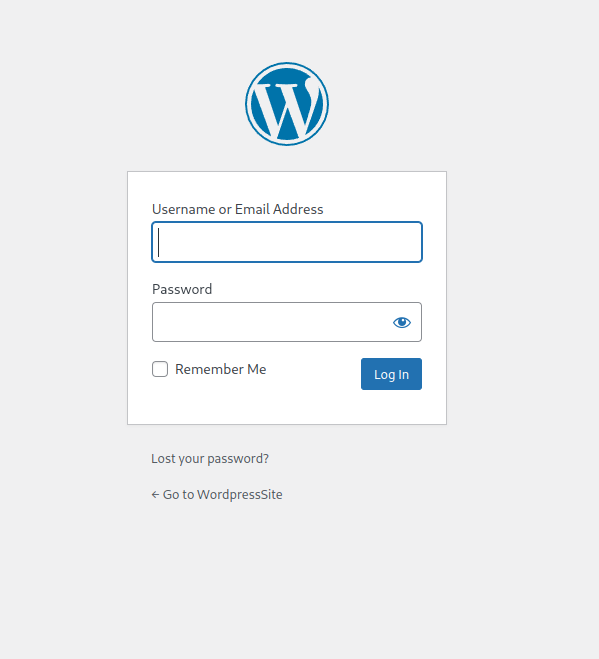
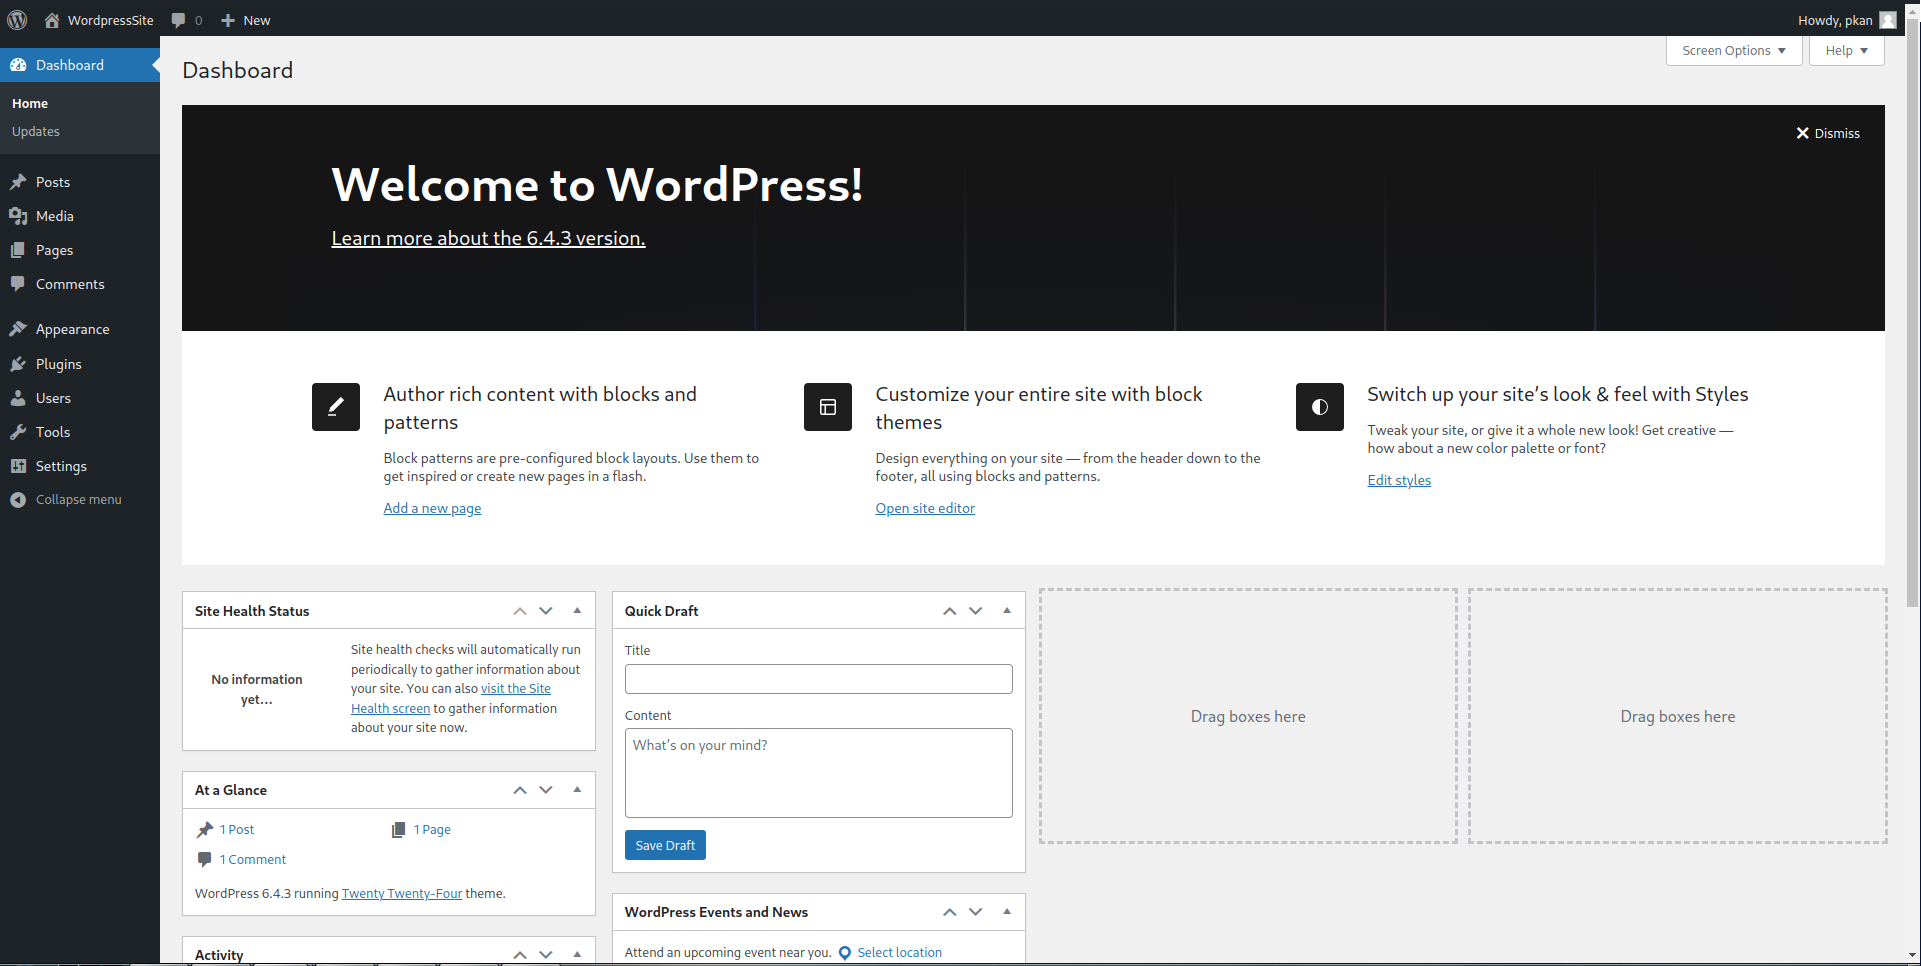
This will take you to the WordPress setup page where you can provide the site title, admin username, password, and email. Follow the on-screen instructions to complete the setup.
Once done, you'll have a fully configured WordPress site ready for use!
Step 6.5: Configure WordPress General Settings
Before proceeding further, it's essential to set the WordPress Address URL and Site Address URL to the domain name if DNS records are set. This ensures proper loading of the WordPress page. Follow these steps:
- Login to your WordPress admin dashboard.
- Navigate to Settings and then select General.
- Locate the WordPress Address (URL) and Site Address (URL) fields.
- If DNS records are set, replace the current URLs with your domain name (e.g., http://yourdomain.com).
- Scroll down and click Save Changes.
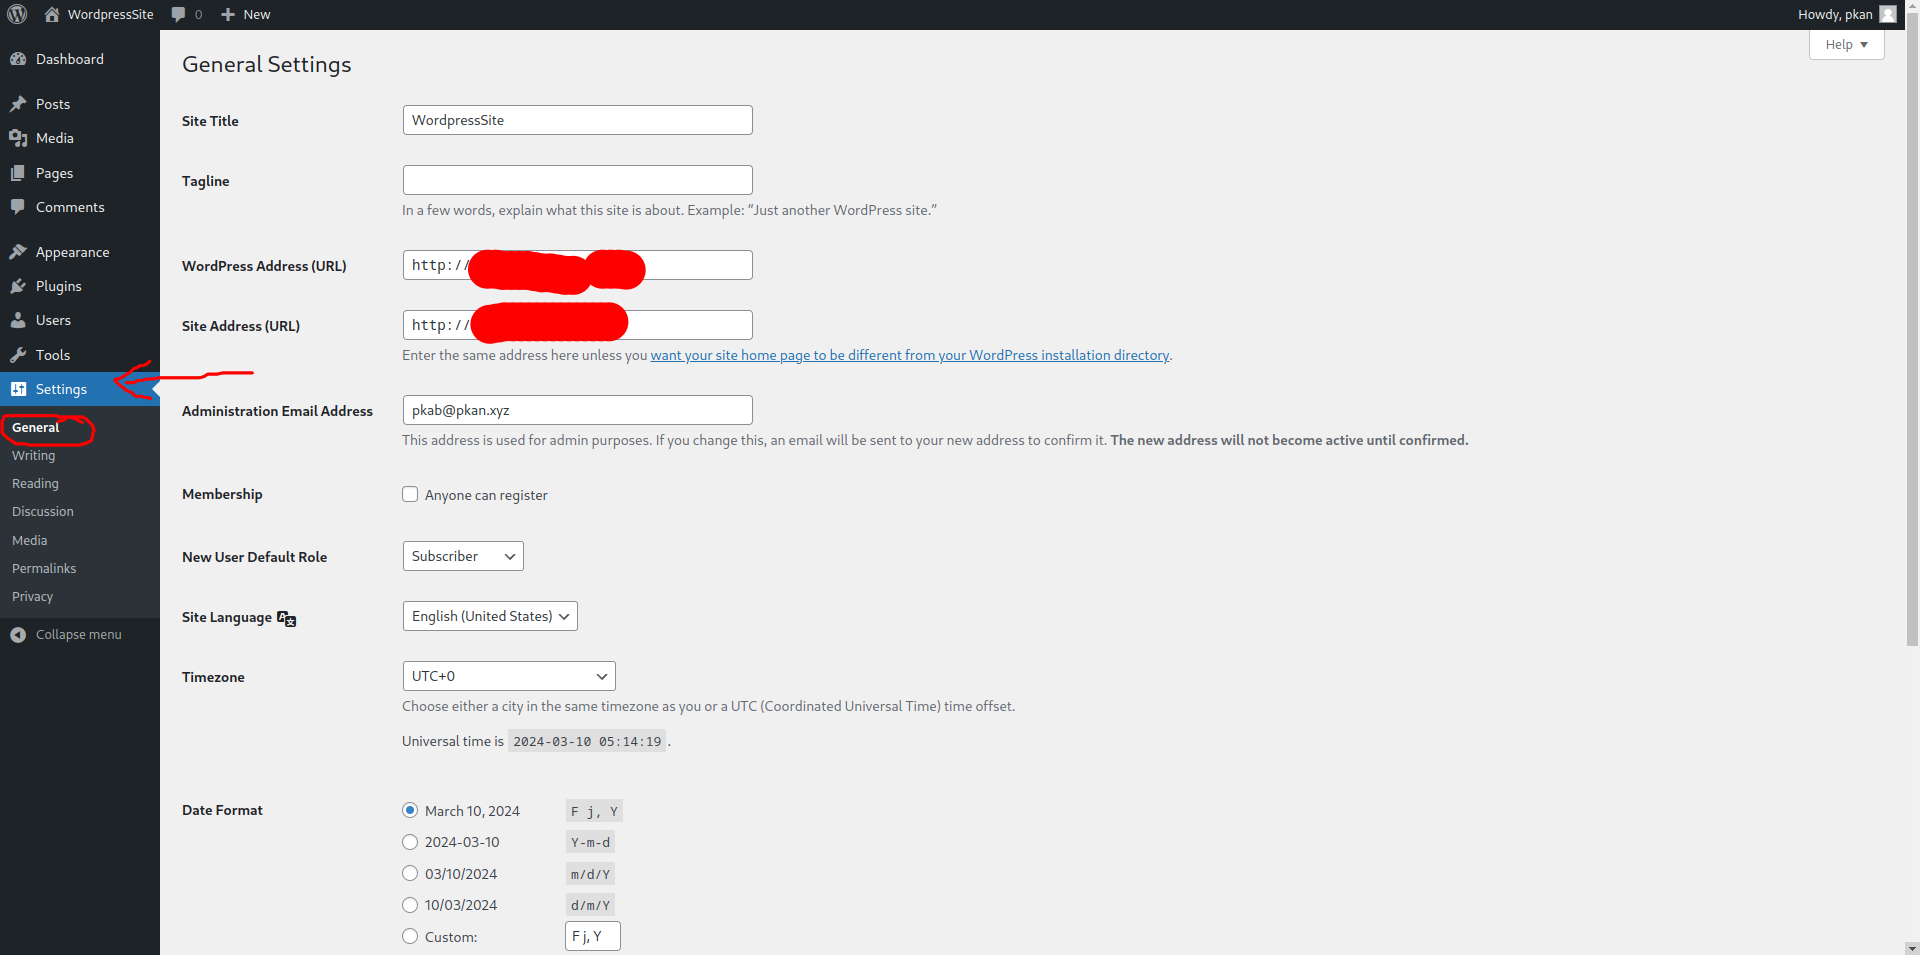
This ensures that your WordPress site loads correctly with the specified domain name.
Step 7: Additional Things to Do
There's one more tweak to make your life easier. Open your `wp-config.php` file again using nano:
nano /srv/www/wordpress/wp-config.php
Scroll to define section where it contains the DB_COLLATE and in a new line add this define section.
define( 'FS_METHOD', 'direct' );
This setting allows direct plugin installation without having to use the FTP protocol. (direct PHP writing)
Save and close the file in nano by typing CTRL+X, followed by Y, then Enter.
With this addition, your WordPress site is now fully configured and optimized for smooth operation.
Part 5: Setting up Wordpress Security
Step 1: Set Up SSL/TLS with Certbot
Enhance the security of your WordPress site by enabling SSL/TLS encryption. Certbot is a widely used tool to automate the process of obtaining and renewing SSL/TLS certificates. Follow these steps to set up SSL/TLS:
- Ensure your domain's DNS records are correctly configured and pointing to your server's IP address.
- Open your terminal and run the following commands:
				# Install Certbot and the Apache module
				sudo apt install certbot python3-certbot-apache

				# Obtain and install the SSL/TLS certificate
				sudo certbot --apache
Follow the on-screen instructions to configure Certbot for your domain. This process will set up SSL/TLS and automatically configure your Apache web server to use the obtained certificate.
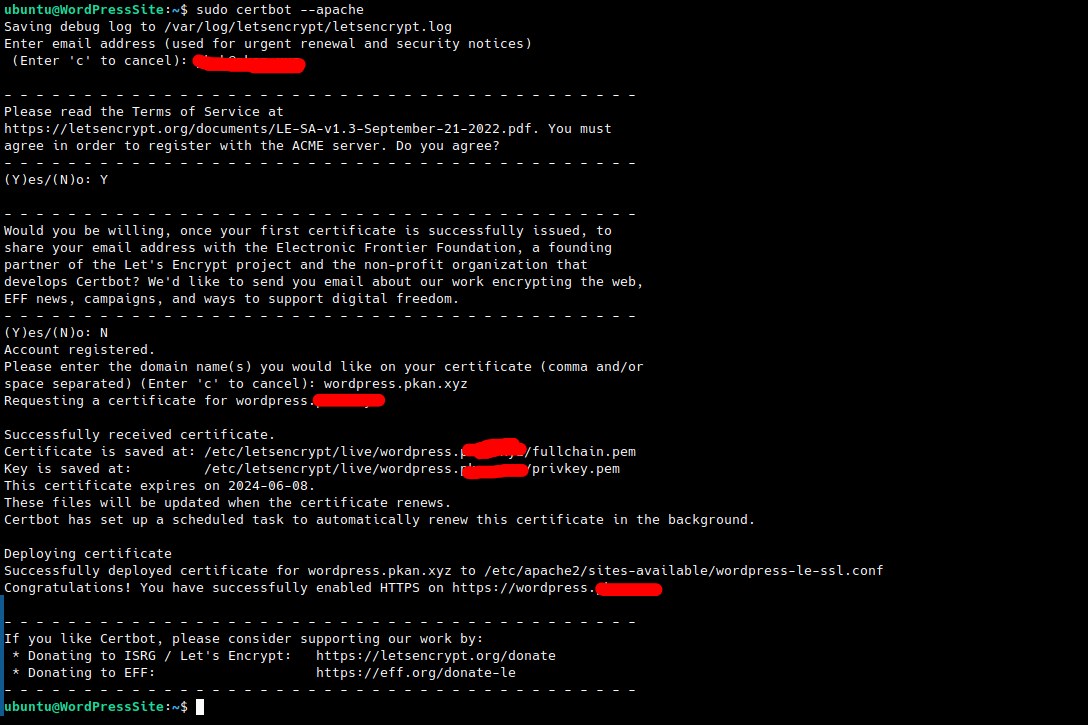
Note: After setting up SSL/TLS, it's important to update the WordPress Address (URL) and Site Address (URL) in the
General admin settings of WordPress. Change these to use the 'https' protocol to ensure proper functionality under SSL.

Your WordPress site is now secured with SSL/TLS encryption, providing a safer browsing experience for your visitors.
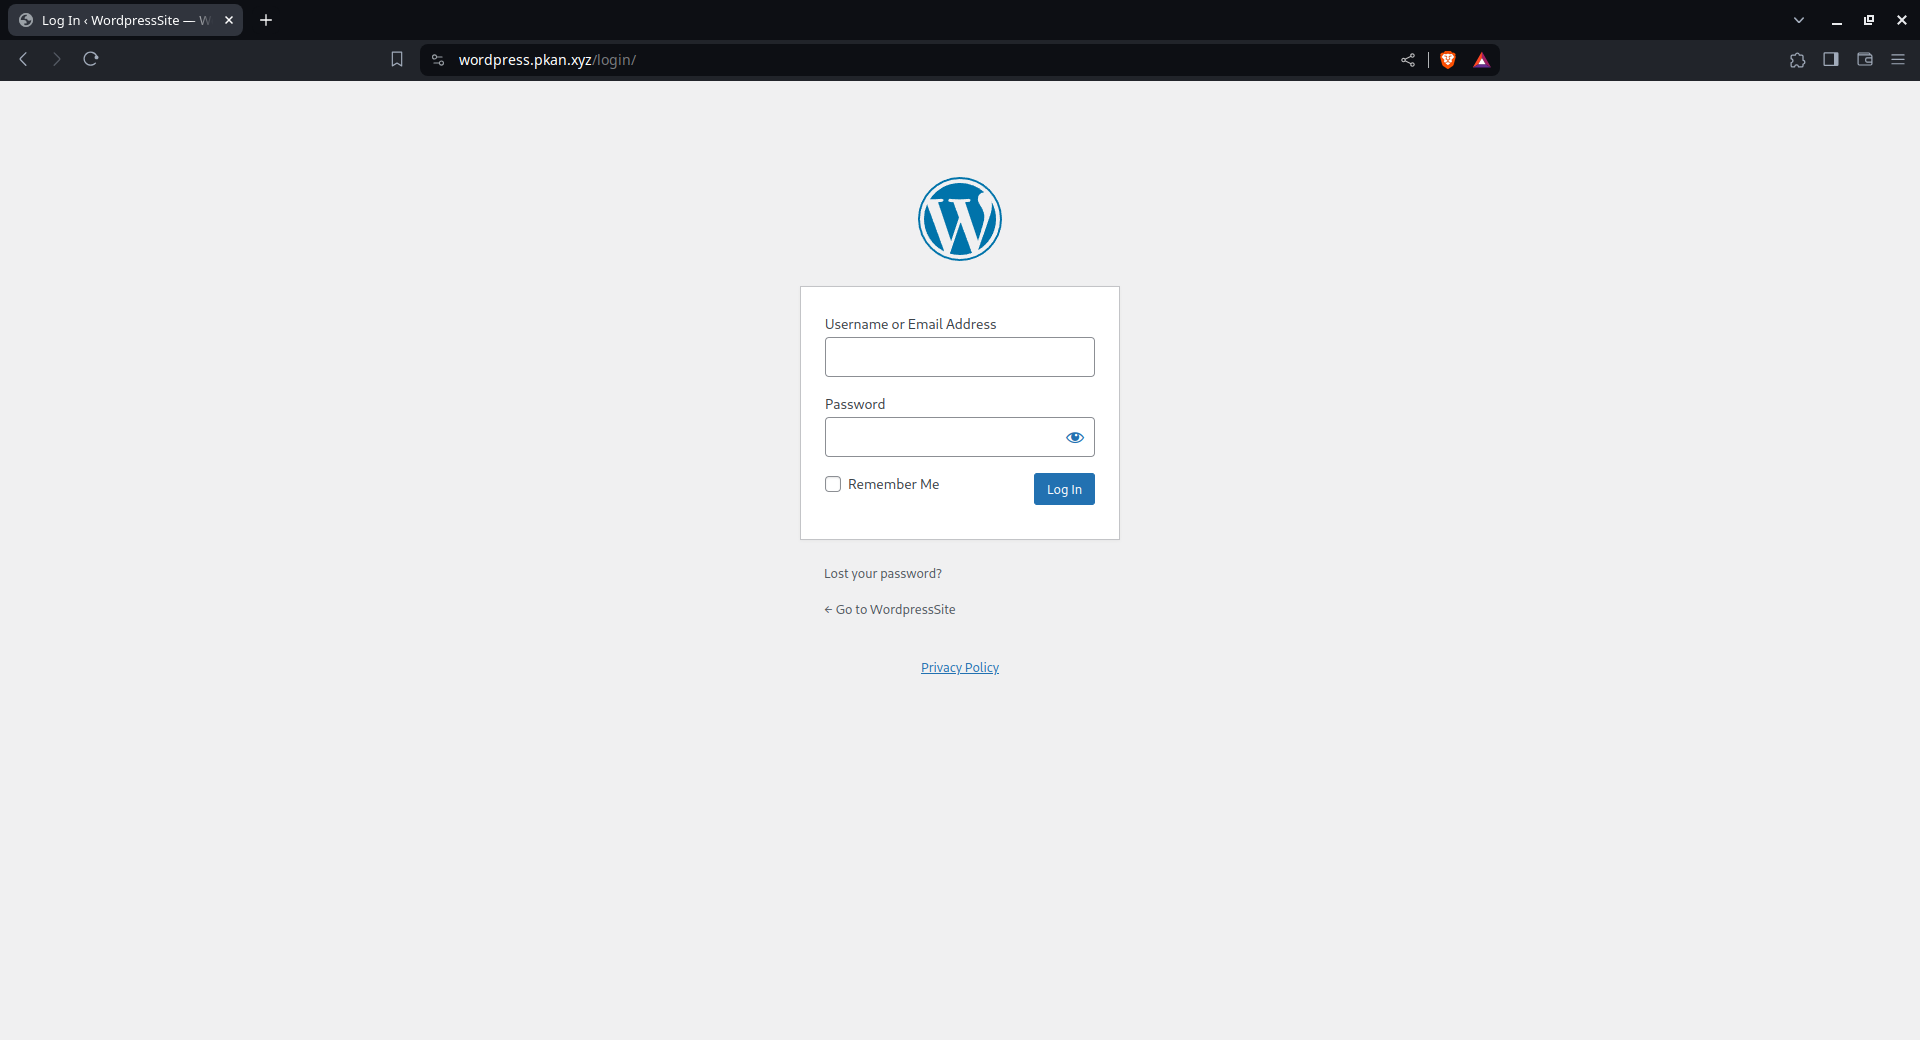
Step 2: Change wp-admin URL using a Plugin
Secure your WordPress site by changing the wp-admin URL with the help of a reliable plugin. Follow these steps:
- Login to your WordPress admin dashboard.
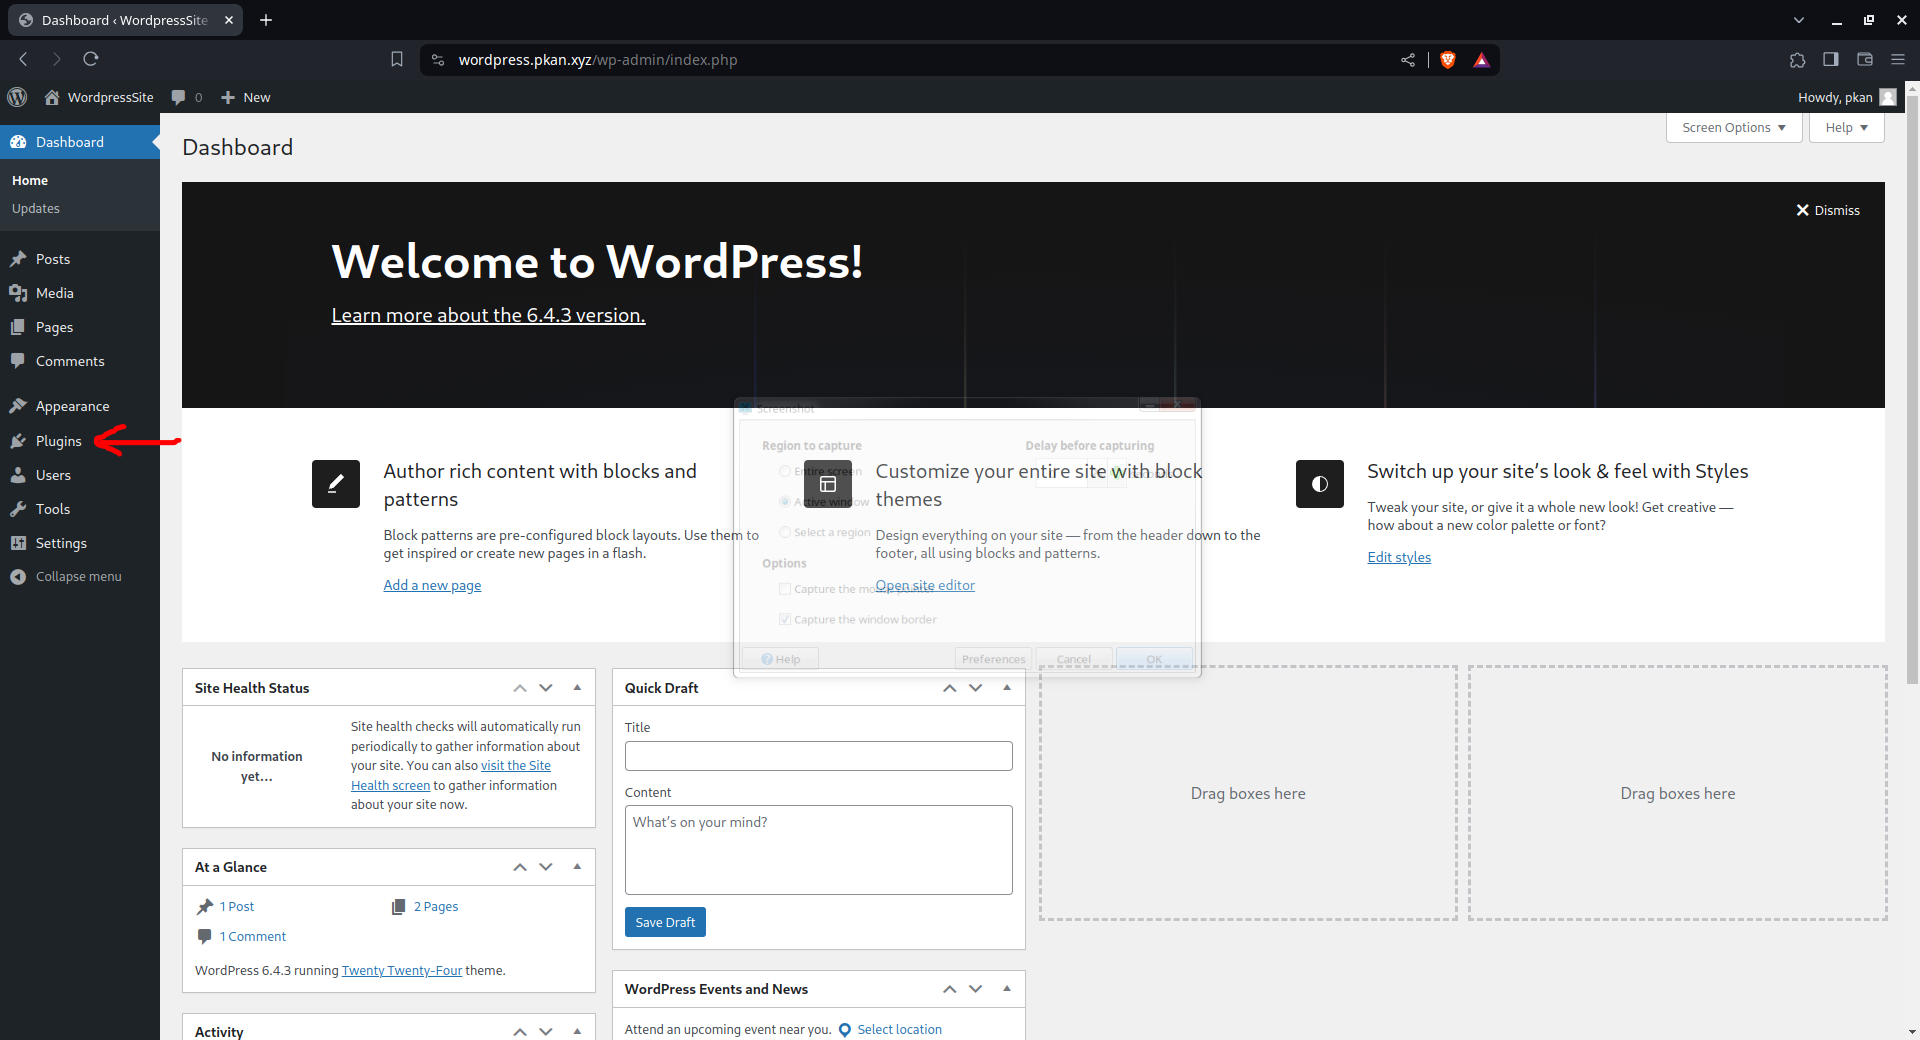
- Navigate to Plugins and click on Add New.
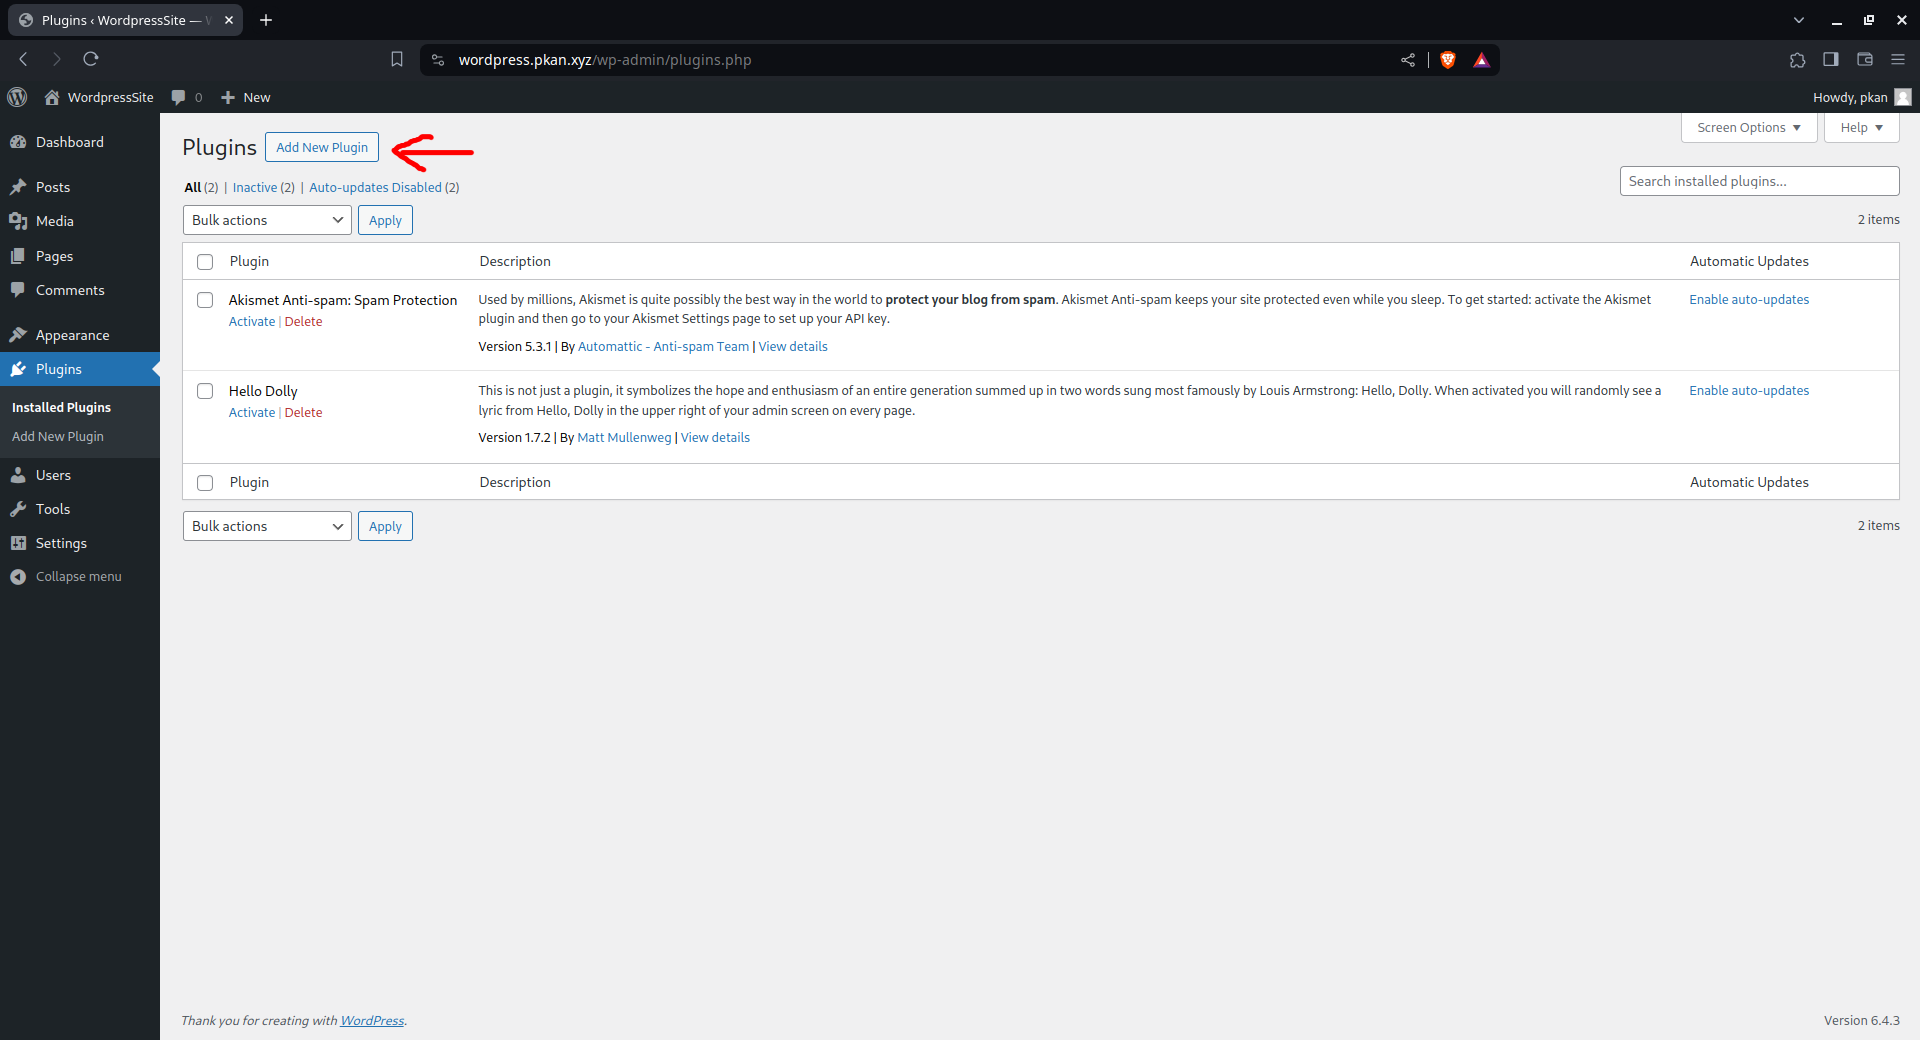
- In the search bar, type 'Change wp-admin URL' and hit enter.
- Choose a well-rated plugin that suits your requirements, such as 'Change wp-admin login.'
- Click Install Now and then Activate.
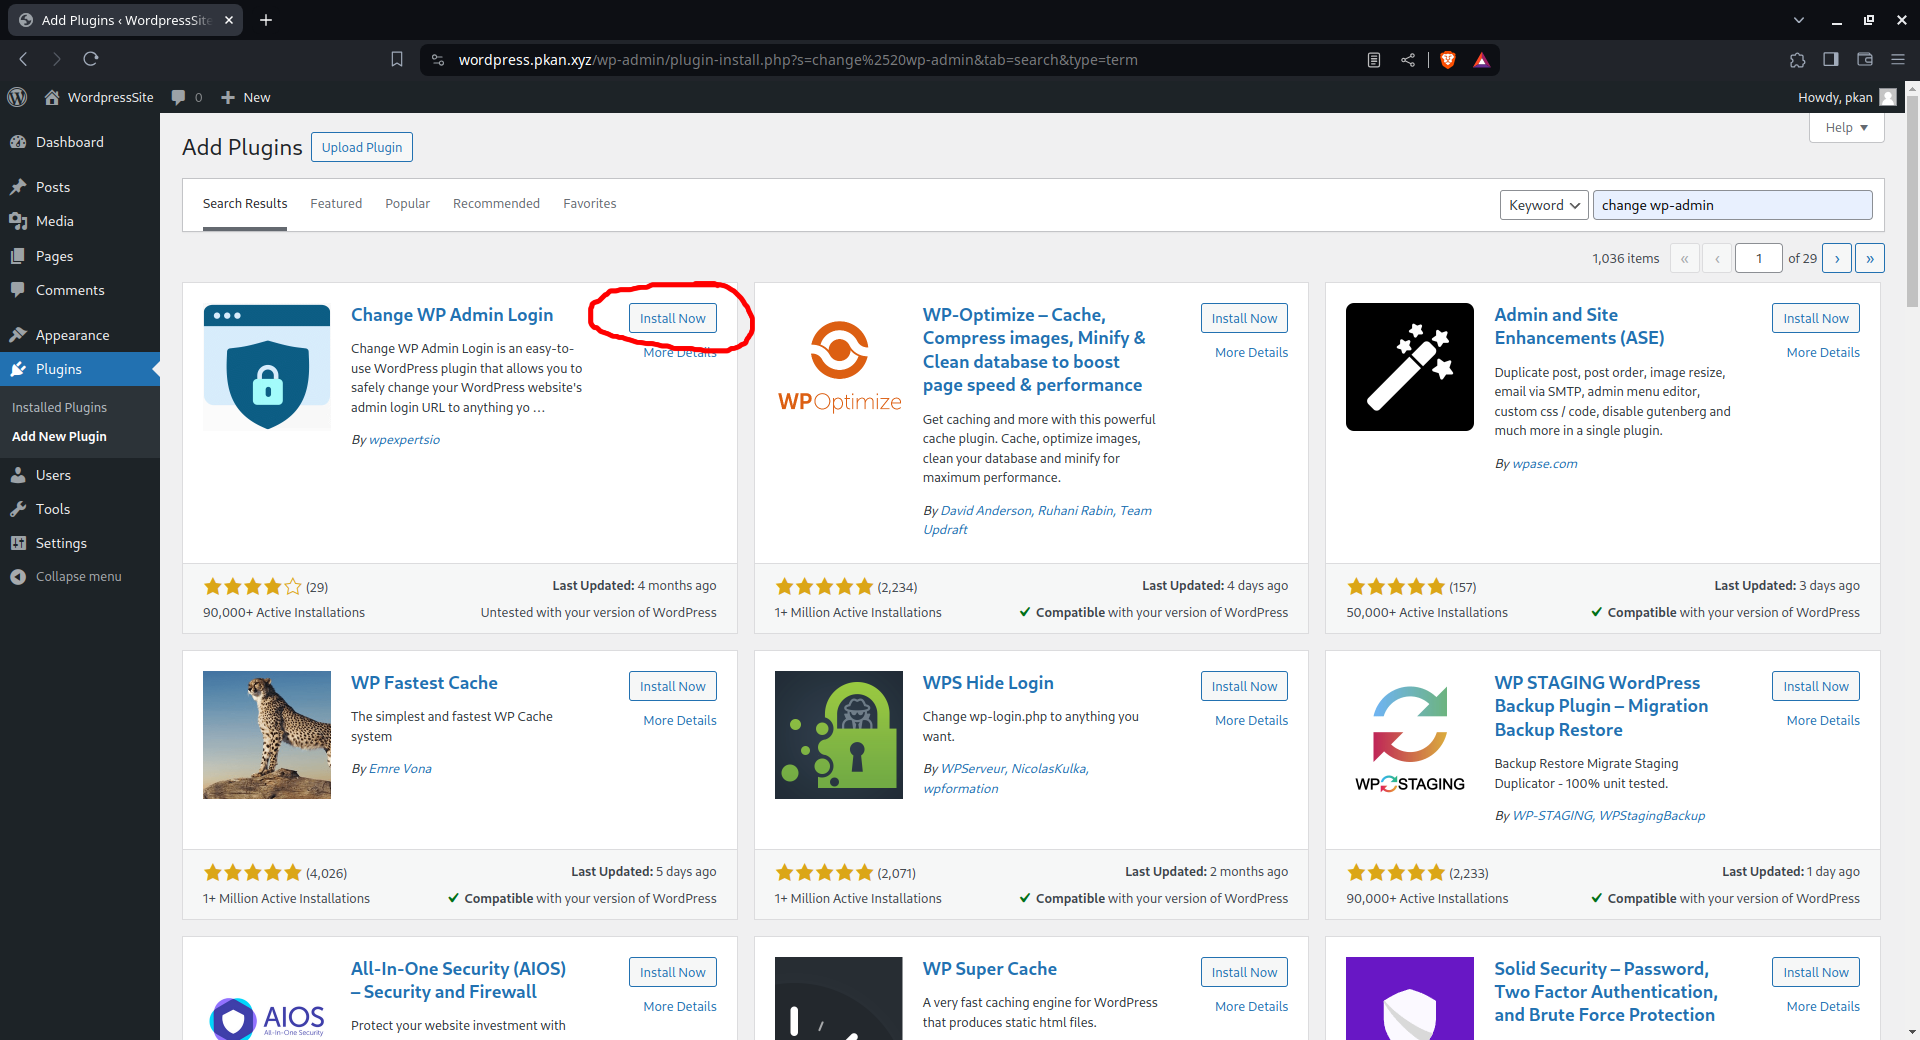
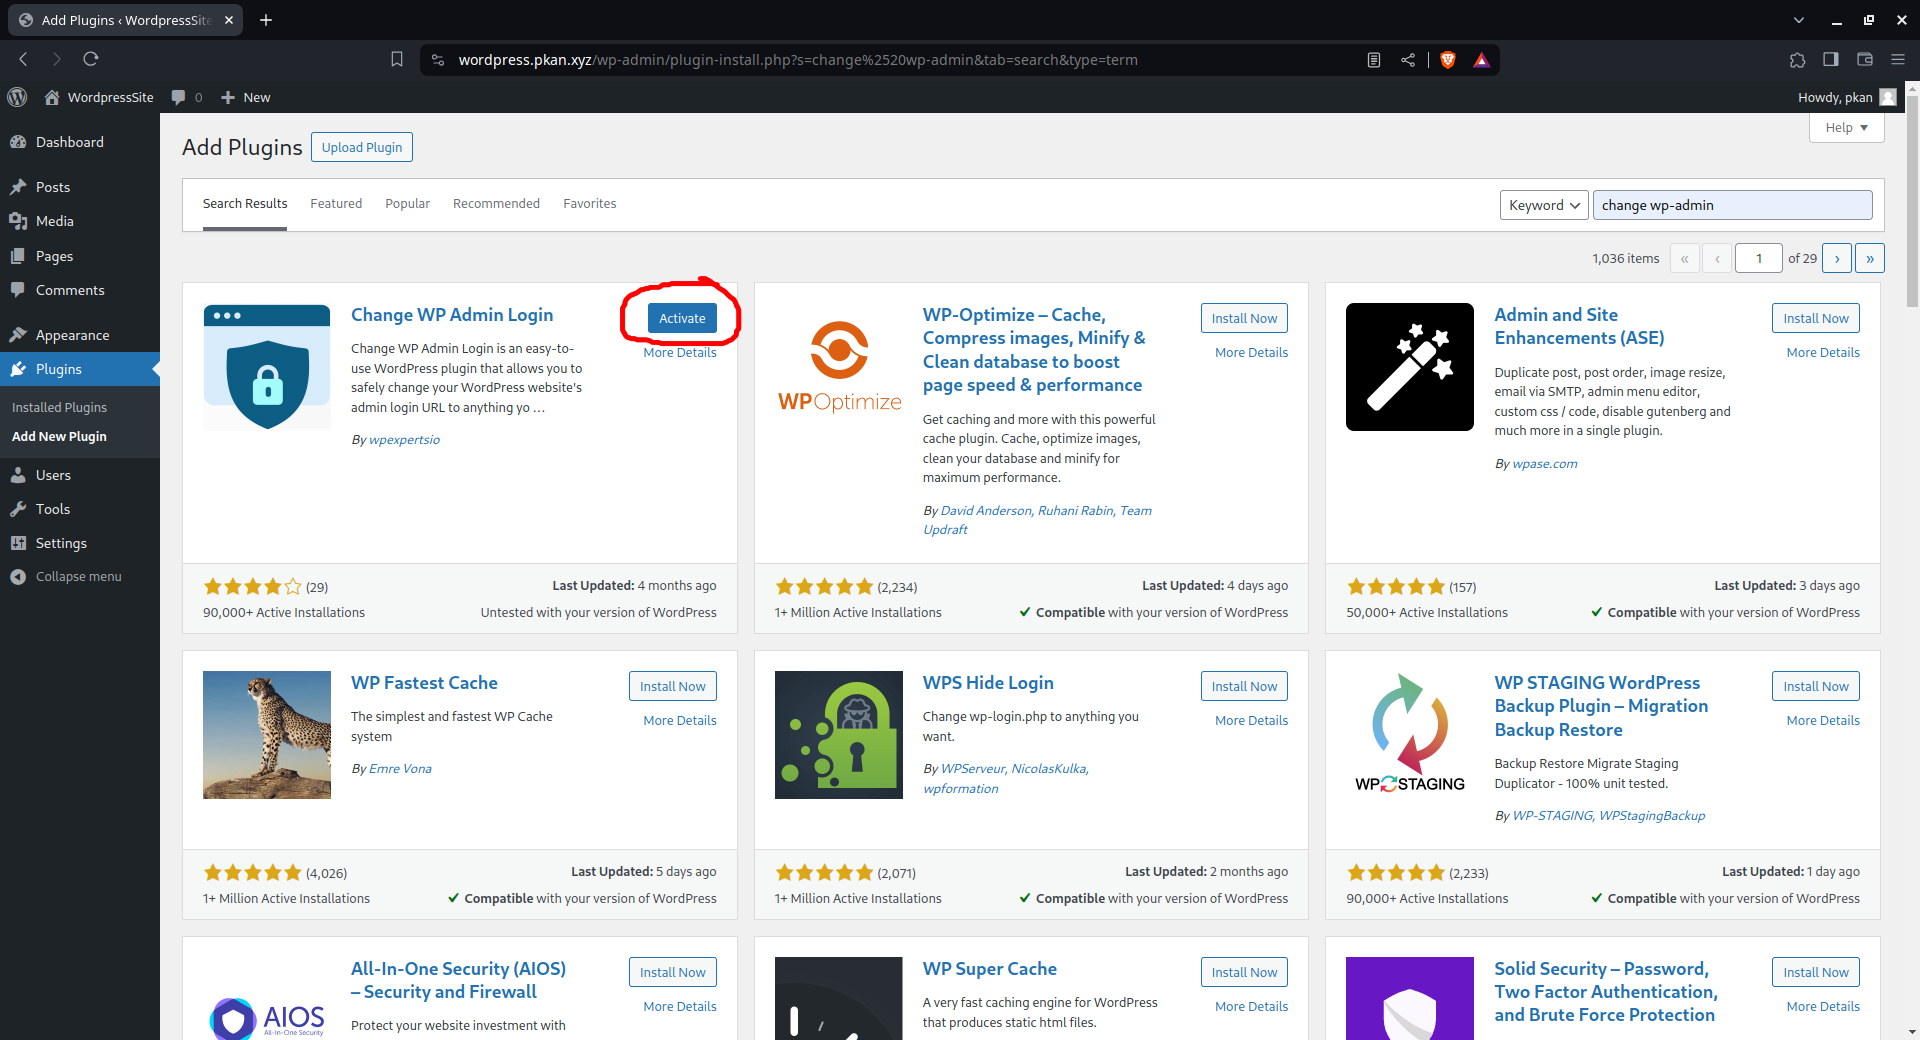
- Once Activated, Go to Settings and select Permalinks.
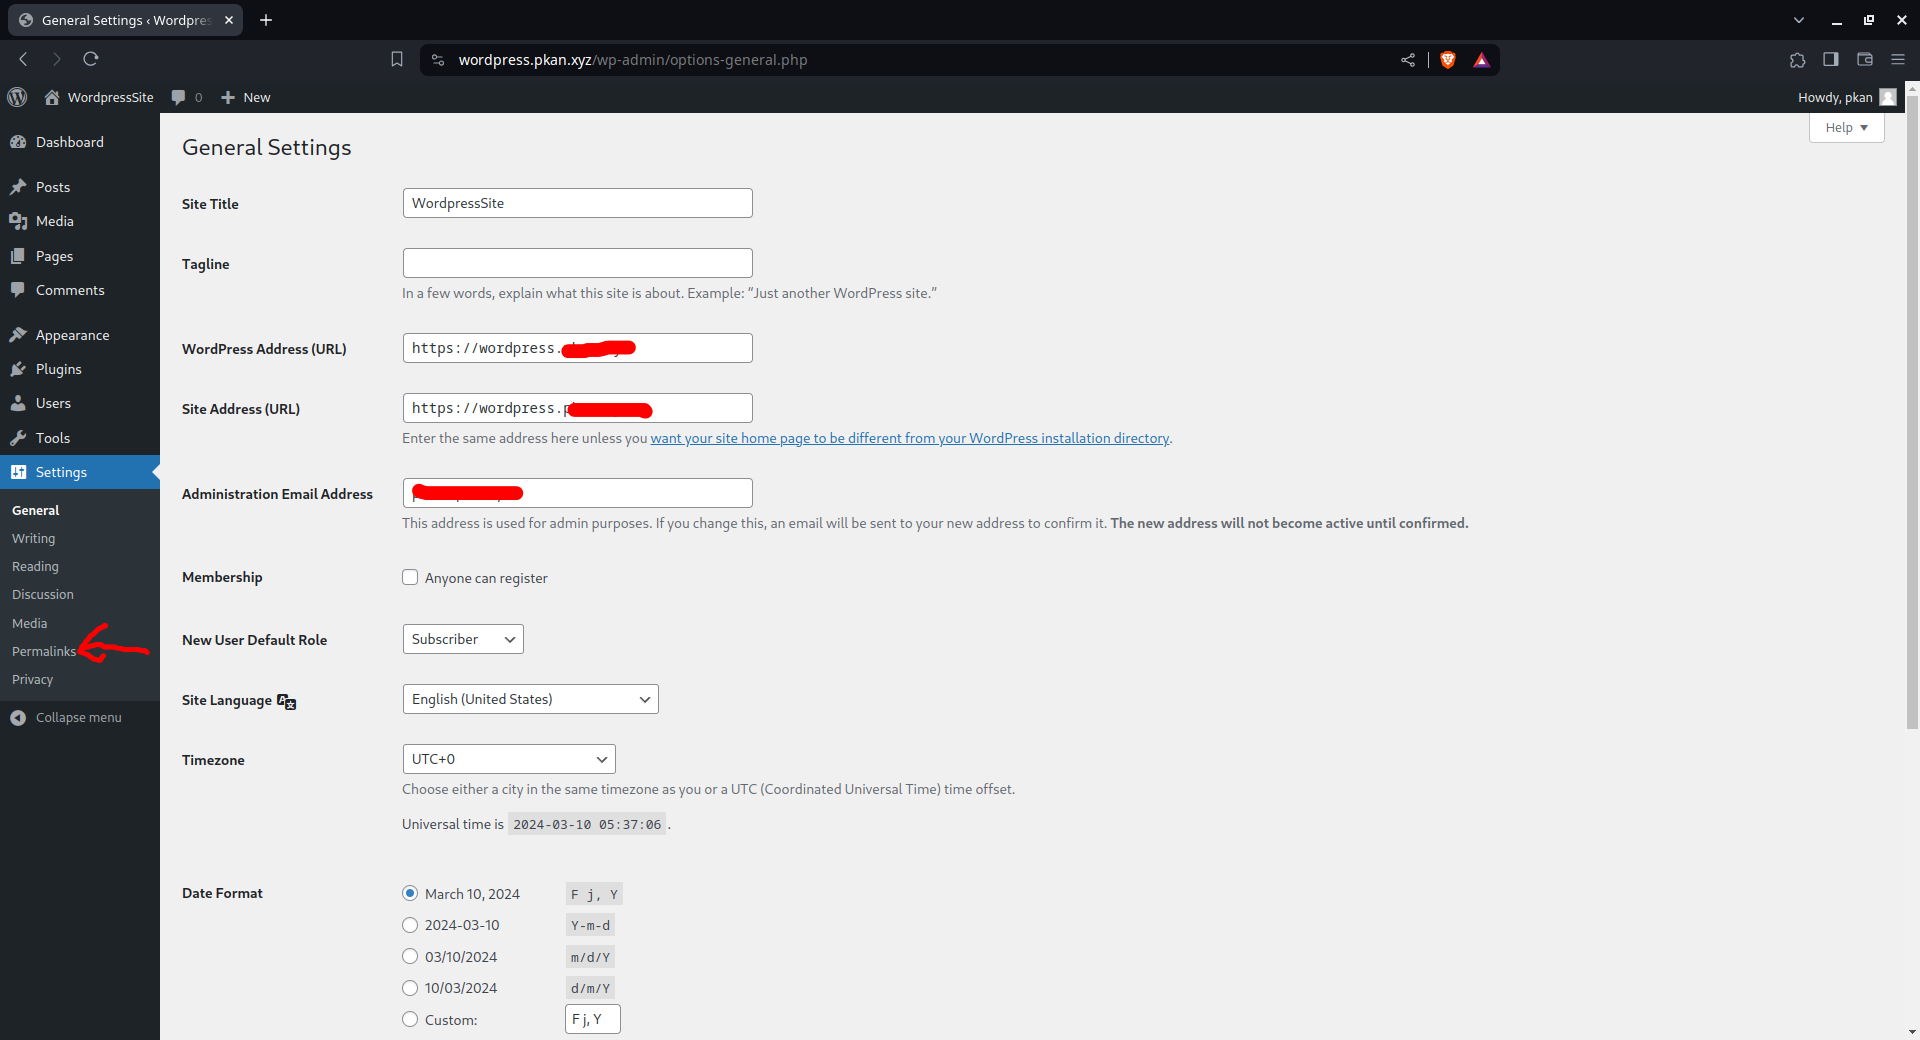
- In the Permalinks section, locate the Permalink Structure under Common Settings.
- Choose the Post Name option instead of the default.
- Scroll down to find the 'Change wp-admin login' section.
- Enter your desired custom login link in the provided field.
- Save the changes.
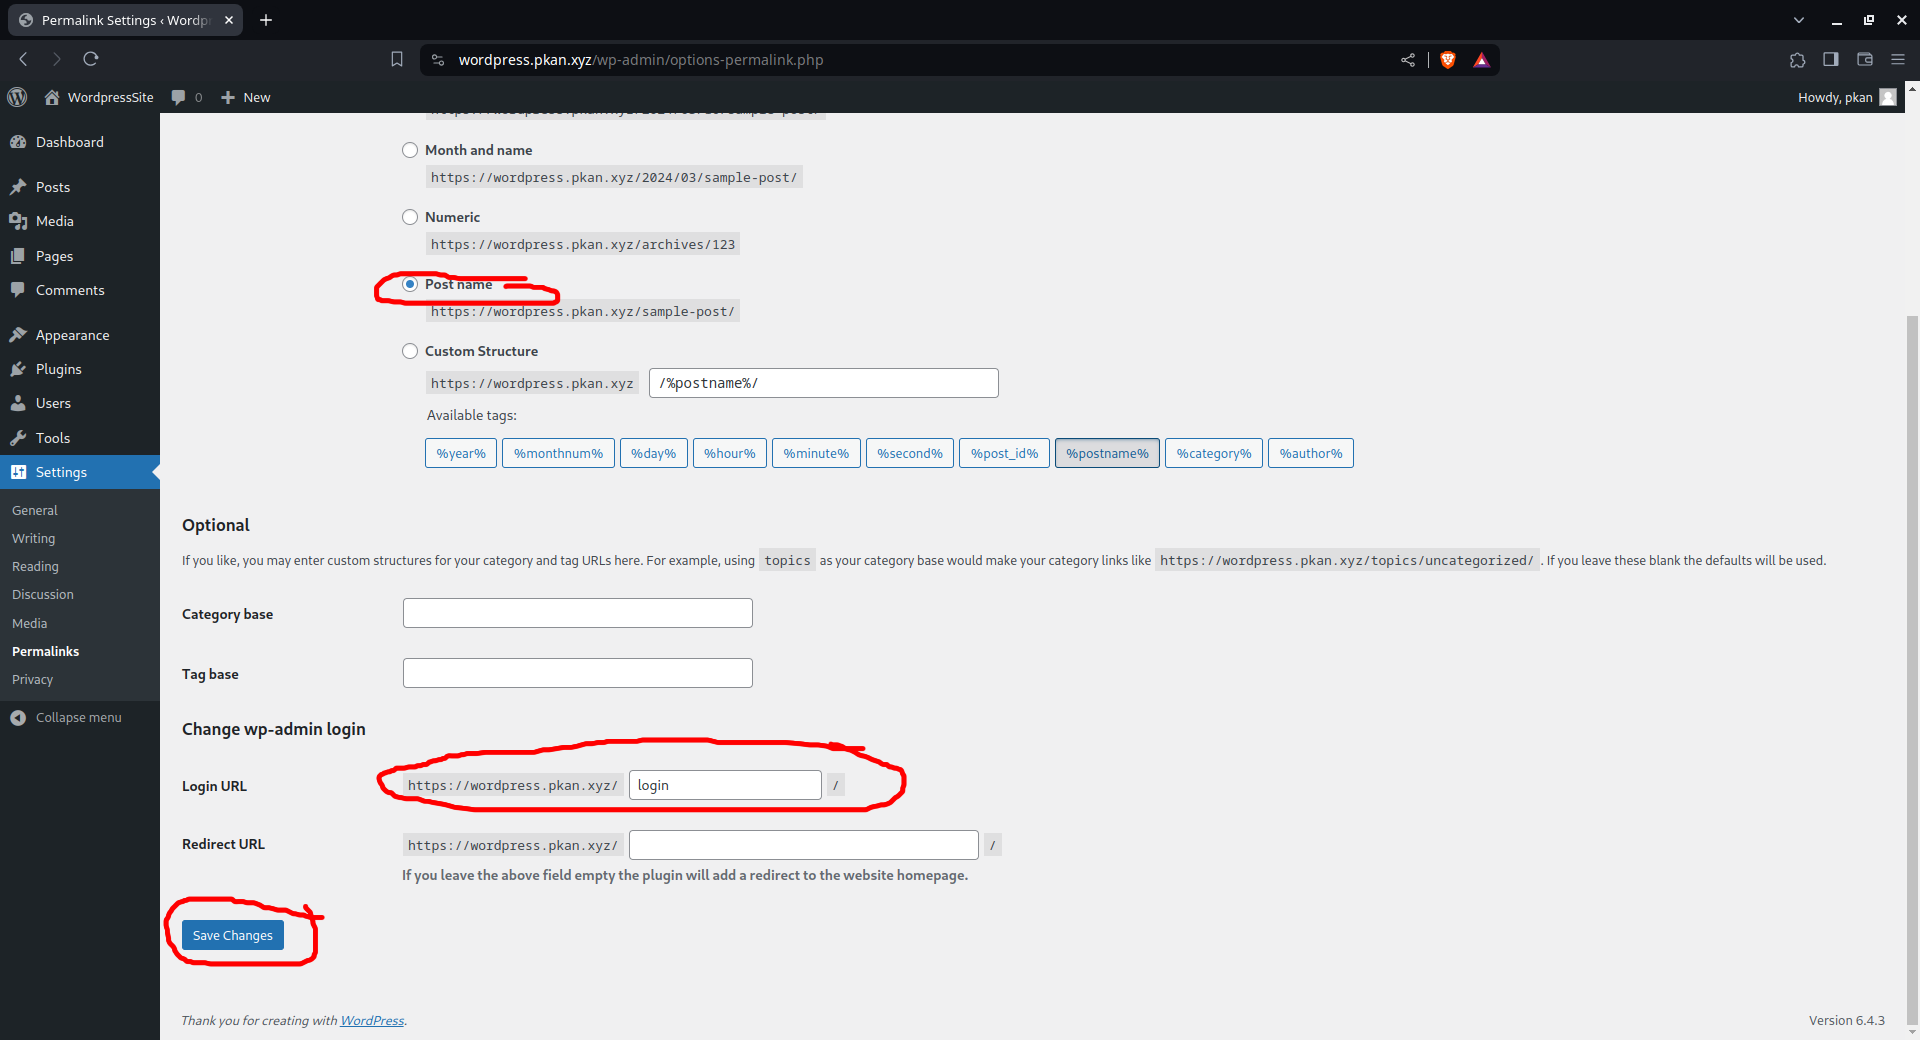
Now, your wp-admin URL is changed, providing an additional layer of security to your WordPress login page.
Step 3: Setup 2FA in WordPress using WP 2FA Plugin
Enhance the security of your WordPress login by implementing Two-Factor Authentication (2FA). Follow these steps to set up 2FA using the 'WP 2FA' plugin:
- Login to your WordPress admin dashboard.
- Navigate to Plugins and click on Add New.
- In the search bar, type 'WP 2FA' and hit enter.
- Choose the 'WP 2FA ‐ Two-factor authentication for WordPress' plugin.
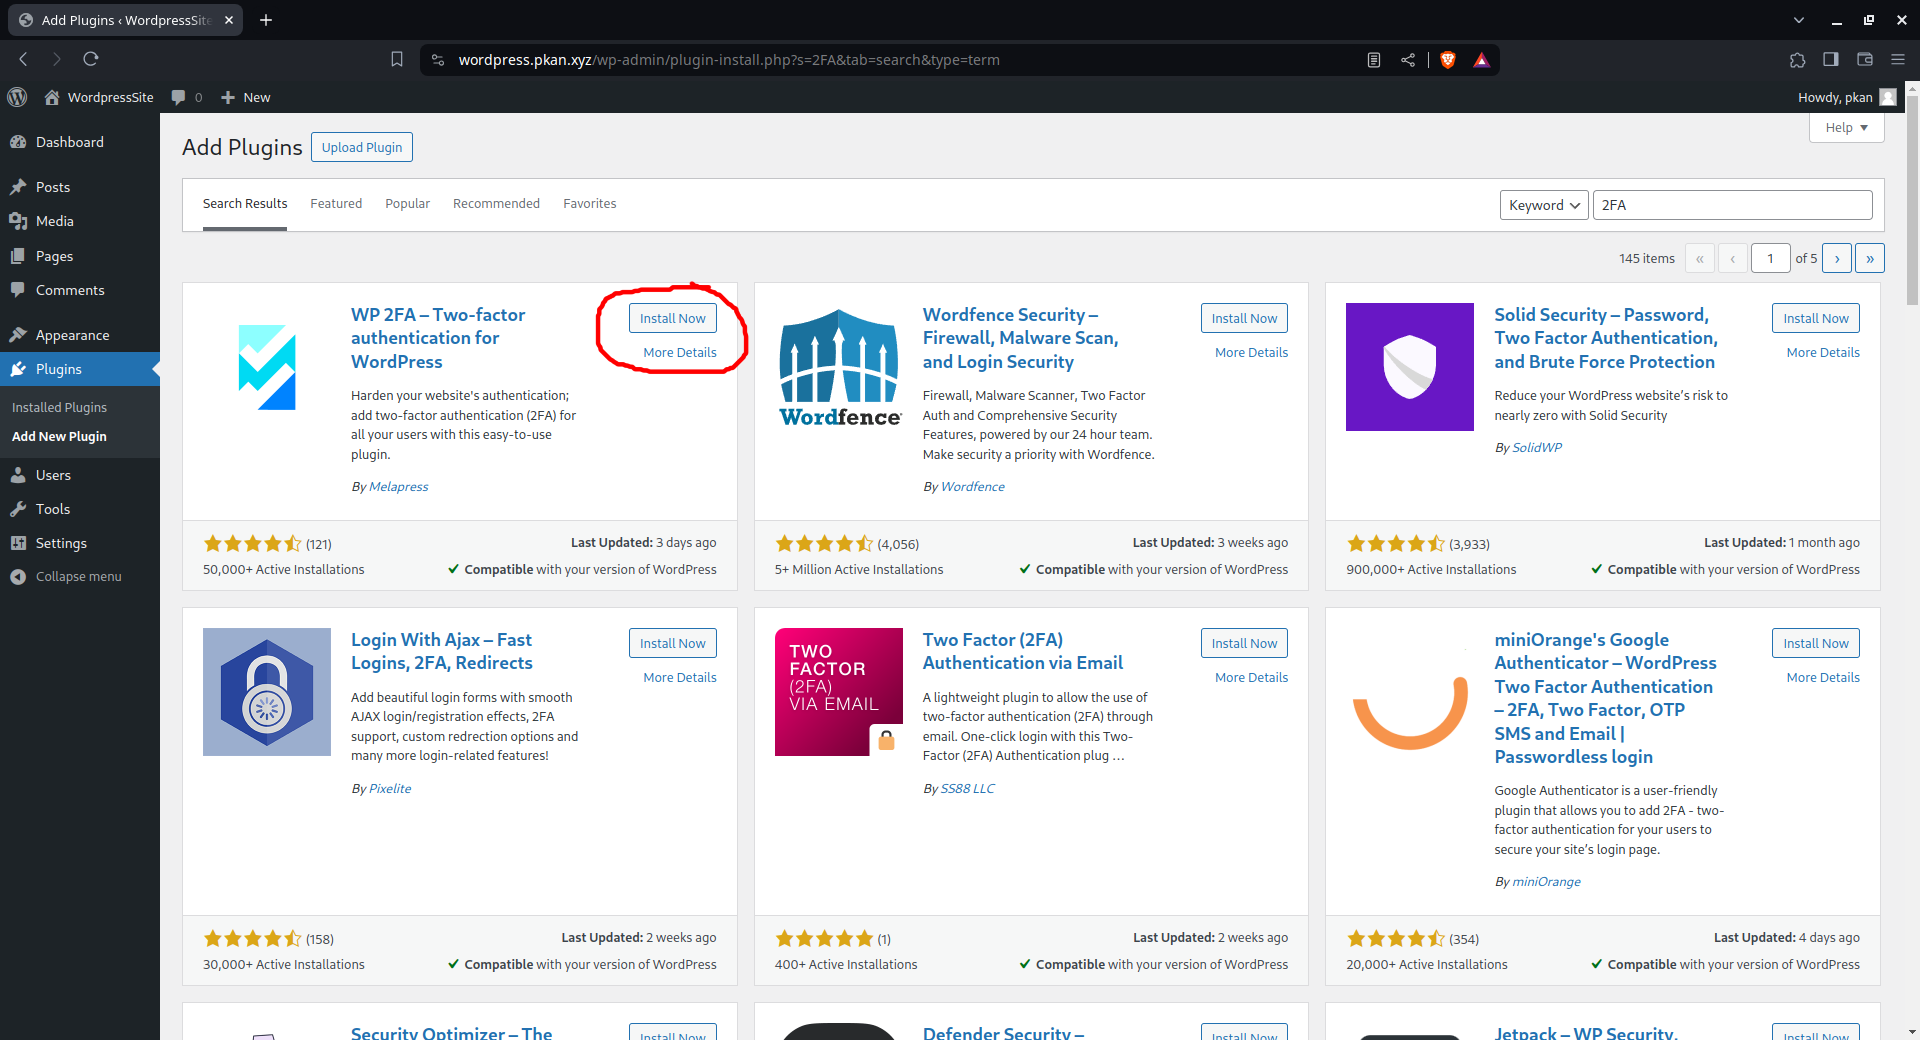
- Click Install Now and then Activate.
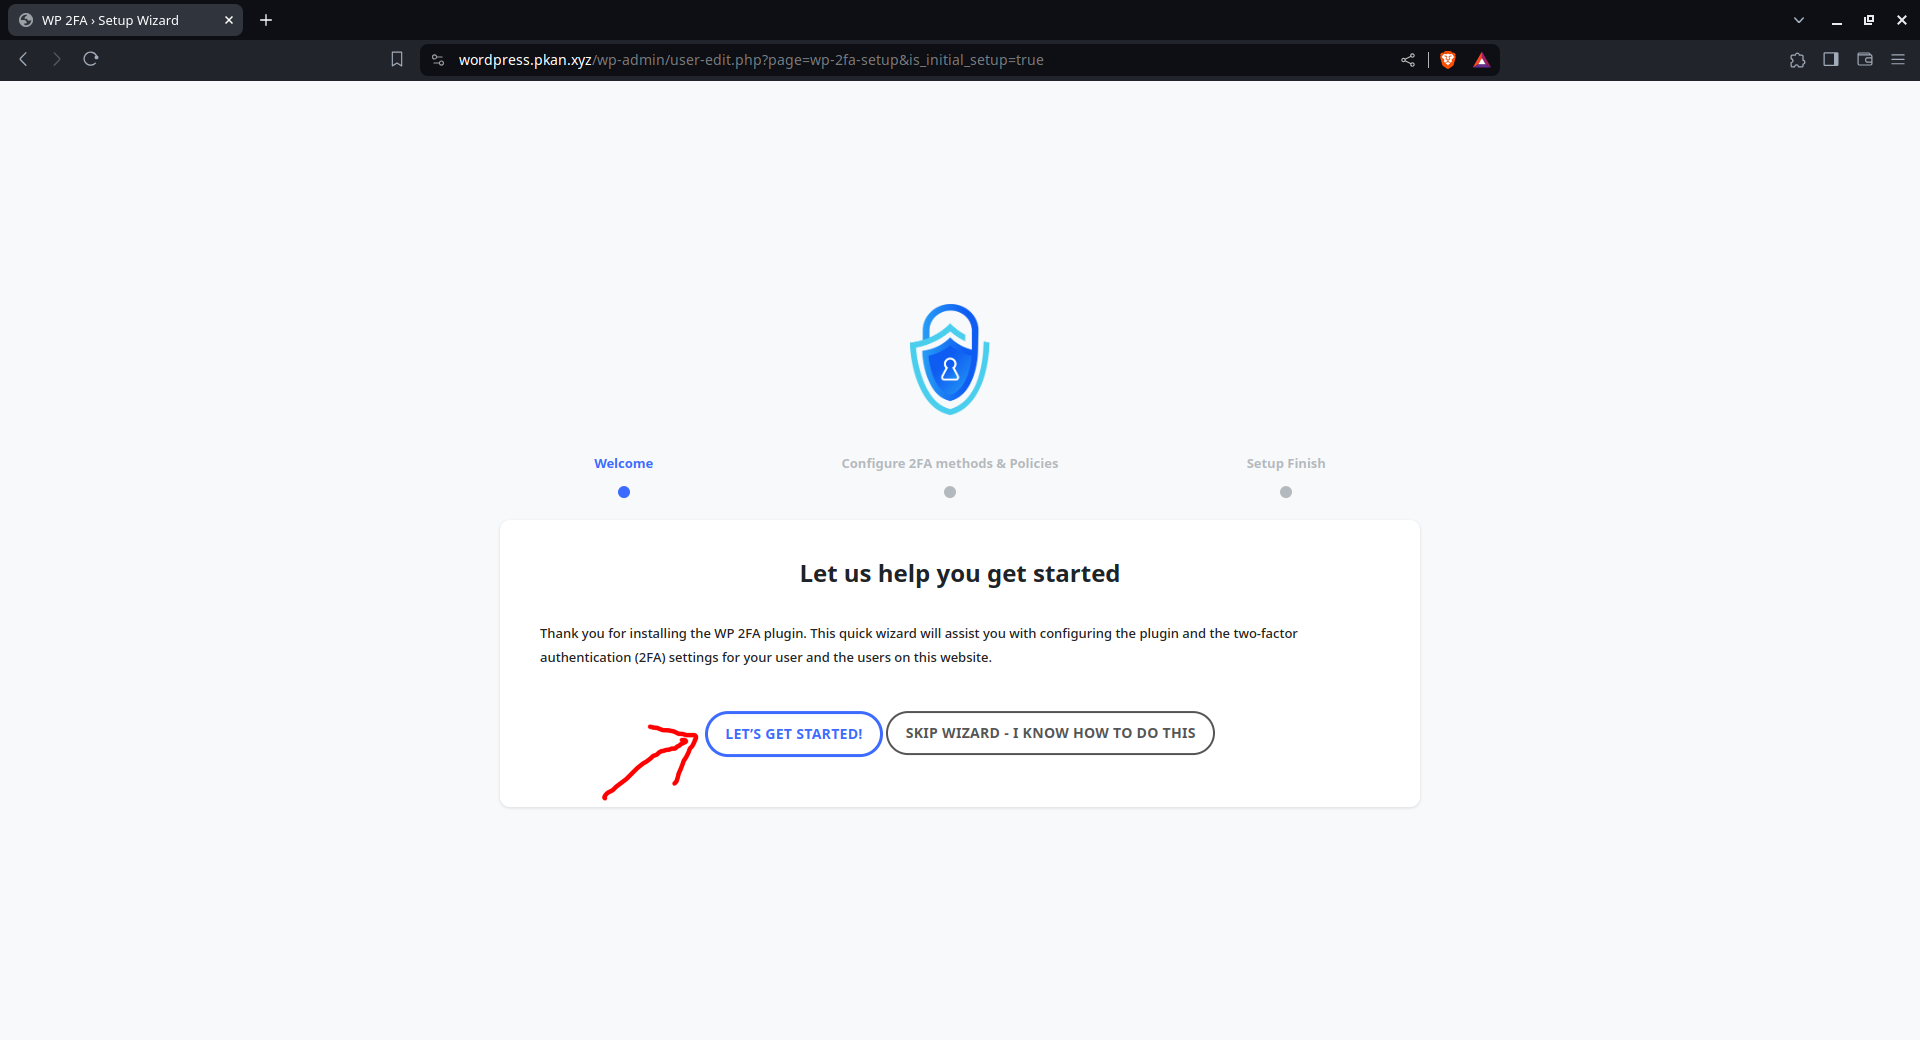
- Once activated, you may be prompted with a first activation setup wizard.
- Follow the on-screen instructions provided by the plugin for the initial configuration.
- Complete the first activation setup according to your preferences.
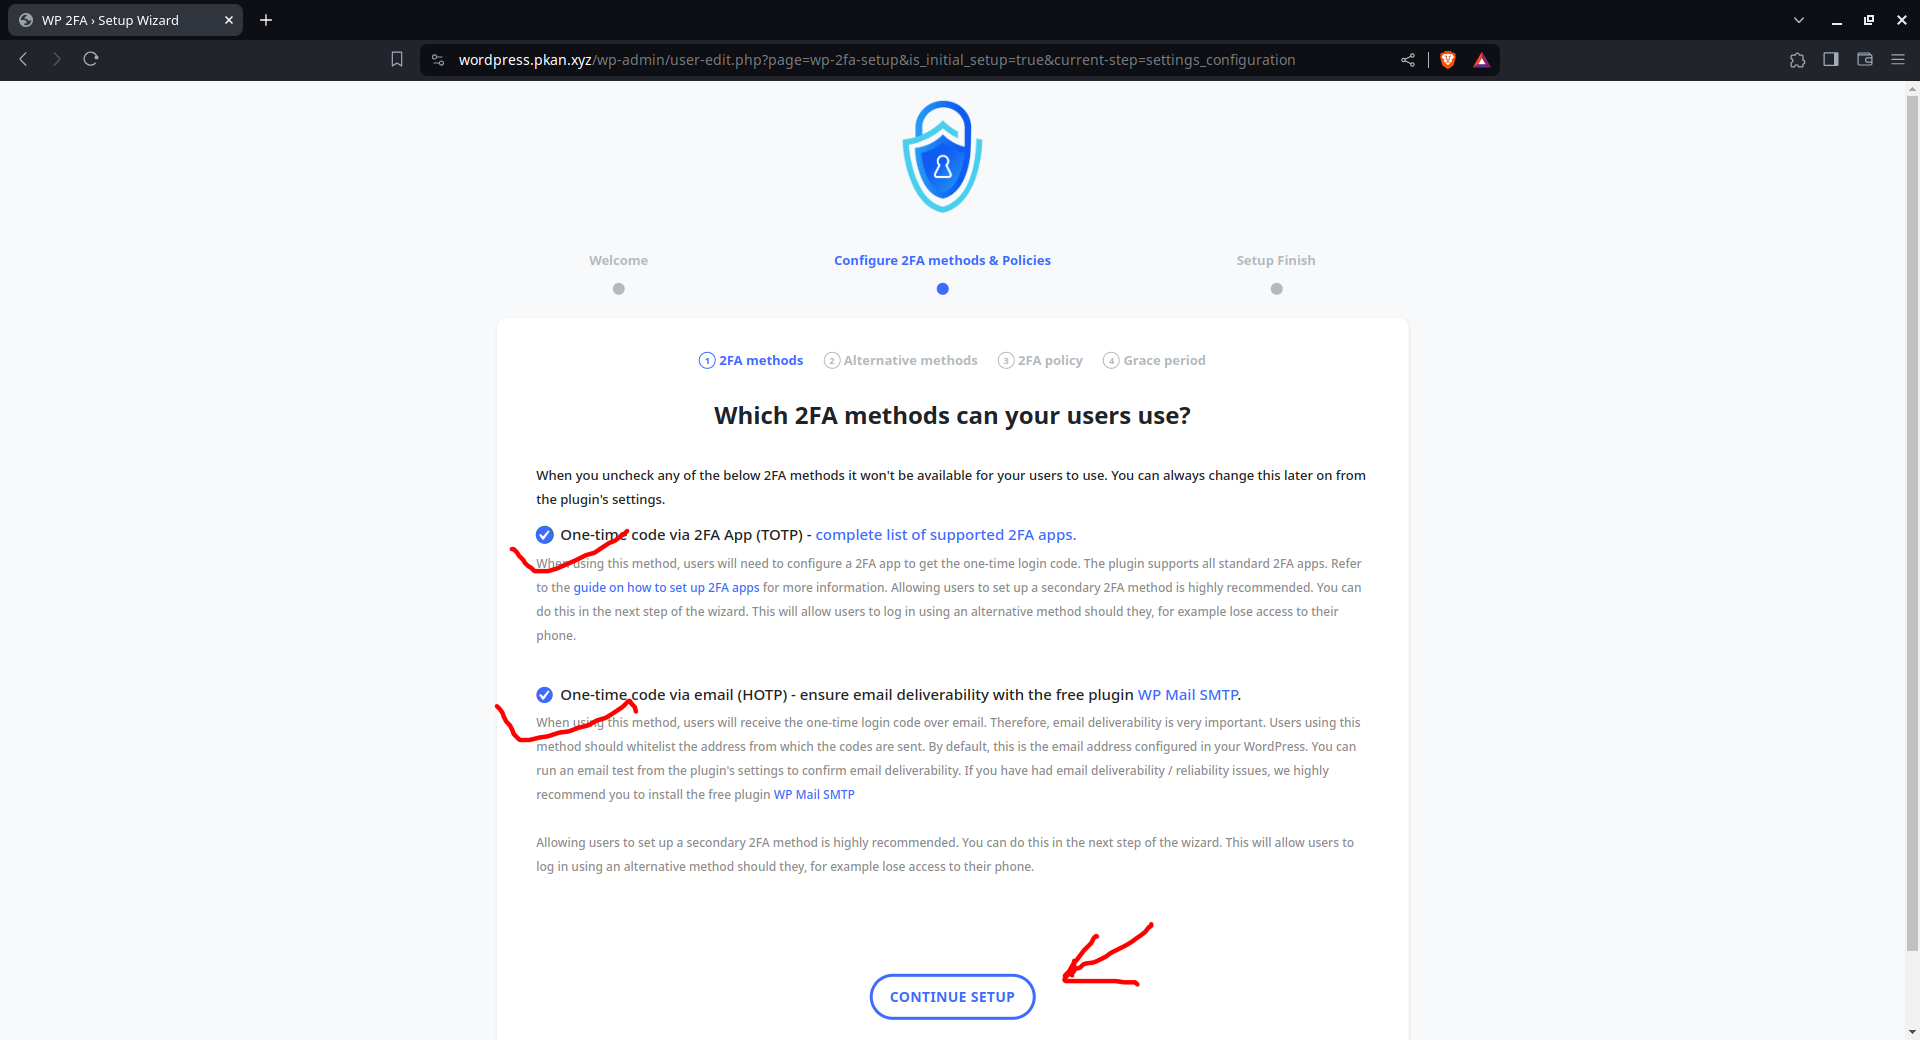
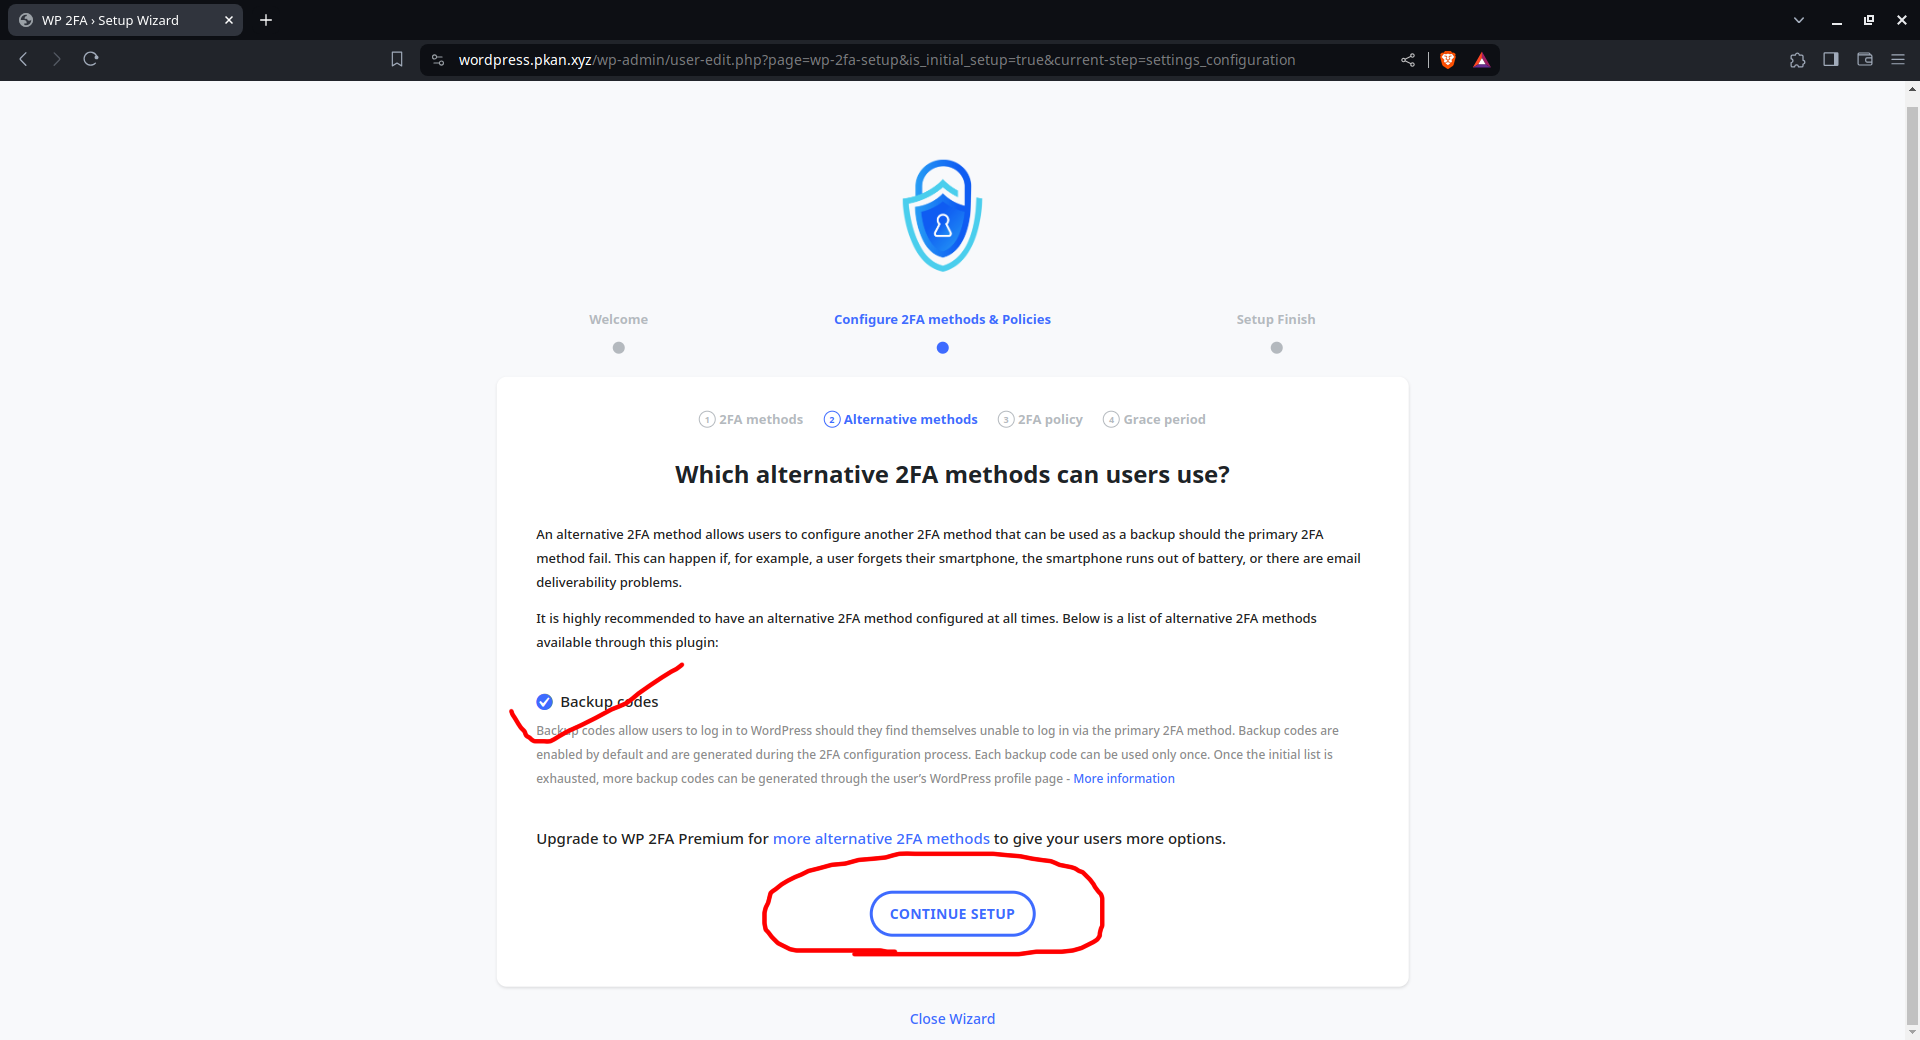
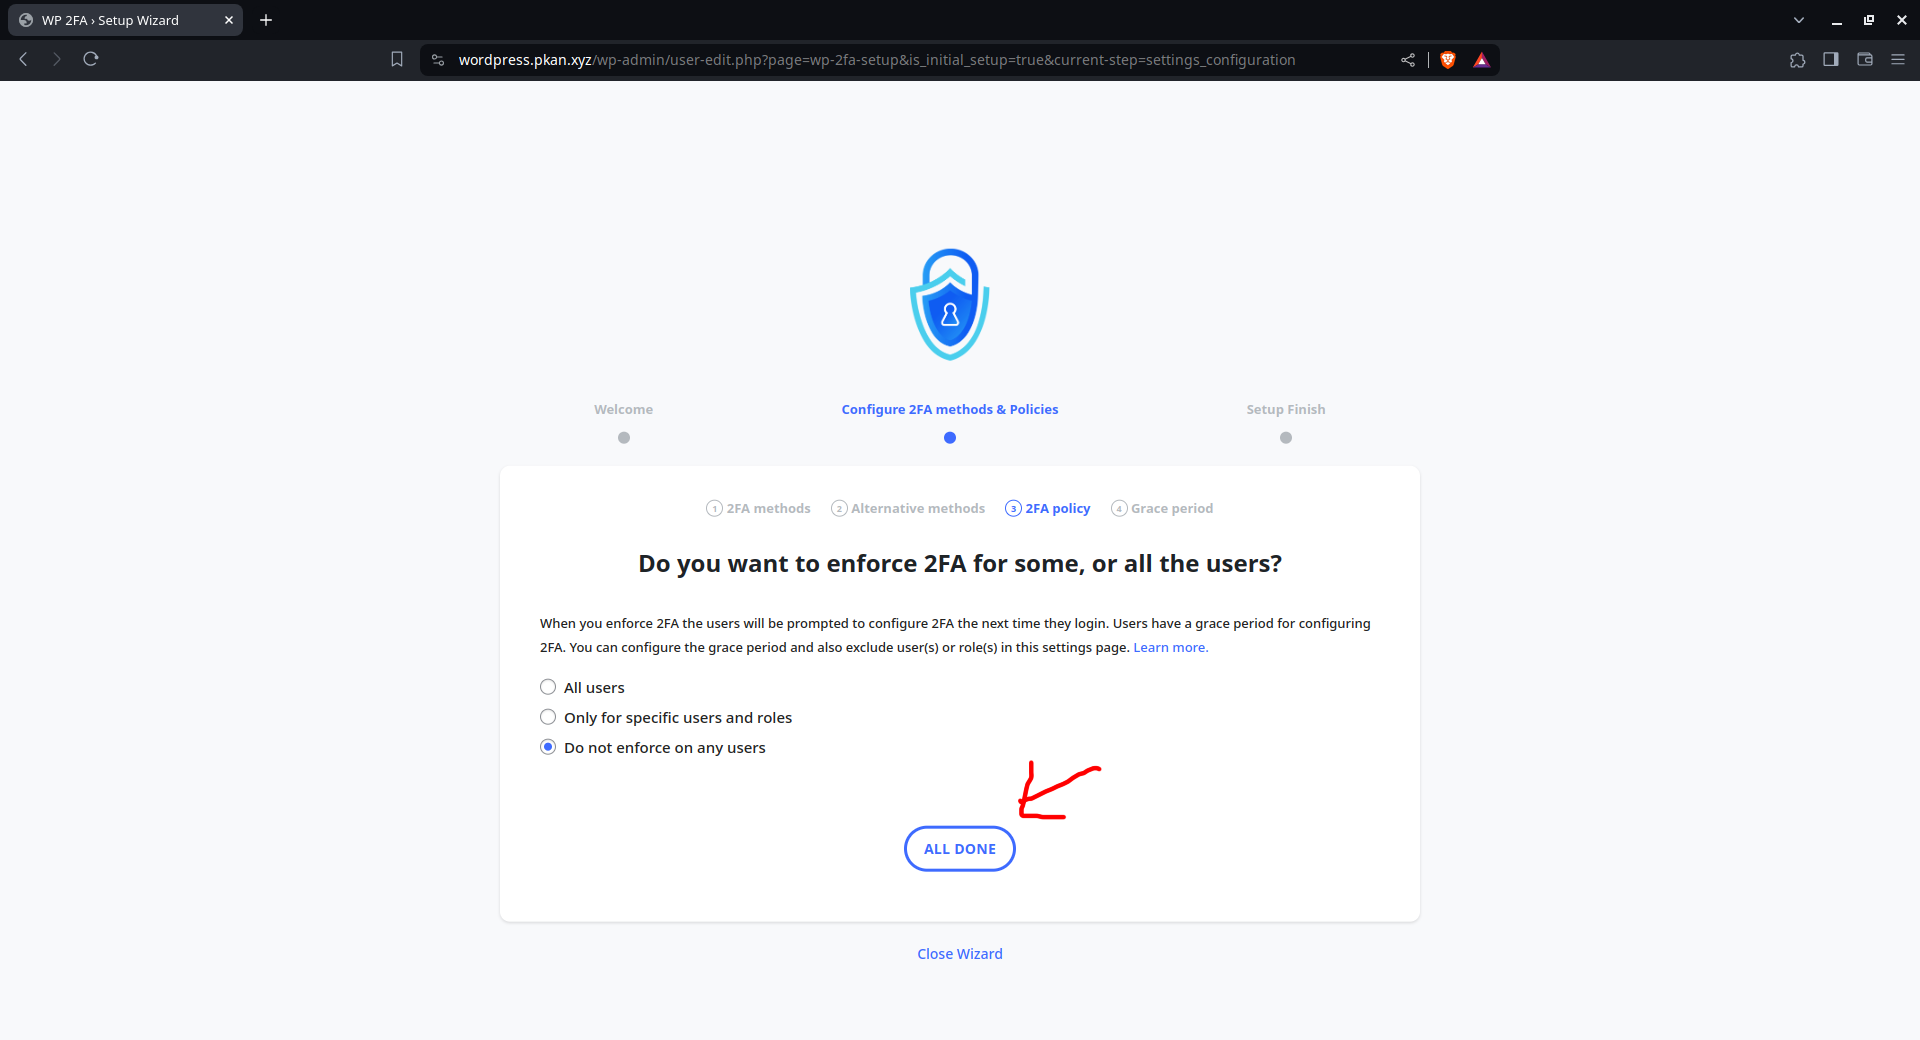
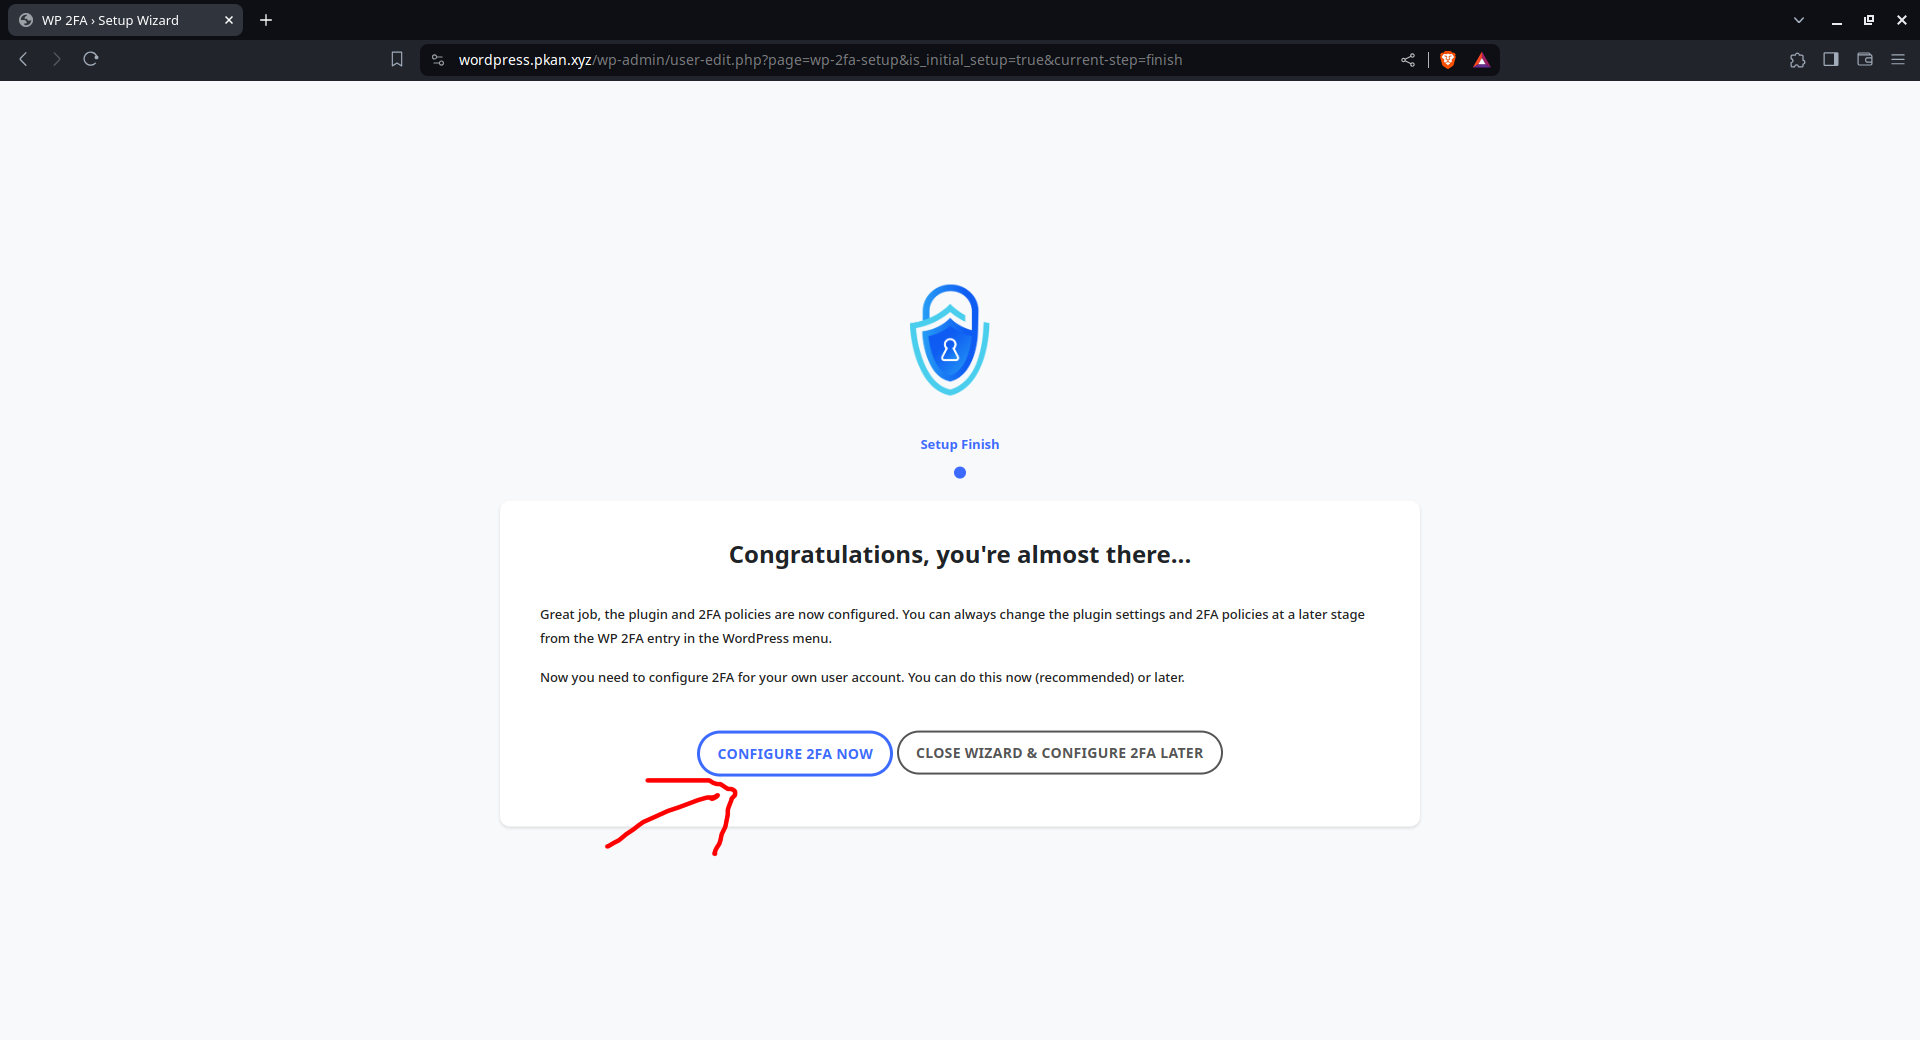
- Once the first activation setup is done, choose to configure 2FA for the current admin user.
- Follow the on-screen prompts to choose the authentication factor. In this case, select the 'Mobile App' option.
- Follow the setup instructions provided by the plugin for configuring 2FA using the mobile app.
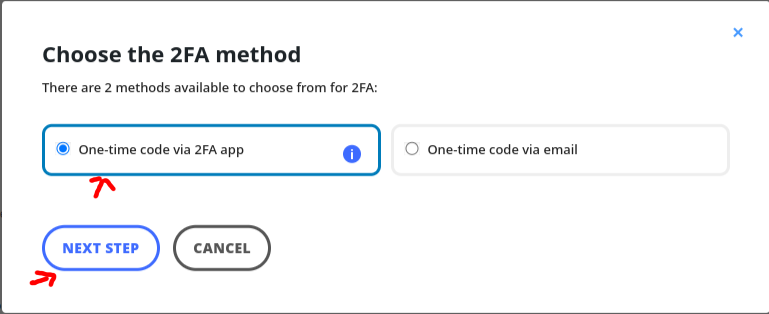
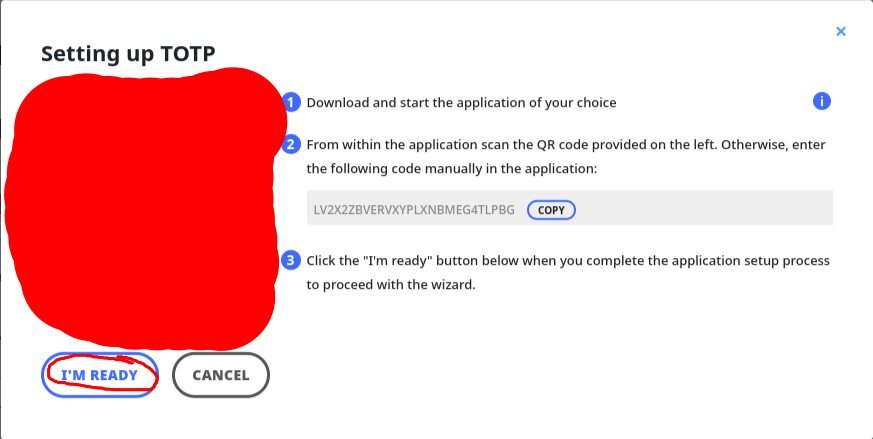
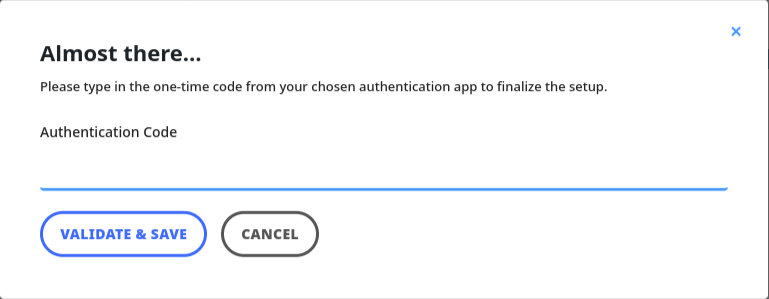
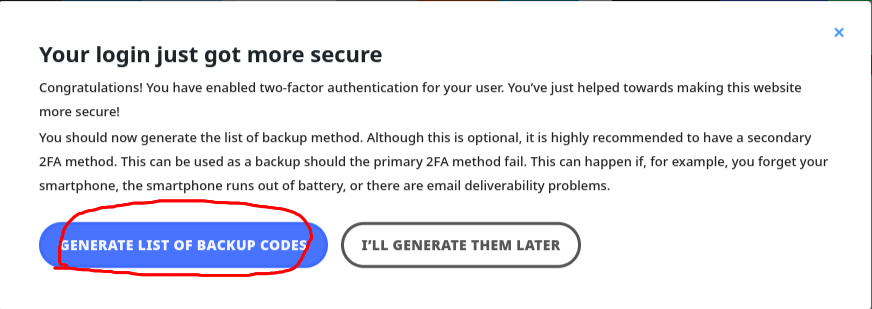
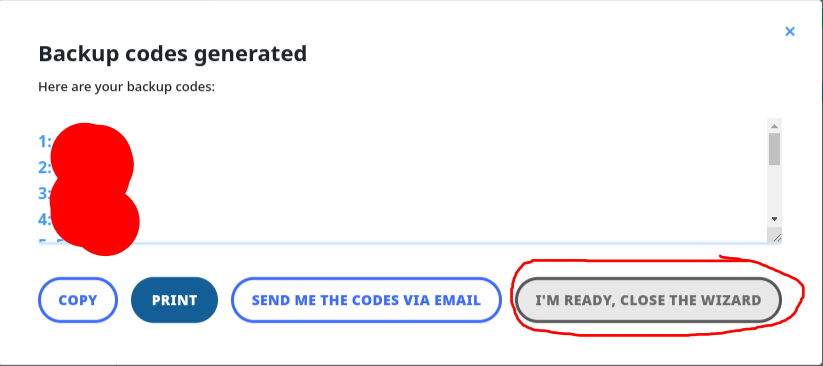
- After following the instructions, your Two-Factor Authentication is configured,
adding an extra layer of security to your WordPress site.
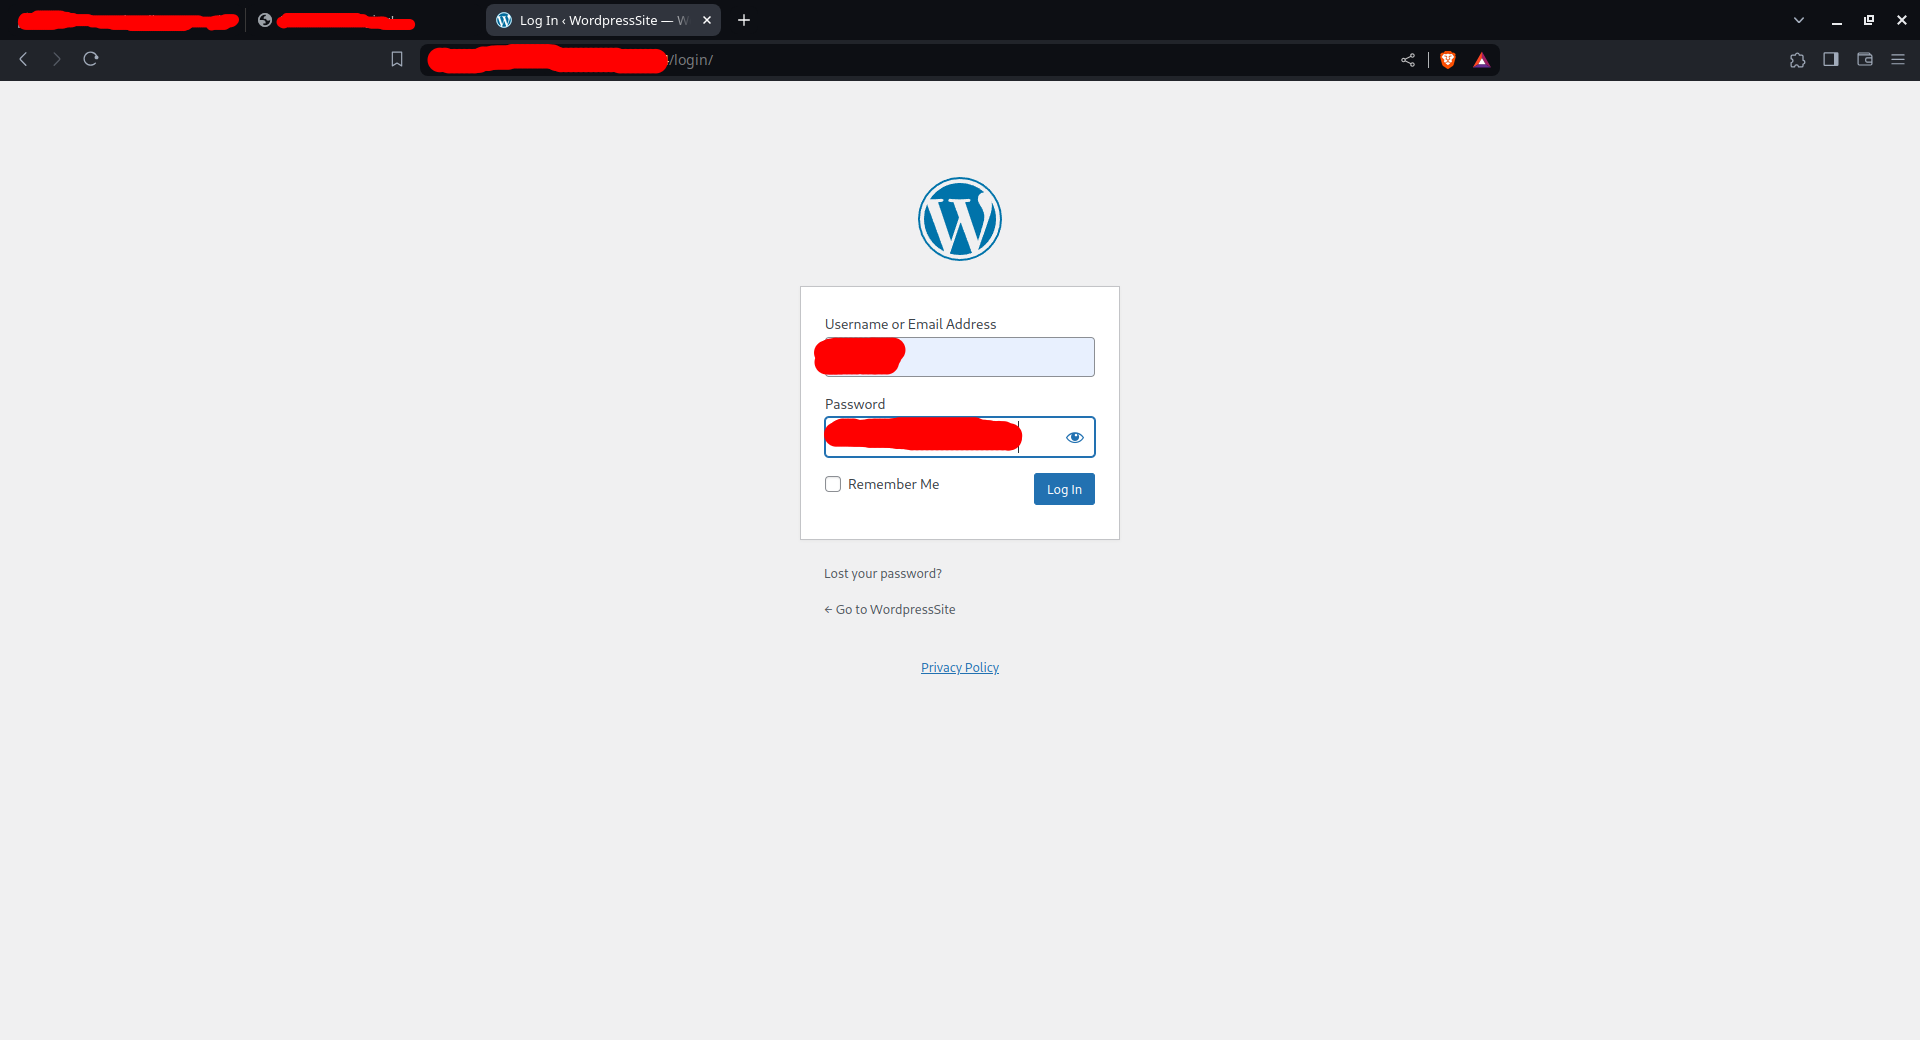
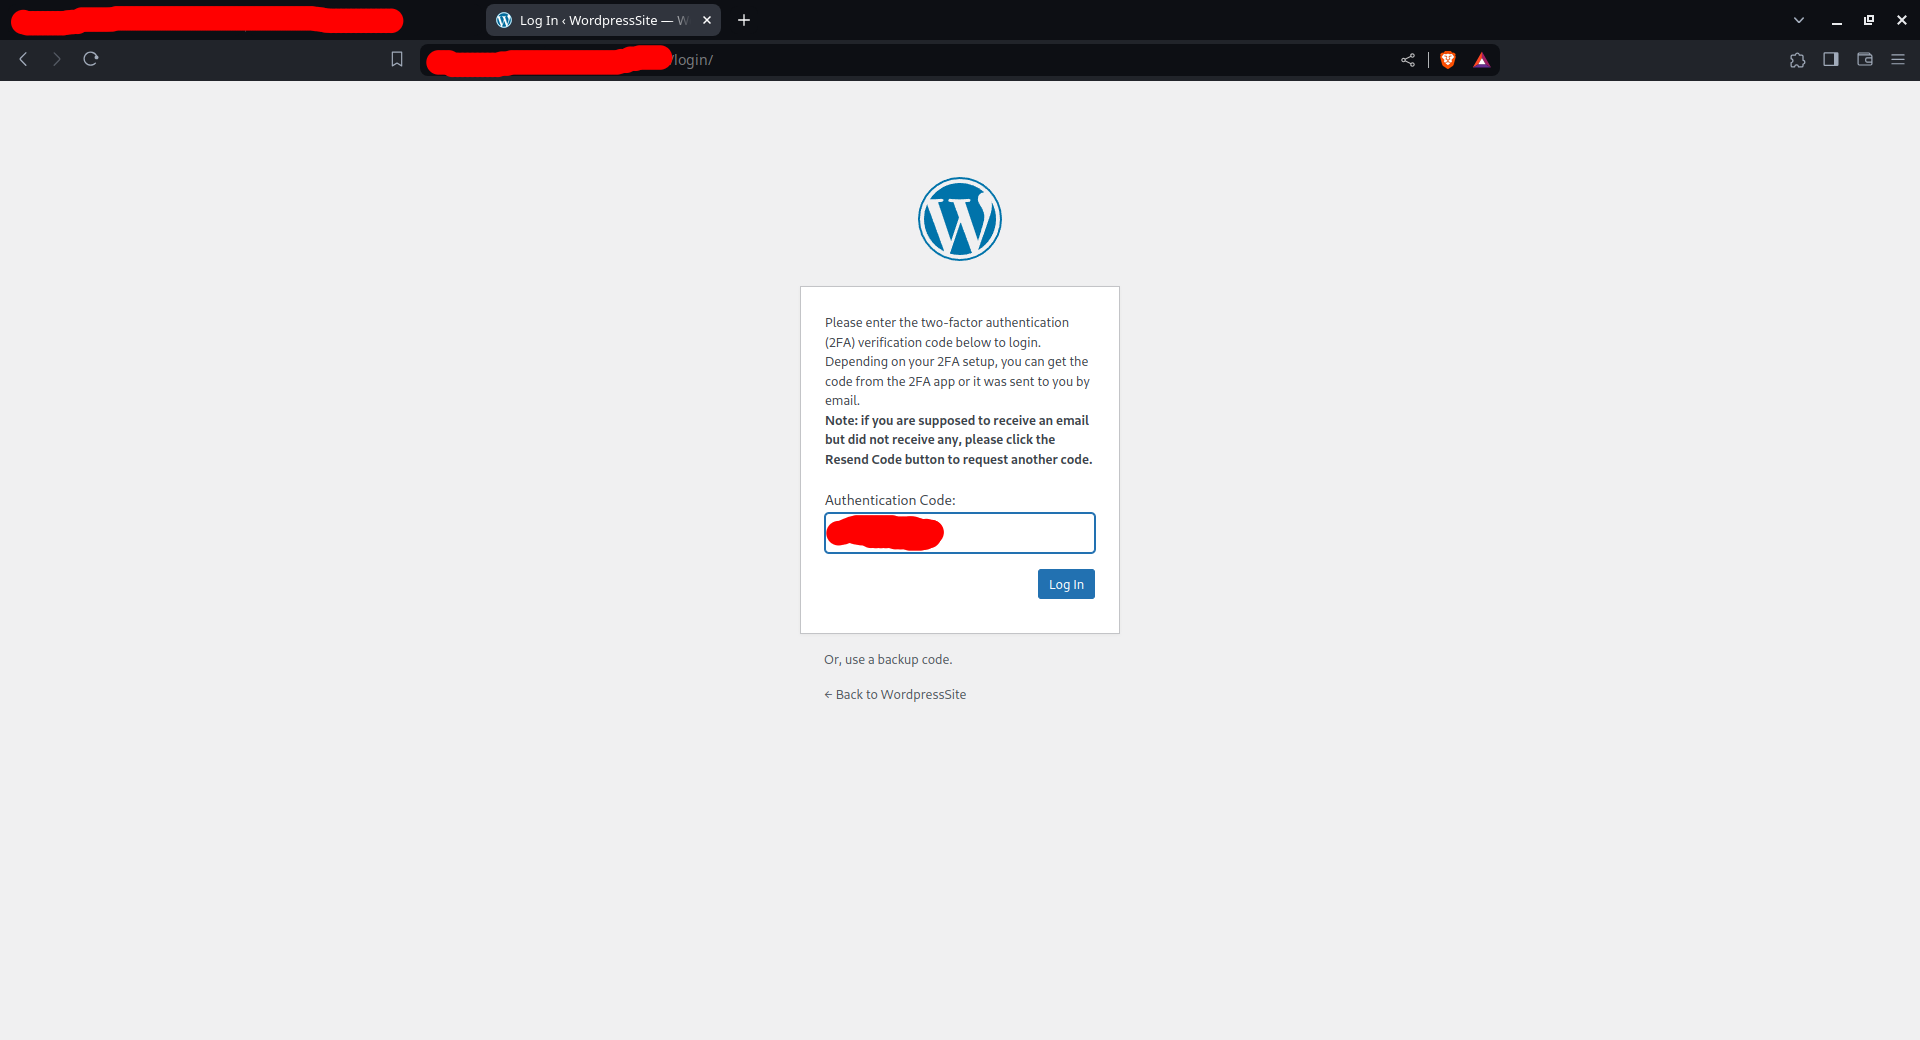
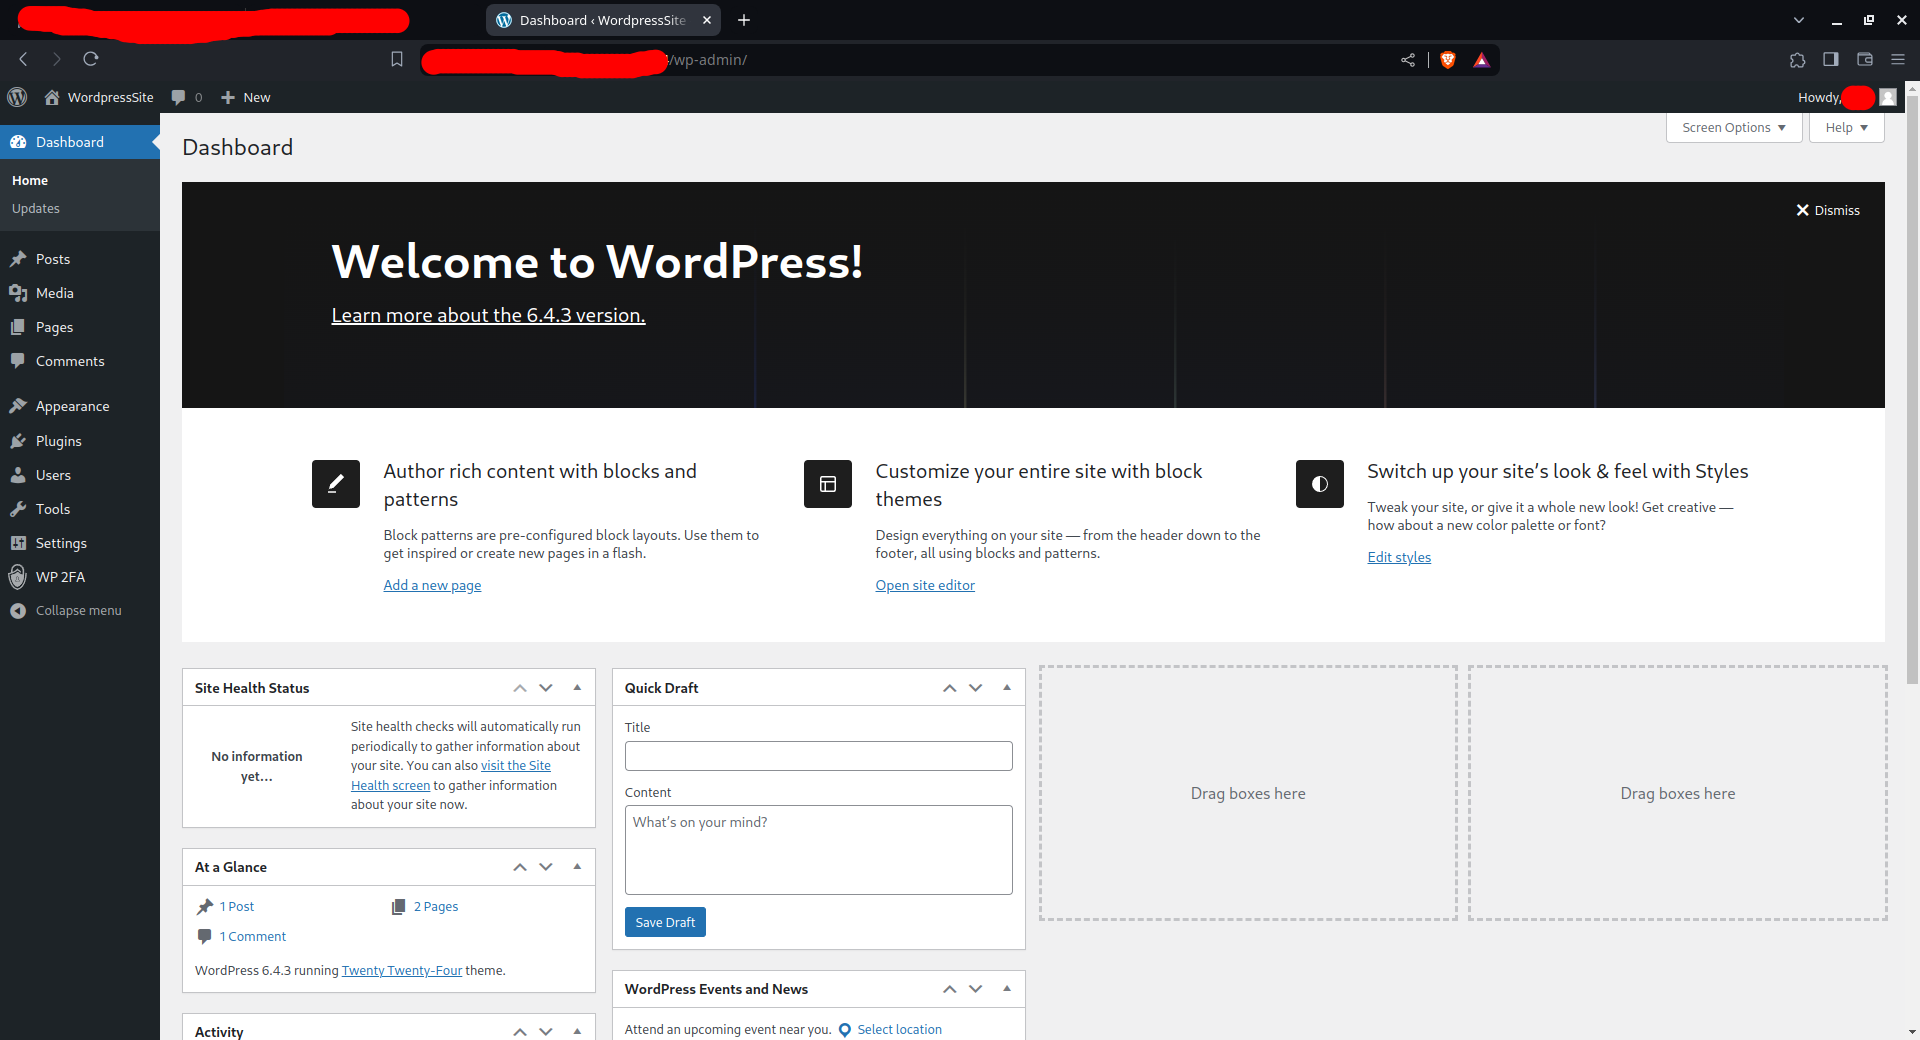
Congratulations! You have completed setting up WordPress security with the successful configuration of Two-Factor Authentication
(2FA) using the 'WP 2FA ‐ Two-factor authentication for WordPress' plugin. This added layer of security enhances the overall
protection of your WordPress site and user accounts.
Step 1: Set Up SSL/TLS with Certbot
Enhance the security of your WordPress site by enabling SSL/TLS encryption. Certbot is a widely used tool to automate the process of obtaining and renewing SSL/TLS certificates. Follow these steps to set up SSL/TLS:
- Ensure your domain's DNS records are correctly configured and pointing to your server's IP address.
- Open your terminal and run the following commands:
# Install Certbot and the Apache module
sudo apt install certbot python3-certbot-apache
# Obtain and install the SSL/TLS certificate
sudo certbot --apache
Follow the on-screen instructions to configure Certbot for your domain. This process will set up SSL/TLS and automatically configure your Apache web server to use the obtained certificate.

Note: After setting up SSL/TLS, it's important to update the WordPress Address (URL) and Site Address (URL) in the General admin settings of WordPress. Change these to use the 'https' protocol to ensure proper functionality under SSL.

Your WordPress site is now secured with SSL/TLS encryption, providing a safer browsing experience for your visitors.
Step 2: Change wp-admin URL using a Plugin
Secure your WordPress site by changing the wp-admin URL with the help of a reliable plugin. Follow these steps:
- Login to your WordPress admin dashboard.
- Navigate to Plugins and click on Add New.
- In the search bar, type 'Change wp-admin URL' and hit enter.
- Choose a well-rated plugin that suits your requirements, such as 'Change wp-admin login.'
- Click Install Now and then Activate.
- Once Activated, Go to Settings and select Permalinks.
- In the Permalinks section, locate the Permalink Structure under Common Settings.
- Choose the Post Name option instead of the default.
- Scroll down to find the 'Change wp-admin login' section.
- Enter your desired custom login link in the provided field.
- Save the changes.


Now, your wp-admin URL is changed, providing an additional layer of security to your WordPress login page.

Step 3: Setup 2FA in WordPress using WP 2FA Plugin
Enhance the security of your WordPress login by implementing Two-Factor Authentication (2FA). Follow these steps to set up 2FA using the 'WP 2FA' plugin:
- Login to your WordPress admin dashboard.
- Navigate to Plugins and click on Add New.
- In the search bar, type 'WP 2FA' and hit enter.
- Choose the 'WP 2FA ‐ Two-factor authentication for WordPress' plugin.
- Click Install Now and then Activate.
- Once activated, you may be prompted with a first activation setup wizard.
- Follow the on-screen instructions provided by the plugin for the initial configuration.
- Complete the first activation setup according to your preferences.
- Once the first activation setup is done, choose to configure 2FA for the current admin user.
- Follow the on-screen prompts to choose the authentication factor. In this case, select the 'Mobile App' option.
- Follow the setup instructions provided by the plugin for configuring 2FA using the mobile app.
- After following the instructions, your Two-Factor Authentication is configured, adding an extra layer of security to your WordPress site.


Congratulations! You have completed setting up WordPress security with the successful configuration of Two-Factor Authentication (2FA) using the 'WP 2FA ‐ Two-factor authentication for WordPress' plugin. This added layer of security enhances the overall protection of your WordPress site and user accounts.
Part 6: Setup Complete and Summary
Congratulations on reaching the end of this comprehensive WordPress security guide! Let's recap the key milestones you've achieved:
- Set up an Amazon EC2 instance with security features
- Installed and configured WordPress on your EC2 instance
- Enhanced the security of your WordPress site with Two-Factor Authentication (2FA)
- Secured your server environment and optimized website performance
By following these steps, you've fortified your WordPress site against potential threats and created a more resilient online presence. Your commitment to security and optimization is crucial for providing a safe and efficient experience for both you and your visitors.
With that, we conclude this guide. If you have any further questions or need assistance in the future, remember that the journey to WordPress excellence is ongoing. Keep exploring, learning, and evolving your website to meet the dynamic demands of the online world.
As you conclude this guide, take a moment to celebrate your accomplishments. Your WordPress site is now equipped with robust security measures and optimized performance. Now, it's time to enjoy the creative process of content creation and sharing. Whether you're running a blog, an e-commerce site, or an informational platform, embrace the joy of publishing articles and connecting with your audience. Thank you for choosing this guide, and best of luck on your WordPress journey!
